Home Artists Posts Import Register

Content

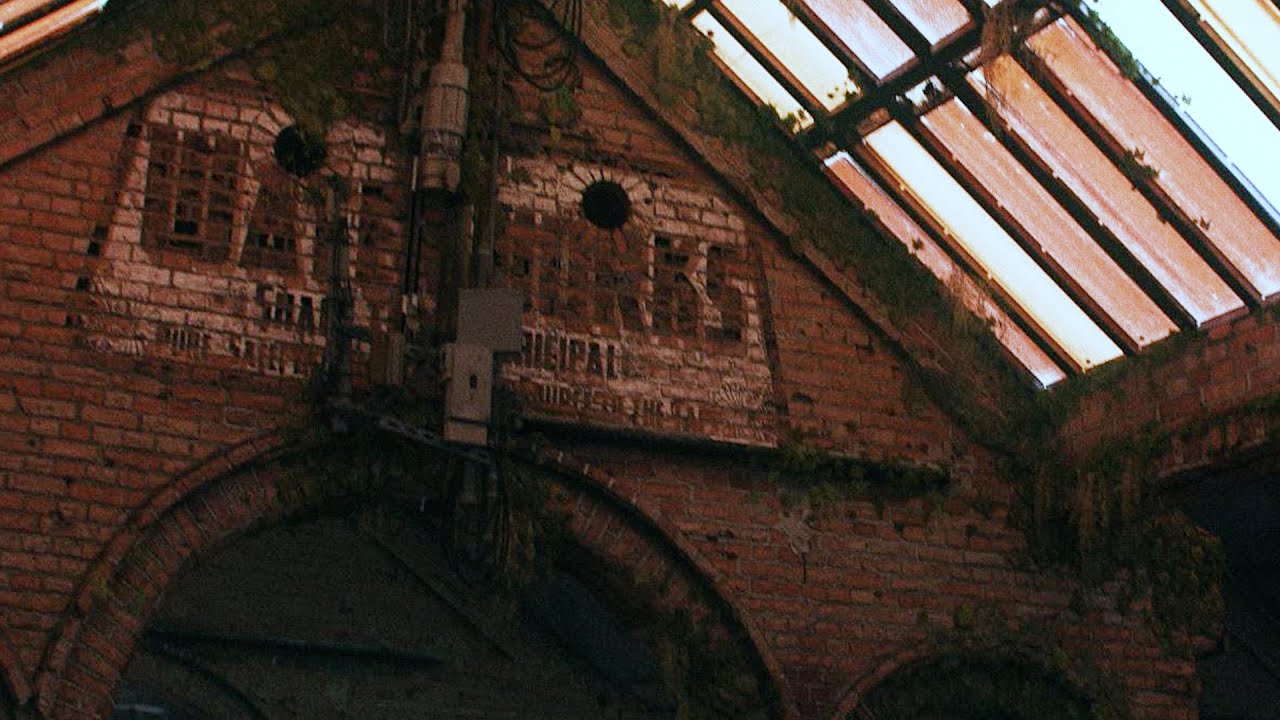
Only realized after I uploaded the video that these are called "Ghost Signs", which is pretty cool.

Just another quick one as I wait for the final mix from the sound team! Revisiting some selection techniques for a quick way to model a brick wall, and some sign design/texturing!  

I actually really like being able to add these to a scene because it's an easy way to show what life was like 50 years before, which could be useful for a more subtle sort of environmental worldbuilding.

Files

Tutorial: Brick Walls and Vintage Painted "Ghost" Signs

Only realized after I uploaded the video that these are called "Ghost Signs", which is pretty cool: https://en.wikipedia.org/wiki/Ghost_sign Just another quick one as I wait for the final mix from the sound team! Revisiting some selection techniques for a quick way to model a brick wall, and some sign design/texturing! I actually really like being able to add these to a scene because it's an easy way to show what life was like 50 years before, which could be useful for a more subtle sort of environmental worldbuilding.

Comments

Anonymous

Hey Ian, were you out and about at Fort Worden as per your IG this week? It felt like that was the gun battery you were at.

Anonymous

jeez, thxxx <3

IanHubert

It was Camp Hayden! A little spot on the north edge of the Olympic Peninsula- I'd never been there before; it was great! Finally explored the Lake Crescent area a bit :)

Kai Christensen

IAN. Your shots *always* look great, but this one is just next fricking level, man. I genuinely can't even *force* my brain to understand that it's CG and not real--my immediate reaction to the beginning of the video was "oh, that looks like a video of a real warehouse" and then it hit me.

Anonymous

Thumbs up if you have no idea what blender is and you're here only 'coz Ian is a sexy boi

Anonymous

Don't ffoget us, cycle to eveee. Love you from Brazil

IanHubert

Yes! I recorded a version the other day but I was a bit too sleepy and it was all jumbled, so I'm re-recording it when I'm a bit more awake in the next couple days! :D

Anonymous

Nice! Always go to Port Crescent and Clallam Bay up there. Need to explore a bit more as there's soo much rad stuff. You should go explore the Tubal Cain Mine trail on the Olympic Peninsula if you haven't. That's the trail with the downed aircraft wreckage on it... https://www.seattletimes.com/life/travel/an-eerie-october-hike-to-downed-b-17-and-old-mine-site/ Here's the WTA info on the trail... https://www.wta.org/go-hiking/hikes/tull-canyon

Anonymous

that moment when i realise that the whole shot is cg

Anonymous

Ian, i don't know what ia this one, could you give me a link ?

IanHubert

OH! I'm sorry- I was confusing, I haven't uploaded it yet, because it wasn't good enough! I'll post it really soon!

Anonymous

Ok k, thank you Very much !!!

Anonymous

I had the same issue with user installed fonts and found that they are saved to C:\Users\username\AppData\Local\Microsoft\Windows\Fonts\ instead of C:\Windows\Fonts

IanHubert

OH! Cool!!! Thanks for that! :D I'll have to check and see which has more fonts in it and set that to blender's default font folder!

IanHubert

Oh man I've been eyeballing that trail for aaaaaages! I've done almost no hiking in that area. Definitely definitely will check it out this summer! Wonder when the snow will melt enough...

Anonymous

I would say June. The snow in the lower elevations of the Olympics always seems to melt out faster. I would say keep an eye on the trip reports on the second link I put in the last comment as that's the main info page regarding that trail from Washington Trail Association.

IanHubert

Hahaha thanks Kai! I think one of the big things helping this one is that it's leaning WAY more into the image textures than usual (the entire roof is an image texture, and the whole wall/brick arch thing is another (this shot is very much "courtesy of Textures.com" heh), so the entire shot just kind of has to help justify those textures.

Anonymous

Yeah, Blender doesn't use the standard Windows font APIs/services. It literally enumerates the files in c:\windows\fonts. As Miha says, you can change the directory, but if you install fonts by right-clicking and choose "Install for all users", the font will install to c:\windows\fonts, and will show up by default.

Anonymous

Yo do you use PBR materials for any of you stuff? how come u did it this way vs using a PBR Brick Texture....processing speed....?

Anonymous

This is awesome, was hoping to see how you made some of the other brick details like the trim or especially the archways. Can you expand on using this technique to embellish brick design details? Thanks!

Anonymous

nice question, i guess the ''Ian method'' is very good for big scene without the need for close up details, like a house or a street and is very very light in terms of rendering time.

Anonymous

PBR materials are basically the opposite i guess, but let's wait for Ian answers

Anonymous

This comments section is making me miss home. (I grew up down the street from Fort Worden's main gate)

Anonymous

If you use a holdout material on a copy of the text you can render it transparent without using booleans! Also I don't think Blender cares what image is open in the uv editor, it's still just editing whichever UV map is selected in the object panel. I think that's right, in older versions you changed UVs per image and it would remember what you set on each image? Shots are looking amazing, I am so keen for Dynamo Dream dude.

Anonymous

amazing

Anonymous

a gas station would indeed be fun

IanHubert

ZACHARY THAT IS A VERY USEFUL TIP! Especially for that graphic design work! Ahhhh- thank you so much for that. And it's true that UV editor doesn't care about the image background, but there's ANOTHER pulldown on the menu bar which does matter, where you select which UV layer you're working on. That said- if that's affected by which UV layer is selected in the object panel (or the little cameras next to them) I don't know- should definitely figure that out! And thanks!!! Very very excited to release it. I'm at the stage where at ANY MOMENT they might send me the final mix and I'm just reloading my email over and over :P

IanHubert

Hah! YOU KNOW WHAT- yeah, in that regard this video was probably kind of a mistake, because some of those PBRs with the displacements and all that look WAY better than this method; I was mostly just excited to have a practical follow-up to the "14 Minutes of Ways to Select Things" video. At the same time though (and this could be superstition on my part) every time Blender's started crawling for me, or giving render/memory errors, has been when I've had too many high-res textures/displacements (i haven't had a problem geometry-wise in ages). Displacements in particular are ludicrously powerful, but I've more or less ignored them because that tends to be when Blender starts crashing for me. But yeah, like Lorenzo said, a nice solid PBR texture with displacements and all that are definitely the best way to go if you need a realistic closeup of a brick wall. I should jump back into displacements though and see if I can get over my fear of them :P

IanHubert

I'm a bit embarrassed- it's literally just a picture of a brick wall (arches and all that included) "popped out" with this method here: https://youtu.be/t_c58ryJ-Sw Which worked really well! But it's definitely limited, and it'd definitely be fun to get into a more custom method. In the years since initially making this shot I've gotten really into hand placing tiles/bricks, so I'd probably do it differently now.

IanHubert

I agree! I've wanted to do it for a while, which I think is why I wasn't all that excited with the quick-o one at the end there.

Phil South

Tinkering around with bump maps and specular maps (to follow along with the brickwork) I realise I could use a bit of in depth on those aspects of texturing. Mostly for what I do flat textures totally cut it, but sometimes I'd like a bit of subtle sheen or bump interest. So if you can do something on that at some point, or point me to where you've mentioned it before?

Anonymous

Great tutorial! Had a quick question: when I move around the vertices to line it up with the brick wall texture, it warps the image too. Is there a way to switch that off?

Anonymous

You don't need install font in your OS if you want to use it in blender. if you already have text typed then just choose and hit the font file, no matter where that file is located or installed

Anonymous

Make sure "correct UVs" is enabled when using the edge slide tool :)

Anonymous

Hey, Ian are we allowed to use your assets commercially?

IanHubert

OH! Totally, yeah! If it's for a movie/render whatever, no restrictions at all! Becomes a little more tricky if you're distributing the assets themselves (like in a game or something), since some of the textures (there'll be a notification in the blend file) come from other sources like textures.com, which allow usage in projects as long as the textures aren't EXTRACTABLE, in which case they need to also contain the disclaimer (which is the big reason I've stopped using anything I don't have total rights to when possible). But yeah if it's just for a movie or something, go nuts!

Anonymous

Total n00b question here. If I remember right, you mentioned in the video that the brick jmage you used wasn't very high res and that's why your bump look funky. Have you ever shot RAW pics and used them? If so, is there a benefit to those, or is it best to stick to a processed image file, such as TIFF or JPEG?

Anonymous

I would imagine RAW files are way too heavy for textures (does Blender even support RAW?) but I would think it would be a great acquisition format to tweak in Photoshop or what have you before you exported them as a JPEG or TIFF. That's what I've done mostly.

Kathleen Judge

Could you use a png you make in photoshop instead of making the logo/sign in blender?

Anonymous

Missed the reply for two weeks, but I just checked and the dropdown in the UV editor does correlate with which uv map is selected in the object properties window. It's actually the same as in the object panel, meaning whatever is selected in the object panel is what's selected in the pulldown menu in the UV editor (and vice versa, if you select something in the pulldown it gets selected in the object panel). The camera icon is the default UV map, ie the one that gets used by the "texture coordinates->UV" node's output when you don't specify a UV map using a "UV map" input node.

Anonymous

RAW format brings some additional information for tune your image (in fact other formats like jpg/png compress images and reduce this infromation). You still have same resoultion with RAW, but with tweaking you can achieve clearly result for texturing, like make image brighter without additional noise.

Anonymous

My favorite part of the video was when your logo boolean glitched for some unknown reason and you just went, "oh well, guess the painter forgot the shadow effect on this sign! How embarrassing for him!" I love how practical of an artist you are. You just truck right through problems.