 Home
Home

 Artists
 Search
 Recent
 Random
 Posts
Posts
 DMs
DMs
 Tags
Tags
 Random
 Importer
 Import
 FAQ
FAQ
 Account
 Register
 Favorites
 Login
Login

Simple method (TEK) for growing Panaeolus cyanescens (aka Copelandia cyanescens, Hawaiians, blue meanies, Pans and Pan cyans) (Patreon)
Content
[Disclaimer: this work was done in a location where it is legal and I suggest you do likewise]
UPDATE 2024: I have published a new simpler TEK for growing pan cyan that you may want to jump to but much of the info in this older TEK may still be of interest to my audience.
________________________
A video for this TEK is now available, but I like to make a written version of my TEKs in addition to the videos, and people have been requesting this one quite a lot, so here it is (I will update this article with any new developments, research, or improvements). Note: A vendor has stepped up to supply grow kits suitable for this TEK, these are NOW AVAILABLE, for full description see: https://www.patreon.com/posts/63406767 or click/tap here for the direct link to the kit.
Someone who wants to remain anonymous produced a very detailed version of this TEK that also combines the other TEKs/Videos I've made to create a spores to harvest written TEK with pictures for FRENCH speakers. This looked so good I suggested he do an English version too, which is now available!
UPDATES:
In July 2022 The Estero cultivar won the Cultivar Cup "Most Potent Mushroom" with over 3% combined active alkaloid content. I believe even higher numbers will be achieved in the future.
In August 2022 an Estero sample was HPLC tested at 3.43%).
In November 2022 I set a new WORLD RECORD for most potent mushroom ever tested with the Tamarind Tree British Virgin Islands (TTBVI) cultivar of pan cyan.
I also created a version of this TEK for mini greenhouses here.
In December 2022 I won the Winter Cultivar Cup with TTBVI.
A patron made a REALLY detailed written version of the TEK based on the video in both French and English.
My patrons have been using the TTBVI genetics to win almost every testing event out there, it has now won 1st place in the Cultivar Cup 3 times, the Entheo Cup, the Island Cup, and the Denver Psychedelic Cup.
A new further simplified TEK has been published that requires no humidifier, no tent, no fan, no timers and works with an unmodified tote: unmodified tote TEK (this may be the easiest and lowest cost method).
First some background, why even bother to grow Pan cyans? Many used to consider this species harder to grow and yields are often lower compared to other species. So what's the point of growing it? I was a skeptic myself, but as I read more and more, my curiosity was peaked. First, it is well documented that this species can be more than three times as potent vs. cubensis, but that alone doesn't really matter -- what difference does it make if one takes a gram of pan cyans or 3g of cubensis? And yet anecdotes consistently suggested that there IS a difference. Some old timers describe this species as "the crown jewel" of psychedelic mushrooms. Some growers will ONLY grow this species. Various comments suggest that this species produces a different type of experience, common in descriptions are: less nausea, pleasant body high, better visuals, low body load, less fear and anxiety, euphoria, smoother and gentler on the mind. I wondered, is there a plausible scientific explanation for this? Aren't the active compounds the same? Well it turns out there are actually dozens if not hundreds of compounds in these mushrooms and they aren't all that well understood yet, in fact it was only recently that scientists even discovered beta carbolines in some species of psychedelic mushrooms (albeit in minute quantities). Some species of psychedelic mushrooms contain aeruginascin which has been associated with anecdotes of euphoria (despite no evidence it can cross the blood brain barrier). Aeruginascin was even found in very small quantities in cubensis mushrooms and has since been found in pan cyans too. Another possible contributor to the different type of experience is baeocystin and its dephosphorylated cousin norpsilocin which also seem to be associated with anecdotes of better trips (and both are found in pan cyans). It is plausible that the specific chemistry of pan cyans is responsible for the positive characteristics that have been attributed to it. Researchers also documented in 1992 that pan cyans produce serotonin which may also be contributing in some way to the anecdotes of positive mood (same paper documented 'slight euphoria' in test subjects, but I think their samples were weak in general, also note that dietary serotonin is not known to cross the blood brain barrier). Because pan cyans require a much smaller dose (due to their potency) you get reduced mushroom fiber/bulk in your GI tract when consuming them which may have benefits with regard to comfort and reduced nausea. All this said, a lot more research needs to be done on this matter. I would LOVE to see some double blind studies conducted to properly compare species in a careful, dose controlled manner.
Other anecdotes found in published literature corroborate the anecdotes found online. For example see A Novel Experience with Panaeolus A Case Study from Hawaii (Journal of Psychoactive Drugs): "I experienced stimulation which seemed to involve both a psychic and a somatic component resulting in a pleasant sense of wellbeing. No one present expressed any feelings of dysphoria or unpleasant somatic disturbances, and no adverse reactions were observed throughout the evening... When looking out the window some of us perceived moisture and felt as though it were raining, but when David and I went outside later in the evening, we discovered that it was in fact quite dry. We concluded that the robust sound of cicada may have given us the impression of rain and that perhaps we had experienced hallucinatory synesthesia. The ocean was vividly glowing in the distance, the clouds blowing across the sky were magnificent, and the entire setting produced a truly spectacular feeling of being aIive."
I studied most of the TEKs out there for growing this species and looked at all of the videos on YouTube of this species growing out in nature. Pan cyans thrive on massive amounts of fresh/moving air, and wild mushroom hunters report that it pops up often after 3 or 4 back to back days of rain and high humidity. It is often found in wide open, breezy fields. It likes massive humidity and massive air exchange. Growers have devised all sorts of complicated and expensive ways to meet these requirements, sometimes using mini greenhouses, humidistats, ventilation systems, aquarium pumps, bubbler machines, and more. After some experimentation, research, and trial and error, I found a much simpler way that is very effective and requires minimal investment. Here is what I came up with that worked well:
THE TEK (GordoTEK Panaeolus cyanescens Grow) [Note: If you use any of my Amazon links it supports the channel! (“As an Amazon Associate I earn from qualifying purchases.”)]
First, I assume you have your grain spawn, as you will need that before doing anything else, so get some spores first (if you are a patron, you can get spores directly from me for free, my spores are the top genetics in the known world, germinate fast, and have won numerous mycology cups. They are also super clean, minimizing contam risk). Then either make a spore syringe and directly inject to a sterile grain jar or put your spores to agar see my agar video then to grain as shown in several of my vids including: bulk mushroom grow vid).

The pan cyan mycelium looks different on agar than most other species, its kind of cottony/fluffy, but good genetics will grow FAST, this pic shows after 5 days from agar cutting transfer to new plate. It typically will not show much segmentation on agar. If left long enough, the mycelium will blue, this is not contamination. Before it reaches the plate's edge, transfer come cuttings of the outer growth to sterile grain jars. It will quickly colonize properly prepared grain.
If you want a free pan cyan spore print (top genetics, for microscopy only), direct message me here with your mailing address (use privnote.com if you want it to be secure and one time view only and just message me the link). If you want to make your own spore syringe its very easy, these syringes are cheap, work great (blunt tip is fine) and they can even survive a pressure cooker (see this vid for more details). I would suggest scraping the spores into a small jar of sterile water (pressure cook a small amount of water in a small jar then wait for it to cool to room temp, you may get away with just using straight tap water or store bought distilled water though too). Use a sterile syringe to suck up the spore water and directly inject that into sterile grain jars. You won't get strain isolation but this method works fine and is less prone to contamination so more newbie friendly than agar. I do recommend agar for strain isolation but spore syringe direct to mycobag or grain jars works fine too.

Important note: I've tried many different Pan cyans cultivars and the best I've found so far is TTBVI but other good cultivars have been "Estero" (a Florida strain named after the town it was found in) XL (from Texas, USA) and Weza (from S. Africa). TTBVI and Estero had the most vigorous growth, were aggressive colonizers, and produced nice dense carpets of mushrooms which is important for final yield because this species produces tiny mushrooms compared to cubensis. TTBVI was the. most potent, and printed better as well. But if you are not able to find the these cultivars, don't worry about using others, the only one I would suggest avoiding are the Jamaicans as they are more prone to overgrowing the casing layer and failing to fruit.
Shake your grain at about 20 to 30% colonization to speed full colonization (you should only shake them up once, if it fails to recolonized there is likely contamination in the jar). Use whatever grain you can find locally, I like millet, milo, and whole oats but other grains work fine too (cheap wild bird seed, rye, etc.). Lately I've been using whole oats because they are inexpensive (sold as horse feed at Tractor Supply) and they have performed consistently well.
Go to a dollar store or grocery story and buy five 13x9x2 foil cake pans, they are 2 for $1 or one for $1 if you get the version with a clear lid (clear lid is nice, you can monitor the growth easily). The foil cake pans look like this:


If you want 25 or 30 of them you can buy from Amazon. Just under 2" height is fine, I wouldn't recommend going over 3" height but shallow plastic totes or storage containers do work fine also. If for some reason you just don't like the idea of your mycelium munching on aluminum, you can also use glass pans, they are more expensive but they work fine and allow you to see what's happening below the surface which is nice:

I've used both and got the same results with both. Plastic storage containers can also work in pretty much ANY length/width, look for around a 2 inch height but even up to 5 inch height works so the height may not matter very much (the shorter height will give better airflow and air exchange).
NEW: A top quality vendor (MidwestFreshMushrooms) has created both a complete kit matching my new TEK they call it the Gordo Special and it includes the recommended totes, heater, screen, enough substrate for a full size grow (8lbs!), casing, and grains. They also have a GordoTEK Special REFILL Kit that has enough substrate for a full sized grow (8 lbs!) plus the casing, AND sterile grains with injection port. And finally they have just the recommened substrate too, which is based on my quantities and ingredients mentioned below (for a full size grow, get 8lbs, for a half size grow which is probably plenty for most people, you can get the 4lbs size). I whole heartedly recommend this vendor! I have received their products personally and tested them with absolute perfect results and zero contams! Using the above links also supports the channel, so double win.
The substrate (note that I now use and recommend the coir based version as it is less prone to contamination, but you can use either coir or straw for the substrate, both are described below):
GordoTEK Pans Cyans Substrate recipe for 5-6 cake pans (9x13x2) - ingredients are measured BY VOLUME not weight and you will use one of your cake pans to measure them (cut recipe in half if you want to make 3 cake pans). NOTE THAT the volume of a standard 9x13x2 cake pan is approximately 3300ml so you can convert this to any measuring container you have and none of the measurements need to be precise:
Vermiculite: fill a cake pan HALF WAY with vermiculite (approximately 1 inch depth). This is approximately 1650ml.
Field aged horse or cow manure: fill one cake pan level to the top (3300ml). I found a real nice stable owner that had TONS of it all piled up who was happy to get rid of some (go into google maps and type "horse stable" into the search box). You don't want the fresh stuff, older is better. If you can't find a horse owner/stable within a reasonable drive, you can buy it online, some have successfully used the big box store cow manure or even chicken manure). Here's another option that may work. Amazon also has Black Kow which some say works fine.
1/4 cup gypsum (optional) (this is approximately 60ml)
2 cake pans of chopped straw (buy it pre-chopped from Tractor supply or chop it yourself to 1 to 3 inch length): fill to top of pan with only light patting down, not packed (even with pre-chopped straw, you may need to cut some longer pieces down, just use scissors or tear by hand, not a big deal). And yes, you will be using twice as much straw as manure (to clarify, you will fill up a cake pan two times). Note: You can substitute 300g coco coir instead of straw and it is less prone to contamination! Just hydrate the coir first with 3000ml boiling hot water (for doing a half recipe use 150g coir hydrated with 1500ml boiling hot water). Put the coir in a bucket, pour the hot water over it, and let it sit for 45 minutes or longer, cover the bucket during that time, its OK if it's soupy at the end).
Hot Tap Water: 2500ml (may need less if manure is wet, more if manure is bone dry, if you used fully hydrated coir instead of straw, you may not need additional water or only a small amount as needed for field capacity).
To simplify, the above can be translated more generally to: 4 parts straw or hydrated coir, 2 parts manure, 1 part vermiculite, plus some gypsum.
Mix (by hand, optionally wear gloves) all of the above in a 5 gallon bucket or a tote, mix very thoroughly, grab a handful and squeeze to determine if you have too much or too little water. You want a good amount of dripping when squeezing hard, but not streaming of water. The mix should be a little more wet than what most mushroom growers are used to, all of these ingredients will soak up and retain water so by the time you use it it will not be excessively wet. The Pan Cyan species likes higher than average wetness. If you used straw it might look as if it's almost all straw, this is OK, the Pan cyans species is more of a grass lover than a dung lover. Some have grown them without manure but yields tend to be lower and this is not recommended.
Load the substrate into mycobags (or large glass jars). Now you could sterilize by pressure cooking for 1.5 hours at 17psi (or 2 hours at 15psi) this worked fine for me and if you use coir that is recommended, but pasteurizing is better for straw based substrate, see: If you want to minimize the risk of trichoderma contamination it is best to pasteurize not sterilize. You can do this by using any large pot or pressure cooker without sealing it shut and keep the wobble weight off. Put 3 liters of water in the pot so it will not run dry. Use a probe meat thermometer with temp alarm and bring the internal temp of your substrate to 140F (60C) then turn the heat off and start a timer for 60 minutes, the internal temp should remain above 140F (60C) for an hour even with the heat turned off. If you do not have a suitable thermometer, you can just steam it for approximately 45 minutes (that was the total time that my burner was on for) then turn off the heat but let it remain in the steam pot for another hour. [Note: I also experimented with the idea of simply adding boiling hot water to the dry substrate ingredients and spawning as soon as it cools, but that did not work well and I don't recommend it, green grass and competing mushroom species sprang out of that, haha].
Another good method of pasteurizing is to use a sous vide cooker to bring a pot of water up to 140F and just let it sit in that water for 5 hours or overnight (this is the method Midwest Grow Kits uses).
After the substrate cools you can spawn it right away or wait up to two weeks (if you are delaying spawning, store the substrate in a cool place, refrigeration optional). Prepare your grain spawn by shaking it up.
Transfer your substrate into the cake pans, only fill to 3/4 full. Straw based substrate is more prone to contamination than a coir based substrate, if you have a flow hood do this step in front of it, or use a still air box, otherwise you can try doing this in open air which actually worked fine for me or optionally even try doing everything under a clear plastic drop cloth. Thoroughly clean and sanitize a table, put your cake pans, grain spawn, isoproply alcohol spray bottle, scissors, and substrate on the table. Spray down everything with isopropyl alcohol.
Note: An alternative to the above is to add your grain spawn directly to the mycobag after it is cooled and seal the mycobag, shake and let it colonize there for a week before transferring it to your cake pans - I tried this and it worked but cost an extra week of time as it will have to recolonize for another week after you transfer it to the cake pans. I would only recommend this if you are having problems with contamination. To me it was a waste of time.
Add about 0.5 to 1 lb. of grain spawn to each cake pan (which is 3/4 full of substrate at this point), you can just eyeball it, you want to basically cover the entire surface with a thin layer of grain spawn. In general more grain you use the faster the colonization however I actually found that using just a standard 16oz widemouth mason jar 75% filled with grain spawn worked fine and quickly colonized a cake pan so you really do not need to use much spawn. Using clean, sanitized, gloved hands, mix the grain spawn into the substrate. Try to evenly distribute the grains throughout the mix. There should be about a 1/4 inch space between the cake pan top and the spawned substrate, this is important because we will be adding a thin casing layer later. After mixing the spawn in, try your best to make the surface even and level, you can gently pat it down but don't pack it down. Try to avoid having long straws poking up above the surface.
Note: I've read that using too much grain will hinder fruiting in this species but I have not seen that personally even when using a massive amount of grain as a test, I consider that myth busted at least for the strains I recommend.
Either cover the cake pan with tin foil and poke 6 small holes in the foil with a sharp knife, or use a clear top lid on your cake pan if it came with one. It is much easier to monitor the growth with a clear top.
Let these sit at temps between 70-85F and fully colonize, it should take about 4-7 days at the higher temp if your grain spawn is good, it will take longer at lower temps or if your grain spawn was not fully colonized. I would not recommend taking the tops off until you are confident it is fully colonized, AND only uncover after you have sterile casing mix ready to immediately apply. It should look like this:

After the substrate is fully colonized, it will look almost completely white, uncover and add your casing layer:
Pans Cyans Casing Layer Recipe:
2 quarts peat moss (or 2000ml)
2 quarts vermiculte (or 2000ml)
15g (or 2 TBSP) calcium hydroxide (pickling lime) (or 40g (or 5 TBSP) calcium carbonate) mixed into
1 quart water (or 1000ml)
[Note: You can use liter instead of quart without otherwise changing the recipe and 15g of calcium hydroxide is about 2 tbsp]
Combine ingredients and pressure cook at 15PSI or higher for 30 minutes. After it cools add it to the top of each colonized cake pan in a very thin (~1/4 inch or half cm) smooth even layer - you can optionally use a sanitized rolling pin or pipe to smooth it out if you want. Spray the casing layer down heavily with tap water after it is in place.
NOTE: At this point (after casing) you can optionally put the top back on the cake pan, just for 12-24 hours, the mycelia needs to poke through the casing just a bit before pins will form and keeping the top on seems to speed that initial move up, probably because it keeps the casing layer warmer. This may be helpful especially if your grow area is colder than 70F.
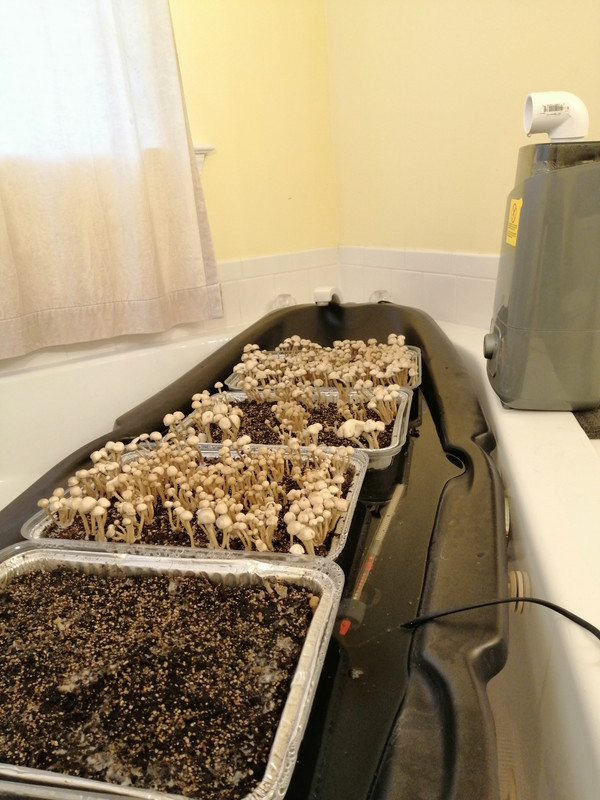
I recommend you set the cake pans in any location that can act as a "sink/catch" for fog such as a bath tub, a kiddie pool will work, or you can simply throw a plastic tarp or drop cloth ($1 at Dollar Tree in the paint supplies section) over a bunch of boxes or anything else you have laying around to create a makeshift "tub/pool". Make sure whatever room you use has been thoroughly cleaned in advance, scrub the tub or kiddie pool with sanitizer wipes or dilute bleach solution. From this point on, there will be absolutely no cover over your cake pans, completely open for maximum air flow. There is little risk of contamination after casing. Note: Some people have had success simply putting the cake pans on a table (put a drop cloth over the table first so it doesn't get wet).
If outside temps are 70F-85F (21C-29C) you can open a window. Some growers like to have additional fans running for more air circulation but I found this to be unnecessary, the humidifier itself creates nice air currents that stream over the surface of the blocks and this is all you need. I did not use electric light, just natural indirect sunlight from the windows in the room, but if your room has no light, you can use 12 hour on, 12 hour off lighting with a simple LED bulb ($1 at the dollar store). You could put the light on a timer but since you will be adding water to a humidifier once a day it's probably just as easy to turn the light on and add the water every morning when you wake up and turn the light off when you go to bed.
Get an ultrasonic humidifier, this one works well, is inexpensive, and has great reviews (but if it's not available, here and here are two alternatives that should work). [UPDATE: for some reason humidifiers keep going out of stock, but in just doing a quick look, here's a cheap one ($25) that should work (they specifically have a knob version or a more expensive electronic version, you want the cheaper knob one). For one with a MASSIVE capacity, this one looks very promising and its only $35.
You can improve the humidifier with a $2 PVC 90 degree street elbow from any good hardware store (Lowes version or Home Depot version for example), measure your humidifier first to make sure you get the right size (1.25" works for the humidifier I recommend).


This humidifier has a huge capacity and produces a perfect fog level at just below the middle setting. The 90 degree elbow will direct the moisture in a more focused way toward your substrate blocks.
Set the humidifier at the top edge of your "pool/tub" elevated, so it throws mist out and forward into your tub. It should NOT be on the highest setting, a mid range setting may be fine, you want it to be throwing out some serious fog but not filling the entire room with fog. If you use a hygrometer near your tub, it's going to go up to about 95% RH (don't leave your hygrometer there too long or it will likely fail). Plug the humidifier into a timer so that it goes on for 30 minutes then off for 30 minutes, around the clock (so it will be on for 12 hours a day total, every day). These timers work fine, are inexpensive and have good reviews, very easy to set:

(push button timer set to alternate on/off every half hour)
You want room temps between 70F to 85F, however if you are growing in a cold climate during the winter and your indoor temps are below 70F, you can still have success (details below toward the end).
At this point, you just need to monitor it a little bit for the first day to make sure you don't have the humidity setting too high or too low. You don't want pools of water forming, just a nice fog/mist over your cake pans. If you get one of the high capacity humidifiers I recommend, you will only need to add water once a day. From that point on, it should be "set it and forget it".
You should see pins in 5-7 days. If at any time the substrate looks dry you can spray it with water, or carefully pour some water over the substrate while trying to avoid pouring water directly on the mushroom fruit bodies. Some people use a syringe to do this, or a small single spout watering can. After it begins fruiting, you can harvest the mushrooms as they mature, this species tend to go into almost "continuous fruiting mode" with wave after wave of mushrooms. You should get pretty thick carpets of mushrooms using this TEK, some flushes will be thicker than others:


(Note in the top left is a glass pan just to show you that they work fine too)

With flush after flush, a single grow could produce a lifetime supply for some people. A good strain can produce a crop that is strong enough to hold up a cell phone.
These can be harvested by cutting at the base with a sharp knife OR by gently twisting and pulling them out but there will usually be pins for the next crop all over the surface so try to avoid damaging those (I prefer using a long sharp knife). Note all of the pins at the surface in this pic (especially easy to see at the bottom):

After a harvest pour 1 cup of water as evenly as possible over the entire surface of the pan. It’s going to look like an excessive amount of water, but it’s not. At any given time, if it looked a little dry I would also spray the surface with a spray bottle of tap water (dollar store spray bottle is fine). The rumors that spraying water directly onto pins will kill them or cause them to abort have been debunked (by me). I have sprayed around, and even directly on pins just to see what would happen, and it didn't cause any problems, I have also directly sprayed the mushroom fruit bodies to see what would happen, it didn't make any difference. Remember how much this species loves rain. That said, I would try to avoid directly watering the mature mushrooms, excessive humidity can cause the caps to turn dark, as can low grow room temperatures.
Dry in a dehydrator, homogenize by blending, and pack into 00 capsules as shown in my bulk mushroom grow video. Sadly, I can't find the capsule maker tool anymore on amazon, ebay, or etsy (all three have had it in the past). It was on Temu, but seems to be gone from there now too. Someone recommended this site as the only place they could find one.
Store in a sealed glass jar, at room temp, in a dark place preferably with an inert gas like argon or with oxygen absorbers. These are typically 3 times as potent as cubensis, so take 1/3 less. A single capsule (0.5g) is a good starter/test dose to get a feel for the species. A sensitive person might have 2 hours of closed eye visuals on such a dose. One gram (two capsules) is considered a normal dose similar to a 3 gram trip with cubensis and 1.5g (3-4 capsules) is a high dose. 2-3 grams could be very unpleasant for many people - you have been warned! Use moderation, homogenize your dose, and only increment in small (half gram) steps after trying a lower dose first.
Here is a cool time lapse video of the 7 days after casing, sent to me by a patron who followed the TEK and said it worked great and was easy to do!
Questions:
Q: Is there a preferred or recommended strain/cultivar to use?
A: I do believe cultivar selection is important, that said I know people have already used my TEK with many different strains and had success so it is not really critical. The "Estero" strain was the best strain that I tested until finding TTBVI which is even better (just as aggressive and easy to grow but even more potent and it prints better). They are extremely vigorous, potent, and produce high yields. There was some doubt at one point that the Estero strain was even pan cyan, some thought it might be pan cambo because it was almost too easy to grow. However thin layer chromatography clearly shows it is not pan cambo, it has the alkaloid potency in the HIGH end of reported ranges for pan cyan. It also meets all of the published morphological descriptions for pan cyan, and even the microscopy work I did show that it is indeed pan cyan:

Q: Should I line the cake pans?
A: NO, do not line them, it's actually good that they slowly become porous, this ensures the cake pans will not take on excess water, the water literally drips right through the pan, it's perfect. I considered poking some pinpoint holes in the pans, but that might leave it vulnerable before full colonization, then I found that after full colonization, the pans become porous on their own (possibly with the help of the mycelium) - this turns out to be ideal. If for some reason you just don't like the idea of your mycelium munching on aluminum, you can also use glass pans, they are more expensive but they work fine.
Q: Can I cut the substrate recipe in half?
A: Absolutely. I probably make too many with my recipe, 3 cake pans is plenty and if the grow goes well you could still produce enough mushrooms for dozens of experiences. There is no need to overdo it, but it is nice to have backups in case some of the cake pans contaminate.
Q: Can I use coir instead of straw?
A: YES, in fact coir may work better (lower contamination rates). HPLC testing has revealed that potency does not appear to be affected by using coir vs. straw. Grow time is also the same. You can sterilize (pressure cook) the coir based substrate and it will not contaminate.
Q: I noticed my mycelium turning blue, is this contamination?
A: No, it's not contamination. This cultivar is so insanely potent that even the mycelium will blue if you give it enough time (it contains active alkaloids)!
Q: What if I don't have an available tub/pool/tarp/space for this?
A: One alternative is to use a mini greenhouse and pipe the moisture in from the top (you can use pvc pipe or flex tubing connected to your humidifier to do this). It costs more and is harder to setup, but it may be the best option for someone that doesn't have an otherwise suitable location to use for the grow. Another option is to just do the grow right on a table top or desk, it works, someone followed this TEK but grew on a table with the humidifier right next to the pans and had success.
Q: Can I buy a kit for this?
A: YES! See: https://www.patreon.com/posts/63406767 You will still need to buy a spore syringe and make grain spawn BEFORE buying the kit (or get a free spore print and make your own syringe or put the spores to agar).
Q: So did I think there was a difference between this species and cubes when all was said and done?
A: I want to avoid tainting other people's experiences by setting expectations. I will just say this much, I DO believe there is a difference. Perhaps this was just due to my OWN preconceptions? I don't want to overhype it, since there is not much scientific investigation into this matter yet. But I can tell you this, I may never use cubes again! With the pan cyans the visuals were outstanding and the body high was wonderful, that's all I'll say. Be very careful about the dosing, easy to overdo it. Use a gem scale. Also want to add that many people now have followed this TEK and sent feedback, almost everyone had success with the TEK, and of those that tried the mushrooms, it was unanimous opinion that they are superior to cubes, many have said "best mushrooms I have ever tried". One person did report taking too much, and he had a somewhat challenging experience although he still characterized it as positive and has tried them again since then (at a lower dose) so I just want to reemphasize this point, take 1/3 of what you would normally take with cubensis, or take a small test dose of 0.5g or 1g to see how your body reacts to it to be safe. DO NOT TAKE 3 grams or you may be sorry you did, even 2g is too much for the average person.
Q: Can you give more guidance on the misting amount? How much is too much or too little?
A: As a very general guideline, for most models of ultrasonic humidifier, if 10=Max setting and 0=Min setting, you are going to want to put it at a 4. if you were using some kind of basin/tub, you want the tub filling up with fog during the 30 minute humidification interval, however you do NOT want the entire room filling up with fog or a lot of fog spilling over your tub. Next: Pick your cake pan up, and carefully tilt it over a sink to not quite 90 degrees, if a lot of water comes out, you know it was over watered. This usually doesn't cause any problems though, just let the excess water drip out, reducing your misting level, and you are good to go. The mushrooms can turn black with excessive watering, so that is another sign that you've overdone it, turn down your misting. The casing surface should feel damp if you touch it. If you pick up a cake pan and tilt it over and not a single drop of water comes out, you might not be watering enough. By day 6 after casing and fruiting conditions, you should see lots of small pins popping up all over the place, it should be obvious by day 7, if you see nothing and you suspect your blocks are dry, you can pour a half cup of water gently over the entire growing surface.
Q: Can I use hay instead of straw?
A: No, hay is not a good idea, the reason is that it is much more nutritious and that tends to feed contamination. I have not personally tried using hay, but everything I've read has strongly advised against it. In case there is any confusion, straw is the leftover stalks of grain after the grain has been harvested, it is pale tan or yellow in color and low in nutrients, commonly used for animal bedding. Hay on the other hand contains more nutrient dense green grasses, it is typically greenish in color and is used as animal feed:

If you can't get straw or simply do not want to use straw, you can use coir instead (it probably works better anyway)!
Q: Can I grow these in a cold room (winter grow in cold climates)?
A: I experimented with a cold room grow at 60F to 65F, by putting a short/long tote (the kind that is designed to fit under a bed) with water in it and an aquarium heater in the water set to the low 80s F, with the cake pans sitting on top of that tote (as shown below). The surface of the mushroom block is pretty close to ambient temps (60F to 65F) but the bottom (top of tote with water) is around 75F. I wasn't sure if it would fruit in those conditions, but much to my delight this actually works well:


For the spawn run, I stuck the cake pans on a short shelf, covered the whole shelf with a clear plastic drop cloth (you could use a blanket or tarp) and put a heater at the bottom to keep the temp around 80F using a thermostatic switch but you could also put a small container of water at the bottom with an aquarium heater in it to provide enough heat for the small space too (aquarium heaters are inexpensive, effective, and don't require a separate thermostatic switch).
Another option is to use the clear plastic cake pan lids as a "boat" and float the cake pans right on the warm water. This seems to work even better than the dry method mentioned above. It helps even more to put a small amount of water in the clear lid so there is better transfer of heat from the warm water to the substrate. You can float the cake pans in a tub, a plastic sled, or a long shallow tote (these are way cheaper at walmart) Here is the setup using a plastic sled (aquarium heater at 85F/29C).
Q: How long does it take to grow this species?
A: Here's my quick math: Best case using agar: spores to agar, 5-7 days until the mycelium can be used (but time varies, could take longer). 7-10 days on small grain jar(s) to get to 1/3rd colonization, shake that, and you should be at full colonization 3 days later, dump that into big grain jars or mycobag and you can be at full colonization in another 5-7 days (best case). Spawn your substrate (dump grain into substrate in cake pans), then it takes 4-7 days to fully colonize the substrate (using recommended TTBVI or Estero strain, goes much faster at 85F temps), case that after full colonization, then its 6-7 days until first harvest. So best case scenario with agar, you can go from spores to harvest in about 30 days. UPDATE: I LOVE A CHALLENGE and I decided just for fun to see how fast I could grow this species if speed was the top consideration, I was able to do it in just 22 days spores to harvest! I did this by going direct from spores to grains (by way of homemade spore syringe), incubating that at 85F, shaking the jars after 5 days, waiting another 4 days for the grain to fully colonize, then directly spawning those grains to substrate (no grain transfers) and casing that after 4 days (the substrate looked completely colonized in just 4 days after keeping the temps at 80-84F). Can you beat my record? Note: I was heading out of town and harvested early so 22 days was not fully mature, one or two more days would have been more legit ;) but the less mature fruit bodies are also likely more potent by weight.
Q: Do you recommend adding aged horse manure to the agar for this species?
A: After a patron suggested adding a pinch of well aged horse manure to the agar with the pan cyan species, I tried that and had good results although not sure if its really any better (I did see the fastest and most vigorous growth on the plates with the added manure vs. control though). There is some debate about adding nutrients to agar, consensus is that it's probably not a great idea, but in this case I think it may actually be superior, need more confirmation on that.
Q: Can you grow pan cyans without manure?
A: Many people have tried this, but the results are mixed, general consensus is that yields will be lower and it's not a great idea. I recommend using manure. Make friends with a horse owner or horse business owner, they will be more than happy to give you all the free manure you want. But you can use cow manure or manure from any plant eating animal. You can even get it from Home Depot (Black Kow is the brand they sell).
Q: For cold weather grow, I had a question about the tub with heated water in it. How much water you need to put it it? And then you just set the trays on the lid of the tub not sitting in the water?
A: I'm not completely sure what the best (or most energy efficient) way is, but I have done it both as you describe and also I tried just putting in enough water to cover the aquarium heater (suction cupped to the bottom) and then using the clear lids that come with the $1 cake pans as a "boat" I put the foil cake pan into the clear lid and yes float it right on top of the water. I think this method is probably better and because you can use less water it might actually be more energy efficient too. Plus floating on water just adds to the humidity which this species likes (see pictures of that setup above).
Q: Have you found any myths about growing pan cyan?
A: Yes, many. For example I now know there is no advantage to using straw. I took samples to a lab and HPLC tested them, one grown on straw the other grown on coir, and there was no significant difference in potency. You will find that a lot of "common knowledge" in mycology is "bro science". When I started working with pan cyans, I was told "spraying the pins with water causes them to abort" (WRONG- I drenched pins with spray water and it did nothing to them) "you have to start on agar and do many transfers looking for the perfect 'whispy mycelium' (WRONG, you don't even need agar and I almost never do agar to agar transfers, and it makes no difference what the mycelium looks like, haha), "you have to use straw, it won't fruit using coir" (WRONG- I actually prefer coir now, it works great and can be sterilized in a pressure cooker). Some of these things could be cultivar specific, I really don't know for sure.
UPDATE: This TEK has now been validated by numerous growers, and people are getting fantastic results, click/tap here to see what people have been saying, and here are some pics I have received:


Someone even had success just growing on a table top with humidifier sitting on same table, he made a little makeshift deflector to direct the mist toward his cake pans:


Here's a pic of a nice TTBVI flush:


(thickest TTBVI flushes I've seen, sent by a patron, grown in a tent)

(one more pic of a dense carpet of TTBVI sent in by a patron)
______________________________________
Links to all of my TEKs, Videos, Trip music, and frequently asked questions with answers can be found here: https://www.patreon.com/posts/22774475 (everything is made available for FREE, I do not use pay walls, support the work only if you feel like you've benefited from it and you are able to do so). People have told me my work has helped them overcome depression, addictions, PTSD, relationship issues, direction in life, and to have important, meaningful, sometimes life changing mystical experiences. I feel honored and blessed to play a small role in this. That is my reward.
Files
