Home
Home

 Artists
 Search
 Recent
 Random
 Posts
Posts
 DMs
DMs
 Tags
Tags
 Random
 Importer
 Import
 FAQ
FAQ
 Account
 Register
 Favorites
 Login
Login

Spellbinding Pixels! (Patreon)
Content
Hey everyone, V.D.Y. here! Back with another Hereafter post!
This week, we're looking at the system we use to generate magic!
First, let's talk about why we even need something like this in the first place. Why not just have our wonderful artist, Twi, draw the magic effects?
The issue is just how many additional sprites Twi would need to make. Let's look at Aurora for an example. Right now, she has 49 frames across her five animations. Each of those frames is eight different drawings of Aurora from each angle.
So if we want Twi to create the magic effect for Aurora, we'd need him to draw it, with consistency across angles, 392 times! And this is before you consider things like if the animation has a "start-up" part, how do you animate it so it can start playing on any arbitrary frame? And what about as the animation changes, say you switch from running to jumping? How do we keep the effect looking consistent?
It quickly became apparent that having Twi draw all the magic effects is not viable. So, what do we do then? We turn to our resident programmer, Errorstream, for a solution, generating the magic effects through code!
But first, Error would need something to base these magic effects on, so we started this process with Twi making concepts!

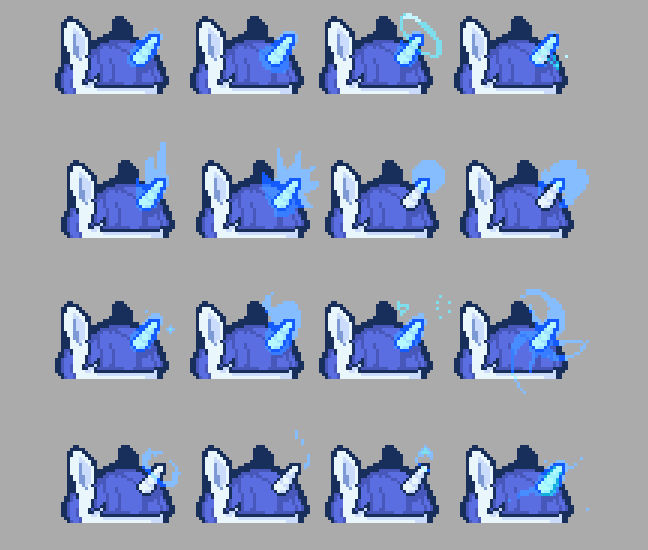
We discussed this for quite a while, trying to find something that we liked visually that was also viable to create in code quickly! Ultimately, we settled on a wobble with sparks type effect that you can see here!


This brings up our second discussion: what color is Aurora's aura? As you can see above, we tried a few colors, but in the end, we settled on the light-blue color since it meshes well with her design!
One additional bit of work that Twi had to do after making the concepts was to separate Aurora's horn into its own layer in all of her animations. It was a bit of work, but luckily, less than the work to draw all the magic animations would have been! Separating the horn layer made it easier for the code to generate a magic aura for the horn and let us play around with layering! For example, even though part of Aurora's horn hides under her hair, we still want the magic effect to appear there!
Another effect we wanted to get done with this first iteration is a "jump spell" for Aurora! You might remember seeing a little preview of this in Aurora's animation showcase, where she uses it for a little extra boost!

So, we had the concepts, and now it was time for Error to create a little magic! So, how'd he do it? I had an extensive discussion with him where he explained the whole process, and I will do my best to summarize it here in a way anyone can understand!
Let's start with a graph!

You may want to click that one to see the full size.
This graph explains at a high level how the whole process works, and Error used it for debugging and figuring out the process. Fun fact: the graph itself is also generated by code, using a custom library Error wrote, Levers, inspired by Unity's Handles!
This process runs for each frame of an animation. Keeping that in mind, let's start by looking at the inputs and outputs of this process. The first input we have is the Pixel Buffer, which comes from another bit of software Error wrote: a custom importer we use for the Aseprite files that converts the data into something a little more usable in the code!
This buffer contains the horn layer when used to generate the horn animation. It has all the layers that compose Aurora flattened into a single image when used to create the jump animation. Flattening all these layers together lets us easily draw the aura around her whole body!
Next, we have two colors: the fill color and the outline color. We use the fill to color in Aurora's magic and the outline to outline it! Then, we have the max size; this is a number we use to determine how big the aura is around her horn.
Finally, we have two crucial bits for making the magic look organic: the Perlin noise and the frame index. Don't worry too much about the Perlin noise; you can think of it as a visually random bit of pixels that we can use to shake up the magic to make it look wobbly!
The frame index represents the frame's order in the animation. We can use this number to shift the noise left and right as it plays to make the magic wobble and change between frames while still having "consistency" with the previous frame!
Finally, we only have one output, the Pixel Buffer containing the animation frame itself! The process passes this set of pixels back to the Aseprite importer, which puts it between the appropriate layers. The importer can then pack all the information with some metadata into a sprite sheet we can use in Unity!
Now that you understand the "ins and outs" of the process, let's talk about the fun part, the "magic" going on in the middle of the graph that makes it all work!

The process first takes the horn, expands it into a blob, and then replaces all the pixels with our fill color, giving us a basis for the magic effect.

We then use the Perlin noise and frame index I mentioned to "wobble" the magic into something more organic! You can see in the second image how the frame index shifts this wobble as the animation plays!

Then, we need to go ahead and outline this magic with our outline color! This animation layer is finished, so we'll hold on to it and use it to generate some sparks we can layer on top of it.

We start by dilating the results from our last step into a giant cloud around the magic, then replace all the colors with the outline color. We can then "dissolve" this image, removing all but a few random points from the cloud spaced apart.
We can then flatten these two results into one image and send it off as the output of the process!
All of this adds up to give us a nice-looking magic animation!

It's pretty exciting to see Twi's concepts come to life through code! The jumping effect is even more straightforward, using a few of the same internals as the horn effect to outline Aurora's body in magic when she jumps!

There's so much more I'd love to talk about here around how Error went about optimizing this code, more detail around the custom Aseprite importer and Levers, and some of the ideas we have for adding more effects and improving the performance of the generator in the future, but this is already looking to be the longest post I've written for the game yet, so I think we'll end it there!
Feel free to ask any questions on the Patreon post; we all love to see them! 'Til next time!
~ V.D.Y.
Files