Behind the Scenes #5: Editing a CG (Patreon)
Content
Welcome back to my Behind the Scenes series, where I share how I create different aspects of the game in way too much detail. These posts are written for anyone interested in the process of making a visual novel and for aspiring creators to see how someone else does it. You can find the full Behind the Scenes series in its dedicated collection.
In this month's Behind the Scenes, I'm going further in depth about an aspect of CG creation that I first touched on in Behind the Scenes #2—turning a raw 3D-rendered scene into a game-ready CG.
Why edit?
There are certainly people who pop out a Daz 3D render and consider it ready to go, especially if they're adept at doing all they need to do within the program itself. But I realized early on—as many of us do—that editing the render is often necessary to fix all sorts of things, from skin poking through clothes to facial expressions not looking right to lighting being too bright, and on and on.
As someone who doesn't have the latest and greatest graphics card, I also need to sometimes render an image in pieces and then put it all together in post. Here's an example of a Julian CG, before and after editing:


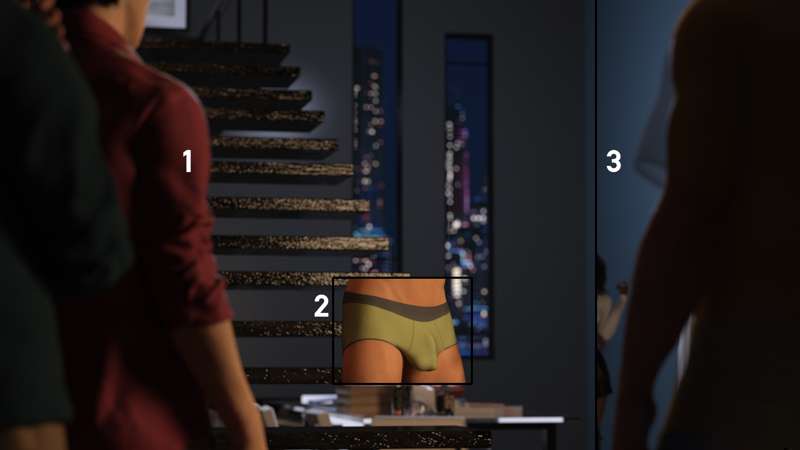
And here are the additional pieces that were edited into the original render:

Piece 1 is adding Connor & Riley, piece 2 is replacing the original underwear since I wasn't happy with it, and piece 3 adds Owen. This image also shows a few other things I'll touch on later—graininess in some of the renders and the color differences between the renders and the final image.
Image Editing Programs
I'm sure everyone is familiar with Photoshop, and probably familiar with how expensive it can be. It is absolutely a powerful program, but if you don't have access to it, there are other alternatives. I use a free program called GIMP that has a lot of similar functionality—or, at least, all the functionality I personally need.
Since I only use GIMP, that'll be what I use for the examples below.
Spot Renders
So let's say you render an image in Daz 3D and decide you hate how an expression looks, or you have to render multiple images since your GPU can't handle too many characters on screen at once. Having to render additional versions of the scene in full takes awhile and is a total pain.
But there's a great tool in Daz 3D that I use all the time—Spot Render. This tool allows you to select a portion of a scene and render just that section, drastically cutting down the time when creating the pieces you need to make corrections to a CG.

One of the best aspects of the tool is it creates an image at the same resolution as the full render, only with everything transparent except the rendered portion. This means you can just load it as a layer above the image being edited and that spot rendered piece will be in the correct position.
The main thing I'll note is to make sure to set it to render in a new window via the Tool Settings—otherwise Daz will just show a preview on-screen that can't be saved!
Denoising
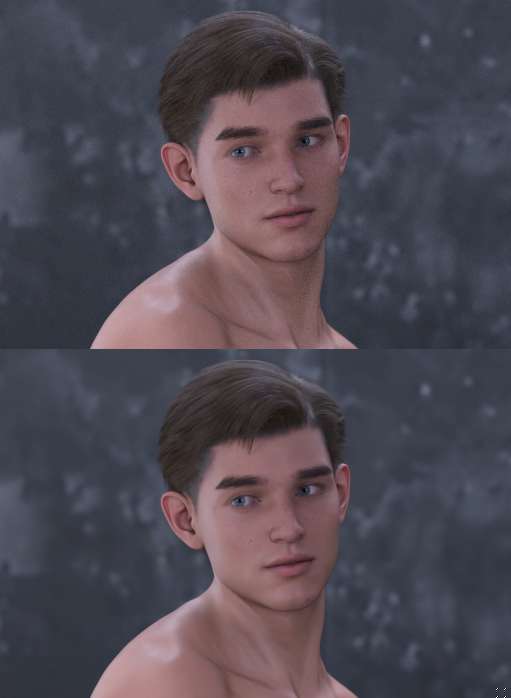
After I have all the pieces I need for a CG, I first denoise them before doing further editing. Denoising is exactly what the name suggests—it removes noise (graininess) from the scene. Here's an example of an image before and after denoising:

In my opinion, this step leads to a much more polished final product. The noise could definitely be used with artistic intent (think film grain to look like an older movie), but for this particular project it just makes images looks unfinished.
One of the downsides is that if there's too much grain, the denoiser can make the image look too smooth, sometimes smear-y. I don't mind the slight painted look of the denoised images, but too much and it veers into cartoon-y. There are a few images in the latest version of the game like this, but they weren't so bad that I couldn't use them. I may revisit them in the future, however.
But this downside isn't necessarily a problem much of the time, especially if the original render isn't overly noisy to begin with. For instance, in the sample you can see it preserved Connor's freckles while only eliminating the noise. I tend to use the clarity of Connor's freckles as my benchmark for how well the denoising went.
There is a denoiser built into Daz 3D, and I think (but don't know for sure) this may be a feature in Photoshop. There are other outside denoisers also. I use an Intel AI one which can be read about in this thread on the Daz 3D forum.
Composites
Compositing is a pretty simple step, all told. You only need one tool—the eraser!
Depending on what piece I'm compositing into the scene, I'll either lay the spot render over the original image then erase the edges to blend it in, or lay it below and erase parts of the original image to show what's beneath.
An example of the latter is fixing hair poking through a hat. I first do a render with the hat and hair both visible, then a spot render with the hair removed. I then place the spot rendered hat underneath the full image and erase the portions of the full image that show hair sticking out:

I overlay the spot renders for bigger sections of the screen, blending the two images together using a soft brush for the eraser. You just want to make sure the entire border is erased—specifically erased with a soft brush—so that there are no visible harsh lines.
Here's an example of a part of a CG before I composited Magdalena on top:

And here's the spot render that'll be overlayed:

I reused this spot render for all variations of this CG, which is why you can see Bastien's arm on the left.
The first image below is the spot render with the left edge erased with a hard brush but leaving the rest of the edges intact. The second used a soft brush to erase the entire border:

And finally, how the combined pieces look:

Most people can plainly see the parts that were erased with a hard brush is bad, but it's the unerased edges I want to draw attention to. Looking closely, you can see the faint lines of the spot render's border. I've definitely shared CGs that had faint lines like this—outside of the areas where the colors aren't a match, it's very easy to overlook!
Small Fixes
The final edits I make before color correction involve things like body parts sticking through clothes.
For these issues I use the clone tool in GIMP. Essentially, you copy another area of an image and then brush it over the spot you want to get rid of. Here's a portion of Matt's sprite that had the issue of skin poking through his sweater, which was eliminated using the clone tool:

In the center image, the lower selection is the area of the image being copied. The other selection is acting as a brush so I can paint on the copied portion. For this step I used a harder brush because the area being fixed was so close to the section that should remain transparent.
One tip I'll give: Drag the tool when brushing rather than clicking a bunch. This moves the portion being selected as well, meaning the stroke you're making is copying a swath rather than a single spot over and over. This helps the edit look less obvious.
Color Presets
Once a CG is completely edited, it's time to put on the final touches by adjusting the colors, brightness levels, and other aspects of the image to create a cohesive and more cinematic look throughout the entire project.
There's a plethora of tools to do this with, but I use color presets made by creators with much more expertise in this process than I do. These color presets come by way of the G'MIC plug-in for GIMP, which has a ton of other editing tools beyond just presets.
When I initially created the game, I tended to vacillate between two different color presets. For the new versions of the images, I settled on a specific house style that combined those two presets to get the look I wanted: a bronze-y tint to skin and more saturated, blue-forward backgrounds. I won't give the specific presets I use, but there are tons to play with to find a unique look for a finished piece.
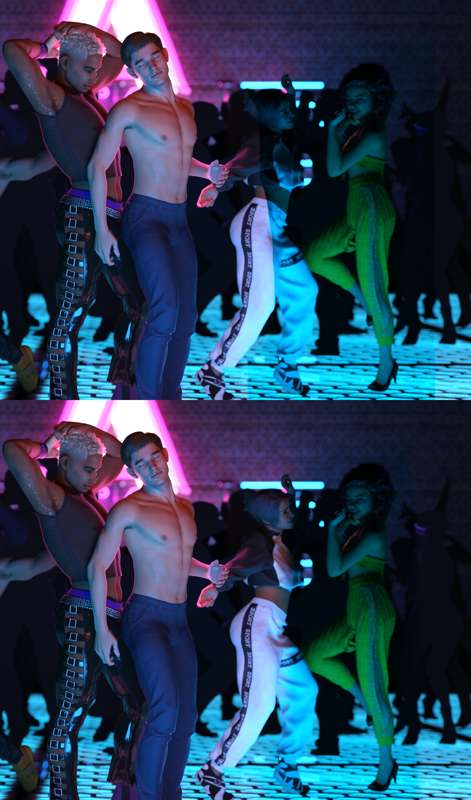
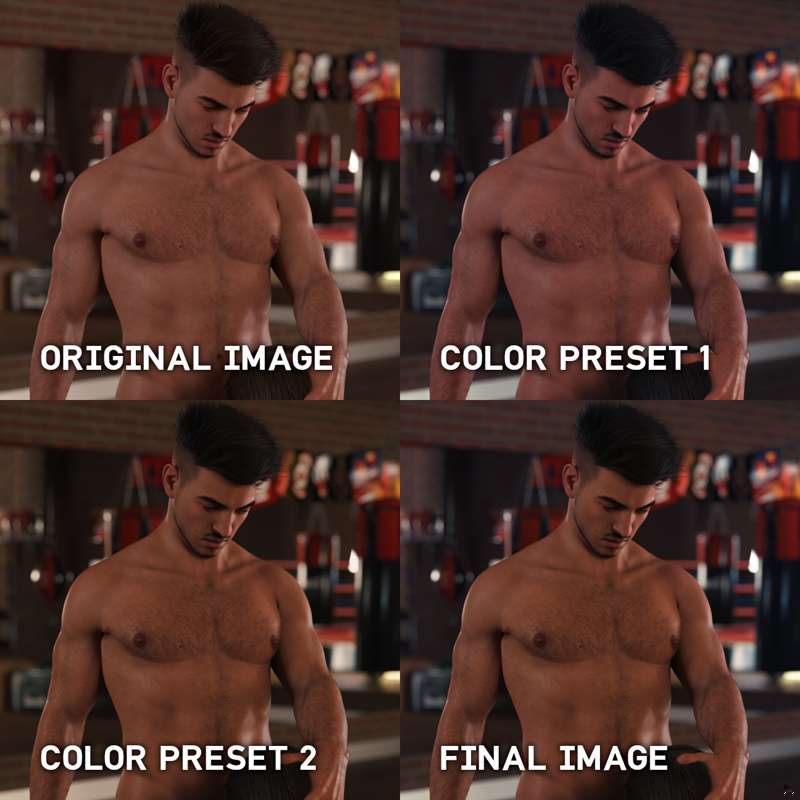
Here's how the presets look at first and then how they are blended together:

Color preset 1 changes the feel of the background in a way I find appealing, but I don't like the blue tinge to Jordi's skin. Color preset 2 deepens and bronzes his skin color, but the background is now more yellow. Once the two versions of the image are composited together, I get what I consider the best of both worlds.
Let's edit a CG!
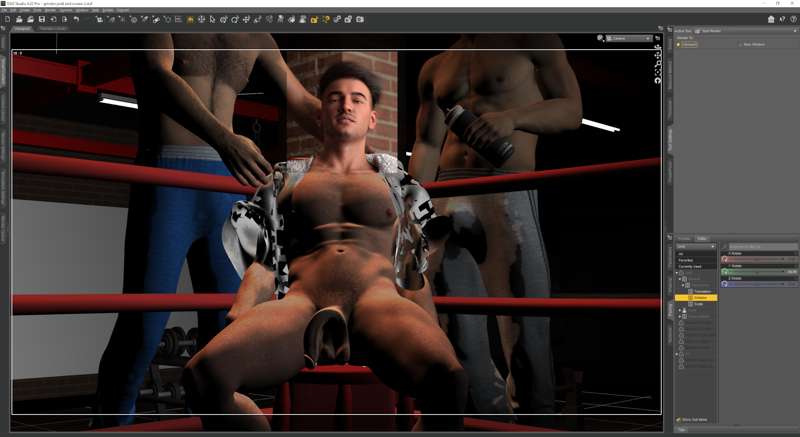
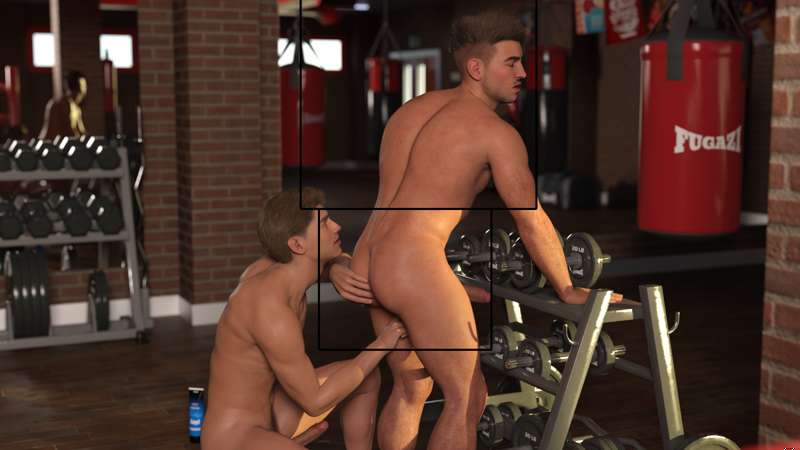
Let's take one of the Jordi Grind'm CGs and edit it together from beginning to end. We'll start by looking at the original render with no alterations made. (The gallery for this post lets you see bigger versions of these images if you'd like to get a closer look.)

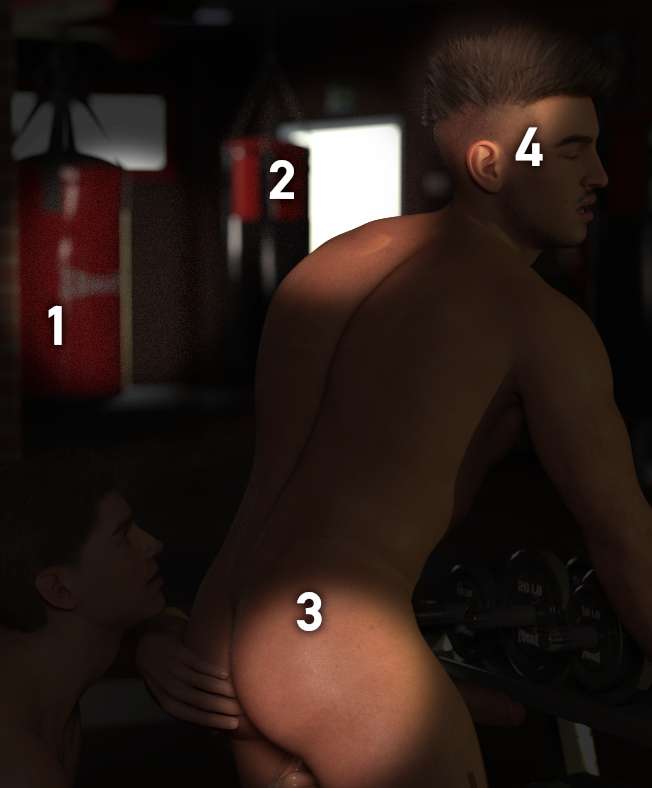
I immediately see a number of issues that need to be corrected:

1. So much noise!
2. The doors to the gym are opened to let the HDRI better light the scene. Since Jordi and Connor are in front of a mirror, this fudging of the lighting is visible.
3. There's an obvious line where Jordi's body hair abruptly ends near the junction of his ass and his thigh. His body hair is basically a shell layered on top of him, and I turned off the butt portion because I didn't like how the hair looked.
4. I normally wouldn't care too much about this, but for the sake of this post I'll point out how uneven Jordi's hair is when meeting his scalp.
Spot Renders
The first step is rendering fixes for both the reflected open doors and the body hair issue. This is easily done via the handy Spot Render tool within Daz. Even though I could have done one spot render for this part since it could be contained to one tall rectangle, I did two renders to preserve the lighting on Jordi's skin.

Denoising
Next I want to denoise the full image and both spot renders. Dropping them into the AI denoiser makes quick work of smoothing out the noise.
Compositing
Now we're getting into the editing proper. I'm starting with the doors, which is on a layer that I'm placing under the full image. I'm then going to carefully erase the open doors, being mindful of not letting the lighting difference bleed over into the rest of the image.

Next comes the body hair. Again I'm laying the spot render underneath and then using a very soft brush to make the hair more naturally fade away.

Fixing this harsh line could also be done using the clone tool, but since it's such a large area featuring different shades of skin due to the lighting, cloning would be hard to do without making it very obvious.
With the composites done, I merge all of the layers together to make it one full image again.
Small Fixes
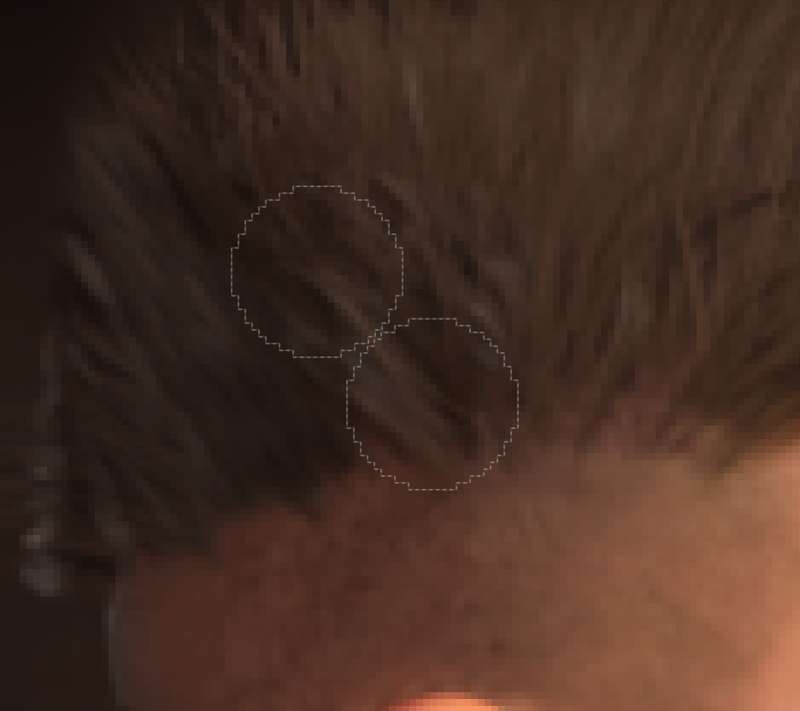
Next I'll zoom in on Jordi's hair and do some cloning to even out the edges where the hair meets the scalp. I normally wouldn't consider it super necessary in this particular image, but in other renders the lighting can make the hair look sparse or not connected to Jordi's head, so cloning is necessary there.

And now all of the fixes have been accomplished!

Color Presets
It's time to apply both of the color presets I use for my images.


With the two new versions of the image made, I place the background layer behind the layer I intend to use for the characters. I need to erase all of the background in the top layer so we can see the layer beneath, but I don't just use the eraser tool. Instead, I use the lasso tool to make a very rough selection around the part of the top layer that I want to keep.

Once that's done, I invert the selection so the background is selected instead of the characters, then set the selection to be feathered by 100 pixels. Feathering has the same effect as using a soft brush, allowing a more natural transition between the two layers.
In some images, the background in the top layer bleeds into the bottom layer, making a sort of halo around the characters. This is the time to use the eraser to clean those parts up.
And now we're finished! The full CG has been refined from the initial render to what you'll see in the game.

This entire process is done for every image in the game. Some images are able to be finished quickly, but many need extra work, so this type of editing can take awhile. But I think the final product is well worth the effort!
That's it for this time! If you liked this post and want to see the rest of the series, the Behind the Scenes collection has you covered.
Files
