Home
Home

 Artists
 Search
 Recent
 Random
 Posts
Posts
 DMs
DMs
 Tags
Tags
 Random
 Importer
 Import
 FAQ
FAQ
 Account
 Register
 Favorites
 Login
Login

September 2018 Progress Update! (Patreon)
Content
Hey guys!
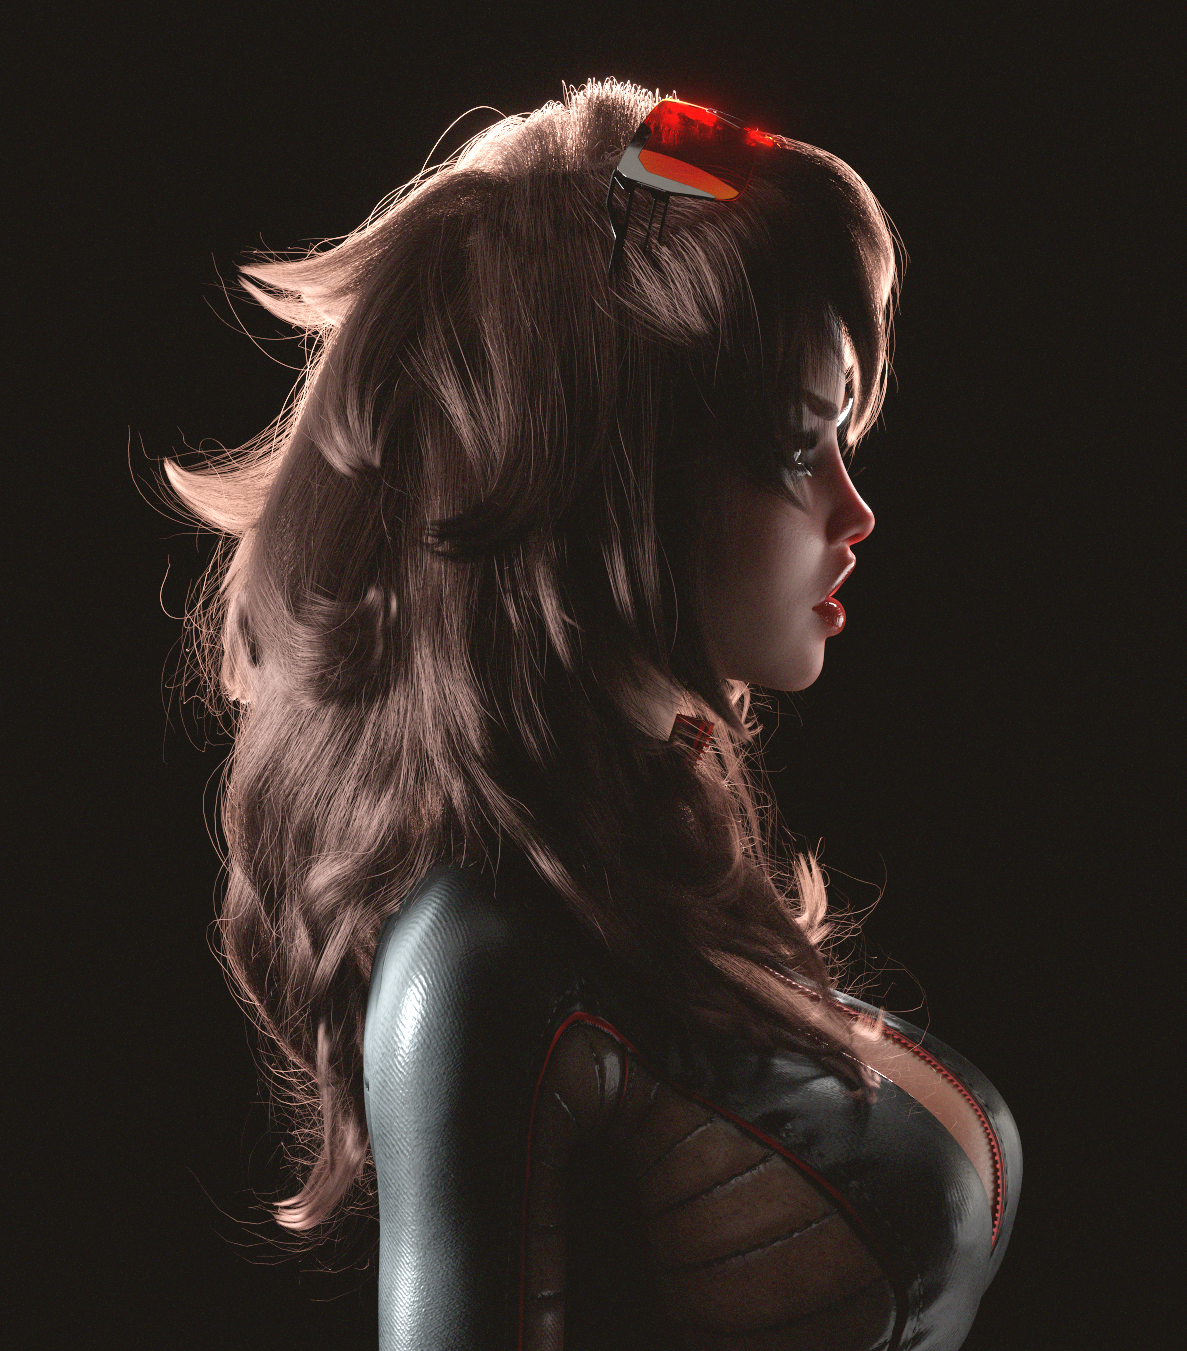
Don’t worry, that’s not a new hair style for Malise :D. This is simply a test of XGen, the new hair modeling software I’ve been learning while I was sick. We’re making completely custom character designs now, and with them we’ll need completely custom hair styles, but I’ll get into that more below.
We made good progress on our Maya transition in August. I completed a set of Maya scripts to alleviate some of our material woes. However, we also learned we need to improve our methods for storing and posing our facial expressions on our character rigs. TK and I put a lot of time in there before I got sick at the end of the month, and there’s still some loose threads there. That said, we completed another milestone toward Battle Test 4 though by confirming our Maya import and rig generation scripts work on males (the police enemy), and more importantly on Neon (and presumably other characters with half their bodies replaced by robotic parts o_O).
Character design and clothing asset progress came a long way. We finished two new character concepts that we needed for v0.06. We’ve made progress on props for these characters as well as the Syndicate and Splicer baddies, and Uber has almost finished his next map revision.
AltairPL has been fleshing out the back end of the URGE engine to get it ready for releases, and we also took a detour to look at positional audio to improve map ambience and battle sounds while he formulates the audio cache components.
Those are the highlights, so check below for all the goodies :D.
Topics for this Update
Here’s the list of major topics we’ll be discussing in this month’s update. Check out the Moving Ahead! section at the bottom for an updated overview of our progress toward Battle Test 4 and the next major release. Topics listed with the ‘***’ have been significantly updated or are new since the last Inner Circle Update.
- Ero’s Maya Conversion Progress
- Ubercharge’s Splicer Gate Map Revision
- Exarch Nine
- Exarch Nine’s Visor - 3D Concepts
- Real Fiber Hair Modelng with XGen for Maya***
- Concept Art Version of Malise
- Meet Mr. Black!
- Limbo’s Colorized Concept Art
- TK’s Rigging Update Part 1
- TK’s Rigging Update Part 2***
- Mr. Kittyhawk’s Clothing Assets – Syndicate Overcoat
- Syndicate Revolver Designs***
- Mr. Kittyhawk’s Clothing Assets – Splicer Jacket***
- Ubercharge’s Splicer Masks
- APL’s URGE Engine Report Pt 1 – Archive, Versioning, and Vectors
- APL’s URGE Engine Report Pt 2 – Positional Audio***
- Moving Ahead!
Ero’s Maya Conversion Progress
One of the first things we checked off our list this month was that TK and I successfully implemented joint rotation limits to our Maya character rig :D. This was the thing I added to our immediate to-do list at the end of the monthly update -- I didn’t think it’d come together this fast at all.
A different area I started to focus on early is material scripting. Most material stuff can wait, but we really needed the ability to transfer our finished materials over to newly imported versions of characters without spending hours of manual work on it. The first of a few scripts that I completed allows for us to do it with a couple of clicks. It has the limitation of only being able to transfer materials between models with identical polygon ordering, but it’s just what we need while we perfect our rigs and are creating new versions of the characters every few days in Maya. Here’s a list of things we can now do with the help of the scripts I wrote this month:
- Transfer materials between any two similar objects in one click. Shape can be different but polygon number and structure must be the same… ideal for character bodies, since all of our human characters now use Genesis 3.
- The same for entire hierarchies of similar objects (two rigged characters for instance, with all their clothes, accessories, and such). Perfect for when we have to re-import characters from Daz (any time TK significantly updates his scripts).
- Quickly make polygon selections by material. If a coat is all one mesh, is leather, and has metal buttons, I can now select just the buttons in 2 clicks.
- Scan for duplicate material connections – a bug that pops up pretty frequently in Maya, is very hard to debug, and wreaks havoc on Redshift.
If this stuff sounds like basic functionality, it’s because it is in my opinion; all the more reason why not having it during the conversion process has been a pain in the ass. I haven’t been doing flashy character renders recently because our character rigs are constantly getting updated, and without a way to quickly transfer materials to the new models I’m left with gray blobs :D.
This also acts as a foundation for long-term material goals. If you take a closer look you’ll see what I’ve created so far is basically the groundwork for a material preset system. I used material presets a whole lot in my previous Daz workflow, and need it now because of the degree of detail we’re going for with stuff like material-based wetness. In Daz I could save a material loadout for a character and reload it later from a library. Maya doesn’t support this out of the box, and we haven’t found third party software that addresses it. What I’ve worked on this past month has gone a long way in giving me perspective on what we’ll need to do to make that possible down the road.
Before I got sick and started on hair stuff, I spent a while updating Malise to the newest version of TK’s rig and working on posing features with TK. As eager as I am to begin poses for Battle Test 4, we ran into some shortcomings with our setup for facial expressions that needed immediate attention. The pose manager I’ve customized is great for saving, loading, and blending between poses, but complex poses like hand movements and facial expressions are a more complicated beast. I thought the pose manager on its own would suffice up through Battle Test 4, but I was wrooong.
What we need immediately is functionality to load multiple, co-existing poses onto the rig -- something called additive/subtractive blending – in order to construct complex poses from smaller building blocks. For example, if I had separate poses for “Left hand fist”, “Mouth open”, “Eyes closed”, I could load each of these independently and they wouldn’t undo the other poses – they’d add them together. This is effectively how Daz operates, and as it turns out it’s the path most advanced riggers tend to opt for. I’ve been getting advice from Adeptus Steve, the lead rigger on the game Wild Life, who has far more experience in rigging than we do. He’s taken the time to walk me through the high-level stuff on how his rigs operate, and while this is something pro riggers perfect over the course of years, we need some solutions in very short order to get us off the ground and moving in Maya. Turns out, TK has a system planned that should work great, which he’ll be talking about some in his rigging section.

Ubercharge’s Map Progress
Ubercharge started back on maps in the last half of August, and completed nearly the entirety of his revision for the Splicers’ Gate map. This one has given us the opportunity to investigate some more advanced map animation techniques without the use of sprite sheets, and we all discussed how to best implement the tech required. These effects may not make it into the next version, but we’re looking at adding animated steam, animated lighting from the fires, and ripple shaders for the standing water. Here’s a higher resolution look at the full map, as well as a before and after:D.

Exarch Nine
Time to introduce a new character :D. The image above (full size here) is an overpaint I did of a photo by photographer Aku, and is the original mock-up I gave to Limbo. We started on this before last month’s update, but I wanted to hold off on showing the early results until we got something closer to my vision. Here’s an image of Limbo’s actual concept art!
This character is the 9th Exarch of the Babel Corporation, and is one of the remaining characters we’ve got to finish for the next major release. She plays a significant role in the game, so you’ll be seeing her in some other outfits eventually. The exarchs are meant to blur the lines of royalty, clergy icons, and futuristic corporate overlords, so I guess this look here is supposed to be her “business formal” o_O.
There’s still some work to be done, but it’s certainly getting there. Here is the progression of Limbo’s designs up through to the latest one to show you how it’s come along!
Let us know what you think!

Exarch Nine’s Visor -- 3D Concepts
Limbo, TK and I worked on some basic 3D shapes to mock-up Exarch Nine’s visor. I wanted Limbo to do some extra sketches of it, and it evolved into 3D mock-ups since differences in the shape are subtle but change the vibe a lot. I decided we should probably move on until after I finalize the character’s face and hair, since going further at this stage would be kind of moot.

Real Fiber Hair Modelng with XGen for Maya
Speaking of hair, I actually began watching XGen tutorials while sick because during the Exarch Nine design process I realized we don’t have anyone on the team capable of doing fully custom hair models @_@.
These images of Malise are a test style I did over the past week as a project to learn the ins and outs of XGen, from everything to initial shaping to rendering in Redshift. XGen was developed by Disney for its 3D animated movies, and is the standard for top tier hair software industrywide at this point.
The capabilities of XGen hair are pretty incredible. Since we are using Genesis 3 for all our female characters, the scalp can be morphed to fit other characters, meaning I could use this test I did later on another character without a lot of editing. Not only does XGen do fibers, but you can convert styles to polygon cards for real-time games (something that could be neat for us down the road). XGen is based on “guides” which are curves that create the general shape of the hair – this style took over 180 of them :X. Once you have these guides set, it’s easy to change the properties of the hair. We could create highly realistic wet versions of the characters’ hair for instance. These guides can be customized at any point (even after the hair is “done”), and can also be used for enabling physics, which is a test I ran early on. XGen also has a built-in modifier stack that includes forces, so you can create great looking wind/movement poses for non-physics enabled hair very quickly.
As I mentioned above, I plan on using it to create Exarch Nine’s hair in the immediate future. Beyond that, the model we have for Ven’s hair required quite a bit of post work to make look good, so I’m positive I could make a much thicker, better model for her quickly using XGen (don’t worry, I won’t change the look :D).

Concept Art Version of Malise
We had a couple days where Limbo was working on transitioning his line-art style to our female characters, and I helped out by converting Malise’s body over to his style (or as close as I could manage) using the 3D version as a reference. I tried my best to get a good style for faces going as well. I’m nowhere as good as Limbo, but I’ve learned a ton just from working with him in our first few weeks together. I thought it came out pretty cool so I wanted to show it off ^-^.

Meet Mr. Black!
Mr. Black is yet another new character that you’ll encounter in the next major version. Limbo and I have been working on a bunch of concepts for him. We’re not quite there yet, but hopefully these will give you an idea of what we’re going for. There are some additional ones in the “Limbo’s Colorized Concept Art” section as well.
Let us know what you think!

Limbo’s Colorized Concept Art
Limbo took the week off from working on new characters, and instead colorized all the concept artwork he's done up until now. He's broken every color up into its own layer so it's very easy for us to go in and start experimenting :D. Limbo apparently has absolutely no fear when choosing colors, but keep in mind none of these are final!
TK’s Rigging Update Part 1
Yay! Finally got the last of my todo list done for the rigging setup scripts. So now, we can transfer characters from Daz to Maya with nearly all the functionality that we have in Daz + Addons that Ero has bought over time. Maya's python implementation is... not really as easy to work with as I had hoped, but I learned a lot, and it's working at least!
Since completing the scripts, I’ve already made a big overhaul to the part that attaches the facial controls. We discovered it's easy to lose them within the geometry while posing, and it might’ve been even worse on other characters whose faces are much different than Malise. Originally, I was using hardcoded values to place the face controls, but it wasn’t possible to move them afterward. We now have a routine that does initial placement, but lets us reposition the controls before clicking a button to wire them up, thus giving us the opportunity to make adjustments.
The face and eye control setup script got a nice round of rewrite and polish. The previous version would move the controls to the joints (with an offset) and go straight to work on setting constraints for animation. The problem that Ero had was that they can
We're at the point where we can actually do progressive work without fear of losing progress on poses we make, which is a good feeling. Naturally, there's issues that Ero mentioned above with usability for facial expressions.
As of the last half of August I was finishing up the ability to import facial expressions directly from Daz so that Ero could use them as a base for improving upon (much faster than creating them from scratch). Altair helped write a special little hack for FBX animations and facial poses to get us started. A problem I was having that stumped me for quite a while, but I would eventually solve, is that the face exploded outward after bringing an animation into Maya.
Getting to the point of what Ero mentioned in his update, I pulled an old item out of my todo list. Eromancer was set on using a third-party script to also manage face poses, but it's not a good system for the number of combinatorial face edits one might do in a typical session. The concept of my solution was an old and simple one called Driven Keys. All you do is create a control attribute, and key transforms of other objects to it. After some setup, you have a list of sliders/controls right there on the rig for easy manipulation of all sorts of facial poses at once. In practice, it's what Eromancer is used to using in Daz, but now with the added benefit of having easy to use controls in the viewport to layer on top of these premade poses.
While I thought this system would be sufficient, as it turns out we came across an even better one after a meeting with Eromancer’s friend. I’ll talk about that more below.
TK’s Rigging Update Part 2
Continuing from my last update, I continued work in the realm of managing animations and poses for our characters. I solved the annoying "exploding head" issue in regards to bringing in old presets from Daz Studio. I settled on a clean solution where I just have a special scene designed for transferring face data around; it isn't something we need to do more than a few times, so there's no need for a big complicated solution, right? I had started work on what would have been an OK at best system for face expressions, but Eromancer introduced me to someone he had met a while ago. This guy is a more experienced rigger than I am, I picked up a few tricks in our conversation. What I really liked was the tool he had written for his rigs: a cute little window with all his pose presets and a couple of nice blending options. He also showed me that dealing with namespaces in Maya isn't nearly as scary as I thought- this is important when we have multiple characters in a scene. It's a much better solution compared to mine (which only sort of blended), and isn't any more complicated either. Also mine had a small potential for slowing performance down. So I'm basically going to copy what I saw, but applied towards my system.
All the while, I needed to bump up my Python skills and how to work with JSON data. JSON is a text document format that you can store all kinds of data in whatever form you need, similar to XML if you're familiar, it's pretty common. So I needed to learn how to read and write the stuff inside Maya's python, which is almost straightforward, but I think I have most of my questions answered now. I do see that whatever decisions I make now in the JSON structure and contents won't easy (for me) to change later, so I want to get everything nailed down so I don't have to deal with that. I've been doing many experiments along the lines of "Is method X, Y, or Z better?", googling around more and finding other interesting ideas I can throw into more testing... So, uh, learning. :)
In the end, this will act not only as the manager for facial expressions, but for all of our body poses too. Many times it's much easier to click "Raise Arms" or "Crouching" and work off of that. We had been testing out using some other pose managers, but they had quirks here and there that made them much less attractive for daily use, I think we talked about that before. It turns out that this is mostly a simple task, and since I'm writing for our own rig, I don't need to make special accomodations (or fail to work with them altogether) for other rig styles like a generic tool might do. Oh, and I'll have an excuse to write an actual fancy UI now, which sounds pretty fun, to be honest!

Mr. Kittyhawk’s Clothing Assets – Syndicate Overcoat
Mr. Kittyhawk finished up his Syndicate coat model! It’s took a while, but a lot of the time was devoted to learning Marvelous Designer and just as much to figuring out the workflow between that, ZBrush, and Maya. After last month’s update he focused on the second major part of the process, which is cleaning the model and painting details in ZBrush. This super high poly version gets baked to a normal map that we can use to keep the details on a much lower polygon version to use on our character
Mr. Kittyhawk then finalized the topology and created a material. We went back and forth with the idea of doing a procedural one after I had some success with a test, but we decided against it considering we’ll likely need to animate the coat, and it would likely produce strange results while moving due to all the folds in it. Anyways, here are the final results!
Lastly, here are a couple other images from Substance showing just the geometry details:

Syndicate Revolver Designs
Much like Malise’s old revolvers, the model we have for the Syndicate henchmen’s revolver is pretty lame. I put together a bunch of references for Limbo to use to bang out a new concept, and he came up with a whole sheet of them :D.
I combined the elements of some into a final version, which Limbo has already started blocking out the 3D model for.

Mr. Kittyhawk’s Splicer Jacket WIP
In the second half of August, Mr. Kittyhawk was on a mission to show how effective his Marvelous > ZBrush workflow has become by pushing out a fully detailed clothing asset in short order. He’s been working on the first jacket for the Splicers, which is starting to approach completion.
Here’s the latest images of his high-poly jacket minus the final details such as stitches and some additional hardware that need to be added in ZBrush. He’s completed the retopo for the low-poly version, which there’s also an image of below.
- Splicer Jacket WIP High Poly 1
- Splicer Jacket WIP High Poly 2
- Splicer Jacket WIP High Poly 3
- Splicer Jacket WIP Low Poly Topology

Ubercharge’s Splicer Masks
One of Ubercharge’s projects this month was to model the Splicer masks that Limbo had created concepts for last month. So far, he’s only done a couple, but he banged out some great materials that will add a lot of variety. I don’t have full quality male textures set up in Maya yet, so I set up a scene with some placeholder skin materials to get some final-ish quality renders, and am more than happy with the results :D. Check out how badass these guys look!
APL’s URGE Engine Report Pt I – Archive, Versioning, and Vectors
The beginning of August was better than I anticipated and I managed to make a lot of solid progress.
Since testing archive stuff required me to jump some hoops at almost every change, I started with making archive creation and reading as user friendly as possible. In the middle of it, I started getting a bit antsy, so I decided to rush some more or less minor things and to make a push to finally interface my release building script with internal function used to create the archive(s), which would result in release building automation, like we could do for RM builds. This required a lot of changes to ruby scripts and revealed some minor issues to address, but it went relatively smoothly and I could finally send prototype of URGE-only Battle Test build to the team for internal testing. Good news is that archive stuff is working great and there were no issues whatsoever related to it, even considering poor/rushed state of some of its components.
Bad news is that I had to make a detour due to two graphical issues revealed in the course of internal testing. First one was triggered by small omission related to Battle Test build, and resulted in some missing portraits not being properly reported via message box - it was easy to fix once I found the cause. Second problem was a return of the glitching caused by 3rd party library I thought I've fixed. It was working just fine on my AMD GPU, but the rest of the team uses nVidia GPUs and I was pretty much flooded with complaints about the glitching. Since this issue first appeared I had a potential work-around on my mind, but I was sure it will impact performance dramatically. I had no other choice/idea though, so I went with it and fortunately performance hit was little to none.
Knowing that archive stuff works just fine, and fixing graphical problems, I could take a step back and properly implement everything that was rushed. At the same time, since I knew exactly what I need, I started to refine and optimize the code and archive structure. And since it was at least a bit related, I did some scripting work to disable some insanity required by RPG Maker version, fix some minor issues, etc.
The only major thing left on the archive TODO list was something I've completely forgotten when making the initial archive design. It's one of those things that was completely ignored by RPG Maker and jerry-rigged by me with scripts, even though they should be an integral part of the engine. I'm talking about the game version system, which is crucial for two features: patching/hot-fixing and save-game compatibility. Both those features are not required for the initial URGE-only Battle Test releases, but for many reasons I wanted to get them up and running ASAP.
During version stuff designing phase I started thinking about something that was bothering me for some time now. Apparently, when some people see something like '0.05' they automatically treat it as a number equal to 5%, which never was our intention. I was able to convince Ero to adopt popular [MAJOR].[MINOR].[PATCH] version scheme, which should work much better for our needs and make my life a little bit easier. I really hope that changing version notation from '0.0563' to '0.5.63' won't cause too much confusion, but Ero is a little bit less optimistic about it. Previously, we have planned to skip few versions and tag next big release as 0.10 instead of 0.06 - 0.10.0 looks less confusing in new notation than 0.6.0, but I'm not sure we should make such a huge version leap for Battle Tests that will come before the next big release.
Anyway, I consider all this version stuff cursed, since every time I started working on it, something entirely different was taking me away from it. All the stuff that was distracting me would have to be done sooner rather than later, so I'm not fretting about it. Most of it was done in preparations for the inevitable first URGE-only release, and was related to getting rid of some old and decrepit RM compatibility stuff, implementing functional changes that veer a lot from old RM approach, and to utilize URGE capabilities better. One of such things was implementing dedicated game ini for URGE, which fits our needs much better and makes configuration much easier. Another thing wasn't really planned, but after seeing how good game archive performs, I decided to get rid of mini URGE archive and move its contents, mainly shader source files, to the game archive(s). This allowed me to get rid of some extra code required by this mini archive, not to mention that shaders modification will be now much easier.
Once in a while, when testing stuff, I would notice a small problem related to my implementation of rendering queue when resetting the game. I was always forgetting to even make a note about it, so when I noticed it again recently, I decided to fix it once and for all... and I did.
Ruby scripts finally got some love too - another batch of workarounds were removed or conditioned, which will make their later removal much easier. Scripts preprocessing was also updated, which will streamline making release builds for both RM (mainly for testing) and URGE. I also made a lot of preparations for changes that will be required for new version of version stuff ^^.
Another big detour from versioning stuff was triggered when I started preparing ground for its archive part implementation and I've noticed a limit I've hard-coded earlier into the archives to save at least a bit of my sanity.
Every time I needed some kind of data container with dynamic size, I had to code one from scratch, since C doesn't have one and it's a bit complicated considering how strict C is on data types usage. C++ and pretty much all higher-level languages have various versions of dynamically sized containers, called vectors, lists, or simply (dynamic) arrays. After working with Ruby for so long, I really missed such functionality, and considering how useful it is, I finally decided to try to implement one in C. My first prototype was a bit clunky, but it changed when Ero pointed me to something I should have figured out by myself, since I did something similar earlier. Updating my prototype with new (re)found knowledge wasn't very hard at least, and I had working version pretty soon. From this point it was only a matter of adding all the necessary functionality... and fixing more or less small bugs found along the way.
There's a lot of already implemented stuff that could use switching to this new container type, not to mention I had to drop or delay some other functionality to save time and my sanity, but most of them will wait for later still. I started conversion with something I know well and use all the time, which is the rendering queue. Found a lot of minor issues during the conversion, but managed to process it pretty quickly and in the process, I was able to optimize the queues a lot and get rid of a lot of complicated looking code. With rendering queue converted, and making sure that everything is working as intended, I did the same to everything archive-related that could use it as well. This allowed me to get rid of the aforementioned hard-limit and optimize archive processing a bit, which will make implementing patch archives processing much easier. I actually made some preparations for it, but since it's dependent on versioning system, it will have to wait a wee bit longer.
When converting archives, I also stumbled upon another thing that started bothering me and I thought it could use optimization, but I needed to make some tests first. Long story short, I managed to improve archive-related performance, resulting in both faster archive creation and archive contents access/reading times, which is always a good thing.
Around this time, TK and Ero asked me for another fbx-processing script, similar to the morph cleaning one I did for them earlier. It was a relatively quick job, since new script was pretty similar to the previous one, but it was a nice change of pace.
With that out of the way, I pushed through the last absolutely necessary part of version/archive stuff. There's still a lot to do, like implement processing of patch archives, adding some checks, and other stuff, but they're more like additions, and I don't expect many changes to the core of both systems. I need a break from this stuff, so I'll probably start adding said functionality somewhere along the line. Well, I think I might have exaggerated a bit when I said lately that I would be long done with the archive stuff if not for my family medical emergency last month.
Next task was to make custom implementation of something, for which we needed a library till now... a bit clunky and cumbersome library, which I wanted to get rid of for a long time, but I had no other choice till recently. Can't say my implementation is as versatile and powerful as the library, but it's a bit faster and uses dedicated code I already had, and adding functionality somewhere along the line shouldn't be too hard.
After that, I took a short break to distance myself from all the stuff still needed, so I could decide what should I tackle next.
APL’s URGE Engine Report Pt II – Positional Audio***
After thinking about what to do next, I had two options. Adding game controllers support is on the URGE release TODO list as an optional goal. I've read about how SDL handles controllers under the hood, and I think interfacing it, along with even more optional mouse support, shouldn't be too hard, but along with some other changes I wanted to make for keyboard handling, I would probably need to make an overhaul of the whole input system. As with many other things, RPG Maker's implementation was pretty basic, and I see a lot of room for improvement, including some stuff we would use for sure.
Second thing I was considering and decided to tackle first was overhauling audio handling a bit. Main reason for it was some lagging issues when playing some sounds on my laptop. Another thing I wanted to add to audio handling for a long time was recently mentioned few times by Ero in our internal discussions. What Ero wanted was to use some localized sound effects, like steam vents, working machinery, etc. And for some unknown reason, RPG Maker devs decided that audio pitch is more important than even a simple panning. This sucks big time, since not only I need to code positional audio handling in C, but I also need to figure out the way of interfacing it from game scripts AND from RPG Maker editor.
Before I started any serious work on either audio stuff, I did some testing of simple sound positioning built-in in the SDL_mixer library we use. It's rudimentary and a bit clunky at times, but with a few tweaks it should be more than enough for our current needs. I'm kinda glad I did this test, since it revealed what I believe is a bug in SDL/SDL_mixer - pretty much audio channels mapping is all wrong for 5.1 speaker configuration. Catching it so early will give maintainers of said libraries time to fix it, while I work on the rest of the audio stuff.
My adventure with audio overhaul started with something small, which was bothering me for a long time now and I recalled it in the meantime. We did our best to synchronize in-battle sounds with animations and other visuals, but if you paused the battle when sound was already playing, it would continue while the visuals were suspended, which kinda sucked. But, a little bit of work, and now audio is paused in such situations as well.
First big thing I had to do, was to implement something resembling audio cache, which should fix/lessen problems on my laptop, allow actual caching of some audio files, and act as a base for the positional audio as well. Something occurred to me only after I already started coding it, and it kinda kicked my ass - all audio playback is using separate thread, and TBH multi-threading is scaring the shit out of me. I never intended to deal with multi-threading, at least not that early in my programming career, so when it hit me it hit me hard. Audio library handles this under the hood for internal stuff, but there's no interface to extend some protection mechanisms for custom stuff. Not gonna bore and scare you with explanations of stuff like race conditions and deadlocks, so let’s just say it was a lot of hard and tricky trial-and-error work to make the cache thing work.
With that out of the way, I can finally start working on implementing the positional audio stuff, and that's my current WIP.
Just in case some of you are thinking something like "I have only two speakers - I don't care about this positional audio crap" - you don't need 5.1 speaker set to enjoy it at least partially - in this case positional audio will act more or less like left/right panning with distance attenuation. Battles are a great example here - if the girl on the left side of the screen shoots her gun(s), the sound should and will come (mostly) from left speaker. I'm pretty sure it will improve the experience and immersion a lot, especially once we add battle H sounds, but in the end, you'll be the judge of that.
Moving Ahead!
The last couple of months we’ve had a section at the end of our update by the same name, and I’d like to first reiterate what was said at the beginning of those. The timeline has been getting progressively more confusing with the Maya conversion, but our next milestone is still Battle Test 4 / the Enty launch. From a player’s perspective, here’s what that release will contain:
- Full lust system enabled, including all stages and armor damage for both characters
- At least one example H skill chain
- Potentially the new combat user interface
Here’s an updated list of goals we need to accomplish to make that happen:
Maya Conversion Stuff
- COMPLETE: Convert materials for genitals
- COMPLETE: Convert the police enemy from Genesis 1 to Genesis 3. Genesis 1 uses TriAx rig weightmapping, which is completely incompatible with any modern 3D app.
- COMPLETE: TK’s rigging conversion (Daz to Maya) pipeline and scripts need to be functional and relatively bug free.
- COMPLETE: Implement a pose library into Maya.
- COMPLETE: Get Malise, Neon, and the police enemy rigs working in Maya
- COMPLETE: Get joint rotational limits working in Maya. By this I mean we need to put limits on things like elbows so they don’t bend backward when posing.
- COMPLETE: Scripts for basic materials handling functionality such as copying between characters and assets, creating geometry sets from materials, and hiding geometry by use of materials. I didn’t have this on the list last month, but as it became more obviously necessary I’ve included it.
- Update Neon’s base Daz scenes to match her model we’ve been using for the recent battle tests. Need to do this before converting to Maya.
- Convert Malise/Neon’s battle poses from Daz to Maya and make fixes where necessary. This one requires we have the rigged versions of Malise, Neon, and the Police enemy in Maya.
- Lay the groundwork for portrait rendering automation in Maya and get a basic system working (this will be a huge timesaver, so it’s worth investigating as soon as possible).
- Render all the portraits up through Battle Test 3 in Redshift and get them hooked up to our lighting system. Will likely knock out a script for simplifying that last part, since any future full re-renders will be impractical to set up by hand.
- NEW: Finalize a system / UI for storing and blending facial expressions
Other Tasks for Battle Test 4
- Finish Malise’s 3D armor damage
- Pose/render the later lust stage / armor damage portraits
- Develop H skill chain and artwork for police / both characters
- Potentially revamp combat user interface
I did a write-up on our goals further out, including some info on the next major release, in the July ‘Moving Ahead’ section, so I definitely recommend checking that out if you want more info there :D.
Thanks again for everything guys!
Files