Home
Home

 Artists
 Search
 Recent
 Random
 Posts
Posts
 DMs
DMs
 Tags
Tags
 Random
 Importer
 Import
 FAQ
FAQ
 Account
 Register
 Favorites
 Login
Login

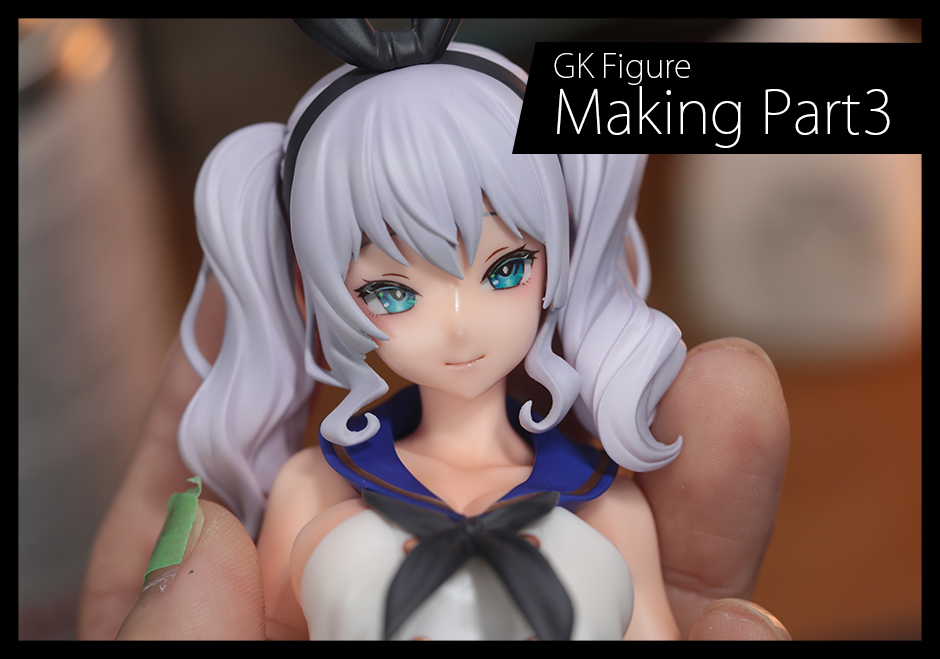
GRIZZRYPANDA - Kashimakaze making process part.3 (Patreon)
Content
Eye Painting ~ Assembly
This is the process of eye painting, but this time, I skipped the preliminary drawing and suddenly did a clean drawing.
The reason is that I did not need to do it. I have been underpainting with vermilion to create the gradation of eyeliner, so if I don't have to do that, I don't need to underpaint either.
At first, I blindly did the underpainting, but once you get used to it, I think you can decide whether or not to do the underpainting depending on whether or not you want the gradient on both ends of the eyelashes.
I have already posted the process on twitter, so I will add some additional information.
*Eye painting method after the eye skin.
First, draw the outline of the eyes.

In this photo, the eyebrows are not colored, which is not good, but if you want to check the atmosphere properly, add color to the eyebrows as well.
At a quick glance, it looks fine, but if you flip it left and right and draw parallel lines, you can see the discrepancy.

The pupil width of the left eye is narrower than the right eye. This is what happened after adjustment.

Before the correction, the eyes were looking slightly outward, but after the correction, they now face forward. The gaze of the figure is very important, so it is best to take the time to adjust it so that there is no sense of discomfort.
Next, I draw the pupils.

I say "draw," but the correct way to describe it is to first spread out the textured lines with a brush and then shave and shape them with a Finish Master or brush.
Then, as I told you in the video, I paint the eyes with enamel paint in a blending manner. Technically speaking, I think it is correct to call it layering rather than blending, but since there is no point in getting hung up on definitions, I will call it blending for the sake of convenience.

The advantage of this painting method is that it is possible to go back and forth between light ↔ dark, so the colors do not become muddy and dark. So it is easier to control the saturation and it is easier than it looks. Also, you can do it with watercolor paints as well as enamels, so I encourage you to try it. If you are mainly brush painting with Falejo or Citadel color, you are probably pretty good at this.
I also like the fact that by blurring the color boundaries, it is possible to create gradations with a painterly touch. However, I think it is difficult to reproduce with decals or tampo printing, so I don't think it is suitable for commercial works such as DecoMas. I feel that it leaves a strong impression on the viewer when used for personal projects.
The enamel paints used to create this Kashima eye color include fluorescent green, fluorescent blue, pure cyan, pure magenta, and white. The number of times to clear protect is greatly reduced, so once you get used to it, you will be able to shorten the time considerably.

Then, add highlights on the eyes and eyeliner to complete the look. The fluorescent color is used for the eye highlights, but the color will be better if white is used as a base color. The color will not be visible without a white base, so it is essential to use a white base.
Then, apply skin color.

After applying the skin tone, while you are at it, use Enamel Clear Red to add blush to the cheeks, ears, lips, and chin area. Don't bother to put a clear coat in between.
In real life makeup, shadow is applied around the upper and lower eyelids, but it is safer to use it sparingly on the figure because it will look too gaudy.
Also, the position of the blush color will look completely different if it is placed on the edge of the eyes or on the cheeks.

https://twitter.com/sukimasangyo2/status/1521520564166627329?s=20
The left side looks sissy, while the right side looks cute. The right side is rarely used these days. If I were to use it, I would adjust it to a more mature look by shifting it higher than the nose. Marine's blush was just like that.

In the case of this Kashima, that means only eye shadow!

If the makeup looks cute, all is well!
I know I've already explained this, but please don't neglect to check your gaze before applying color. If you have slanted eyes or your gaze is looking in the opposite direction, you will feel uncomfortable even if you do your best to apply color. Therefore, please check your gaze thoroughly.
My method is to take pictures from multiple angles at each stage and repeatedly check to see if there is any sense of discomfort.

The discomfort that cannot be seen just by checking with the naked eye can be clearly recognized in a photograph.
Don't run away from the discomfort!!!!!
So, once the eye paint is done, it is assembled quickly and completed.

Files