Home
Home

 Artists
 Search
 Recent
 Random
 Posts
Posts
 DMs
DMs
 Tags
Tags
 Random
 Importer
 Import
 FAQ
FAQ
 Account
 Register
 Favorites
 Login
Login

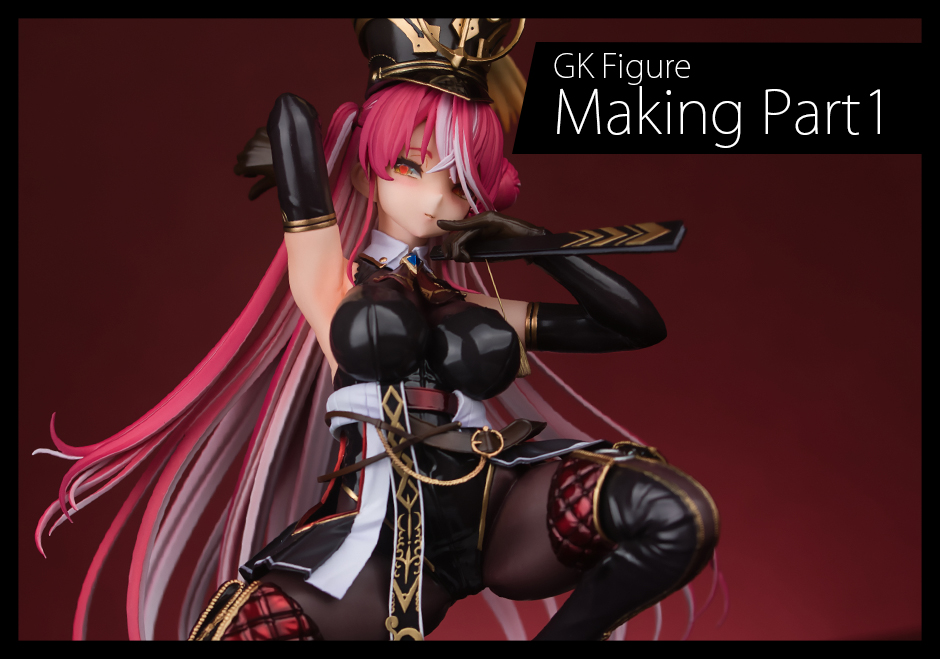
Fujiyama Sankaku - Houshou Marine 3D Edition Making Process Part.1 (Patreon)
Content
I assisted the dealer Fujiyama Sankaku with a paint sample of their newest work, the "Houshou Marine 3D Edition".
I believe that it will be available at TFO10 and later events, so if you were not able to purchase it this time! If you were not able to got it this time, please wait for the next time.
I have already posted the video, so I will try to give you some making tips in this post as well. I didn't include explanations in the video, but I think it is enough for those who have built garage kits to some extent to understand the contents, so please feel free to use it if you don't understand something.
If you have any questions about the article or the video, please feel free to ask me and I will try to add supplementary explanations.
┃Making process 1 (parts check, surface treatment, dry fit)
■Parts check
After purchasing a garage kit, first check the parts within a week as much as possible. If you fail to do so, the dealer will not be able to respond if parts are missing later. There are many reasons for this, such as a broken mold, running out of parts stock, etc. In any case, it is safe to check the parts before the deadline.
This Senchou consists of 37 parts in total.

You may think that the number of parts is small for Takatori's kits. However, the kit is 1/5 scale, which is quite large, and the painting is quite challenging, so it is just as challenging as he's previous kits.
■Sanding (filing)
Since the number of parts is small, surface preparation such as sanding is easier than you might imagine (I did not say it was easy to finish).

There are seam lines in areas with fairly fine detail, so careful removal is necessary in these areas.

The arrows indicate areas that were originally straight, but were filled in during the casting process, resulting in wobbly lines that need to be re-carved with a liner saw or similar tool.

The workmanship will be different just by fixing this rattling.
I won't go into the zipper part because it would be a long explanation by itself, but I think it would be a good idea to look at the actual product first to make a judgment.

When there are large bumps like this, it is recommended to fill them with Cyanon rather than sanding to even them out, as it is quicker and does not destroy the modeling.
The seam lines on the bottom of the body part are deep and difficult to remove, but they can be easily removed by using a figure engraver to sand and file. As you learn how to use the tools, the work becomes faster and more enjoyable.

This protrusion of the belt on the costume is designed that way, so be careful not to scrape it off.

Since there is a dividing line on the side, be careful not to sand it with Artima7 or other sanding tools without thinking, as you may scrape it off.
Similarly, the slightly protruding part of the forelock may be shaved off if you don't think about it.

Is it gate because it is small? It might be mistaken, but be careful, as it is the part that constitutes the bangs.

Well, even if it is scraped off, it does not affect the area because it is almost invisible.

As for sanding the back of the hair, as reported in the video, it is just a process of warming it up with an embossing heater and filing or filling in the small areas, so I will skip the explanation. It is not a nerve-wracking work, so it is easy to do it while playing some good music or Youtube.
■Dry fit
After sanding, let's do a quick temporary assembly. In the video, the body and foot parts are first assembled with Φ1 brass wire, but later reassembled with Φ1.5. I tried to use thin brass wire for the first time to see how it would look, but there was no particular point in doing so. I think Φ1.5 is fine from the beginning. Or maybe even Φ2.

Most of the recent kits from any dealer have dowels and are easy to assemble, but for replication reasons, this kit is dowel-less.
Therefore, the difficulty level is a little higher because brass wire needs to be installed perpendicular to the body. However, you don't have to worry about that much because there is a guide for shaft hammering.

Since I was a little worried about fixing it with only two brass wires, I decided to install one more spot as a spare. Mark the shaft strike angle with a pen.
I tweeted how to pinning a kit without dowels at the end of January because I was working on this kit.
https://twitter.com/sukimasangyo2/status/1620096414528458752
There is a method to fix the pins in position by putting them through the body side, but it seems to take extra time to bury them and restore the shape, so the basic policy is not to do it.
Fill in any gaps with Cyanon.

It will look good when heaped on the body part side. I used Cyanon, but I think Epo Putty or something else would work as well.

Apply Mentum or Vaseline to the foot part side, pour Cyanon into the gap, and wipe off the overflowing part with a KimWipe. After that, spray the hardening spray and let it harden. Once the parts are removed, file the parts that feel uncomfortable and adjust them.
You can also use Good Smile's Mask sol instead of Vaseline to fill in the gaps, so try whichever method you prefer. If you put too much at once, it may be difficult to remove the parts or the gap may widen.
After tentatively assembling the entire figure, the parts with large gaps were the joints between the body and legs, and the chest parts.

For this part, soak it in hot water of about 80°C to warm the entire part and press it against the part on the other side to eliminate the gap. However, be careful not to burn yourself because the part itself becomes quite hot.

If there are no more gaps like this, it is OK.
Another thing we want to restore the shape of at the tentative assembly stage is the seam on the side of the glove. Since the seam line is just in the concavity of the side seam, it is necessary to re-carve this line.

If the seam line is erased by filing, it will result in a flat side like this....
Moreover, the left hand side is the part that stands out because it is right in front, so it is quite important to re-carve it. First, draw a guide for re-carving with a pen.

It is enough to get a rough bite, so draw a line like this. Then, a groove is carved using a liner saw, and the edge of the groove is rounded using a conical diamond bit, a sculpting knife, or a Kami Yasu.
As I said exactly the same thing for the Koyanskaya I produced before, it is necessary not only to carve grooves but also to round the edges in order to make them fit into the modeling.

So, although it is a bit time-consuming, carving and filing are repeated several times.
This is the process of rounding the edges.

It still gives the impression of being hard, but if you keep working on it, it will gradually round out and become more comfortable.

I think this is enough. This is just carving the seams, and I added the wrinkle detail while I was at it.

I added the creases where we thought it would not be strange if there were creases here.
I recommend that you put put putty or cyanon on the surface and then cut it down, rather than cutting a wrinkle out of an empty space, because it is easier to create peaks and valleys.
The finished product doesn't look particularly strange to me (partly because the colors are so subdued), so feel free to try restoring the seams and adding details.

The only other thing to keep in mind when dry fitting the figure is that a Φ4 aluminum round bar is just right for connecting the body and chest parts. The hair bundle is heavy, so the body must be able to be fixed firmly...
The fan tassel that the she is holding in left hand was not included in the sample. I do not know either if it will be included in future kits that will be sold, but if you want to make it yourself, it is quite normal.
I used a resin gate that I keep in case I need to process it in some way.

If you sharpen and thread these things like they do in the video, and point a 0.5 brass wire, it's a fine tassel. No matter what anyone says, it's a tassel. okay?

You should make it while considering the size. I think it could have been a little thinner.
You might also refer to the illustration of the captain's 3D Edition posted by Ai Akasa on Twitter.
https://twitter.com/AkasaAi/status/1591385129049788417
Thinking about this and that while dry fitting and processing is also one of the most enjoyable aspects of GK.
Finally, the hat is made to be detachable by embedding two Φ5mm magnets in its head.

The hat is heavy, so if it is less than Φ5mm, the magnetic force will not be enough and it will fall off. Please be careful.
Also, for the head, bury the magnet deeply enough to leave about 3mm of surplus at the top, so that the surface can be filled with cyanon and the shape can be restored. If you want to decorate the figure without the hat, shape restoration is essential.
The embedded magnets are transparent, but you don't need to worry about it because you will paint with a color surfacer.
The magnets on the hat side should be buried as close to the surface as possible without sticking out. The shorter the distance between the magnets, the higher the magnetic force, so there is less risk of the hat falling off.
The way to bury the magnets is shown in the video, but first, to position the magnets, insert brass wire so that it sticks out a little on the head side, and dot the masking coat R on the head.

If you put the hat on in that state, you can transfer the position to the hat side.
Drill a hole there and then try to install the hat on the brass wire of the head.


The image is a bit confusing, but it is transferred properly.
If the position is OK, then the hole for the magnet is drilled and filled........
By the way, I recommend using HIQ-Parts 5mm x 2mm (N52 or N53) magnets. Compared to no-name brand magnets, which are obviously less magnetic (N50 is surprisingly weak), HIQ-PARTS magnets are definitely more magnetic, so we recommend them.
...When you have a dryfit like this, you can proceed to painting.


Files