Home
Home

 Artists
 Search
 Recent
 Random
 Posts
Posts
 DMs
DMs
 Tags
Tags
 Random
 Importer
 Import
 FAQ
FAQ
 Account
 Register
 Favorites
 Login
Login

La+ Darknesss(sculpted by Takatori) wip part3 (Patreon)
Content
▶ Eye paint
This is a bit sudden, but this kit comes with decals. I had a chance this time, so here are some pictures of the state with the decals attached.

Here is the hand painted.

The decals are quite nice, so I thought it might be possible to apply them and use them as a base for drawing and gradations.
It saves me the trouble of doing the preliminary drawing, and I can just add highlights while looking at the overall image, which I think is not so bad. Personally, I think it is good to draw, but if you have high-level decals, you can use them as they are, or use them as a rough sketch.
Whether it is a drawing or a decal, as long as the work is good, it is good! I think it's a good thing. I wonder if I can make the right choice if I am aware of what the recipient of the finished work will think (what they are looking for).
...Now that I've digressed, let's return to the eye painting process.
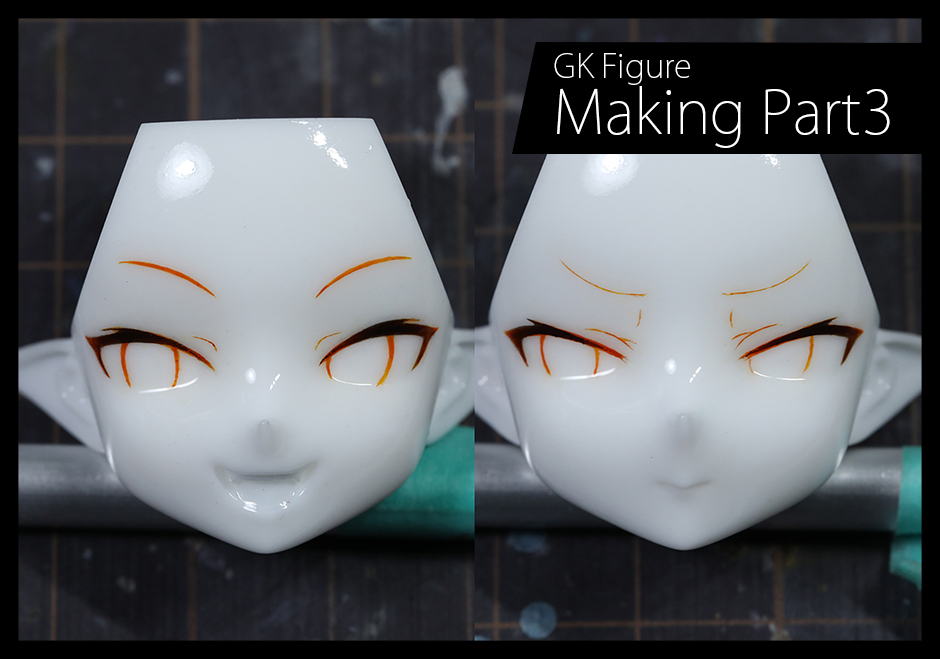
First, draw a quick line drawing.

By adding a horizontal line, you can check if it is balanced or not.

I feel that the lower edge of the eyelashes on the left eye could have been a little longer. If you want to improve, check the draft on your PC and use editing software to check the height and position of the eyebrows, eyelashes, etc. very roughly.
At first, you may cry because the height and position of each part does not match at all, but if you keep doing this, the position will match to some extent without this process.
However, it is not necessary to make it 100% symmetrical at all, so it really only needs to be to some extent.

Another face will be drafted.
*I do not explain below, but clear coat is applied at each step. (Drying time for clear is generally 10 to 30 minutes.

I closed the eyes with clear and created a gradient, but I was careful not to put too much black on the Live2D eyeliner because it is not black but a brownish-black color...

The base color of the eyes is a light yellow. The pupils should also be painted to make the next process easier.

In addition, draw a semicircle-like area around the pupil.
After this, the gradient in the pupil is created with an airbrush.

Tamiya Enamel Smoke (X-19) is the equivalent of clear black in lacquer paint. Even if enamel black is thinned with lighter fluid, it is easy for particles to appear between particles, but using smoke solves this problem. Mixing smoke and clear orange will also make clear brown, killing two birds with one stone.

I used these two paints to paint the pupil gradient. It is easier to get a clean finish if you first apply the gradient in black around the perimeter and then apply the brown. Since it is enamel, I am happy that I can reapply as many times as I want if I make a mistake (the basic premise is that it is well clear-coated).

It is easier to apply neatly if the handpiece is moved in a semicircular motion.

Remove the masking, wipe off the unwanted areas, highlight in the eyes with white, and paint the double eyelids and lower lashes.

The work on the eyes is completed when the shadow areas are also airbrushed.

Draw diagonal lines on the cheeks. I always draw this line using a mixture of clear pink and orange enamel. If the color is too dark or thick, the atmosphere will change, so this is a difficult part to draw.

Paint the skin tone and also the mouth. The mouth of the smiling parts, especially the lower teeth, were mostly painted with a brush.


Finally, adjust the gloss, ears, and blush with enamel pink for a hint of color and matte coat, and finish with gloss on the lips at the last minute. The gloss can be applied lacquer clear with a brush .

Let's make them pretty!
Files