Home
Home

 Artists
 Search
 Recent
 Random
 Posts
Posts
 DMs
DMs
 Tags
Tags
 Random
 Importer
 Import
 FAQ
FAQ
 Account
 Register
 Favorites
 Login
Login

La+ Darknesss(sculpted by Takatori) wip part2 (Patreon)
Content
First up are two colors that come up too often in La+ painting.

They are pure violet and pure magenta. I use these two so much that it is no exaggeration to say that I paint almost everything with them.

Now, with these two main pieces, we will start by painting the chairs. First, mix magenta and white surfacer to make a color sufacer and apply a solid coat. Then shadow the edges and crease areas with pure color magenta.

The backrest is fun to paint because it is a large area, but it is heavy, so use a handle that can hold it securely. I used a 3mm aluminum round bar as a handle for painting.

Once the gradient is made, masking is done. The tape will float in the groove, so use masking sol to protect it.

After masking, paint the edge of the cushion in black. For large areas like this, I usually use a gradation of intermediate colors to avoid monotony, but I thought it would look cool to use a gloss finish for the edge, so I painted it solid black.
It would be nice to use a black surfacer and paint it in one coat, but I did not have any on hand, so I painted it in gloss black from a gray start-up. The figure looks better when there is a gradation in any part of the figure, but in some cases, a single solid color looks better.

The hair is painted, but the color is like an even lighter shade of lavender. It was made by mixing white surfacer with a small amount of pure violet, and then a small amount of magenta as a fine tuning. This color is applied solidly. Since both brightness and saturation are low, white is OK to use as a highlight color.
I use a thin coat of white surfacer. When both brightness and saturation are low, a half-hearted highlight will result in a state that is not well defined. So I went all out and used white. The advantage of this is that if I make a mistake, I can quickly restore the original color with a color surfacer.

The mane is painted in the same way, with magenta mixed with white as a color surfacer, and then a gradient is created with violet on top of it.

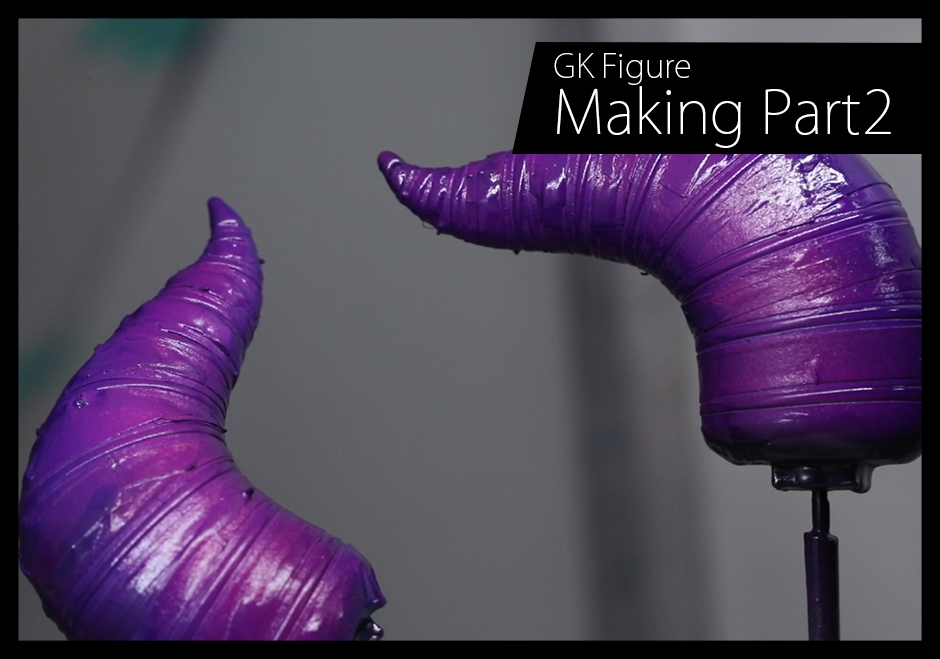
The corners are painted in much the same way. First, paint the entire surface with a gray color that tends toward black, and after masking, paint the rings with magenta. Then, paint the upper and lower parts with violet. In this way, a beautiful gradation can be created, which makes the best use of the saturation of the magenta part.
It is not recommended to apply magenta after violet, since it is difficult to adjust the saturation of the magenta.

The raven eye is hand painted, using the concavity of the eyes as a reference. If you can make decals, you may make them!

It might be better to have a little more yellow in it. The paints I use are Gaia enamel fluorescent green, fluorescent yellow, and Tamiya enamel green.

The cushion part of the chair should be matte coated first. After that, masking is done and the logo painting on the back side is started.

I was wondering how to paint the logo on the back of the chair, but I was told that I could use the same color as the cushion part, so I created a gradation using a base color made from Gaia Enamel's pure magenta mixed with white, and violet made from a mixture of magenta and cyan.

Since pure colors cannot be applied over black as it is (because of the clear color), I made a base color by mixing enamel white and magenta once, and then applied violet over it.

Once a gradation similar to that of the cushion part is created, it is OK. Here comes the hardest part.

Remove the masking and remove the areas protruding from the logo using enamel solvent and Finish Master. This is really... tough.
If you make a slight mistake in controlling the Finish Master, the tip will advance to the part that should not be erased, so you need to work without being in a hurry.
No, even if you are careful, it will stick out many times, so frankly speaking, there is nothing you can do about this, even if you are careful. It may be better and faster to make a partial gradation with the base color → violet again for the parts that stick out, rather than doing it with a brush. In fact, I did it that way and made a lot of corrections.

The state in which wiping has progressed to some extent. The arrows indicate areas where the tip of the Finish Master has hit. No matter how careful you are, something will hit something...you should do this wiping work as such.

The pacifiers are drilled with dimpled areas on both sides. After painting the pacifier with lacquer in violet, I painted it with enamel in blackish blue and yellow.
Other silver parts are painted with Premium Mirror Chrome by Gaianotes. Premium Mirror Chrome is an aluminum-based paint, but if the base coat is gloss black, it becomes a mirror-like color, so it is very useful.
The basic painting process is only difficult in terms of masking, and the colors used can be handled by using the first two colors as a base, changing the saturation and density, and mixing in other colors.
Files