Home
Home

 Artists
 Search
 Recent
 Random
 Posts
Posts
 DMs
DMs
 Tags
Tags
 Random
 Importer
 Import
 FAQ
FAQ
 Account
 Register
 Favorites
 Login
Login

Beginning Clothing Customization Part 1 (Patreon)
Content
This is cool a update. So basically, I've always been fond of offloading work from myself to the community since I am for the most part a one man team developing this game. So for clothing customization, I will allow you guys to customize the textures of existing pieces of clothing (and more). This is the showcase of the completed tech:
The system borrows from Japanese "doll house" style games where you can customize a character and save that character's settings (hair/eye color etc.) into a card (a png image). You can then share that png image on the internet and have people download and load the image into the game which will unpack the saved character's settings. The difference in my system is that my cards will store large amounts of information such as entire textures. For example:

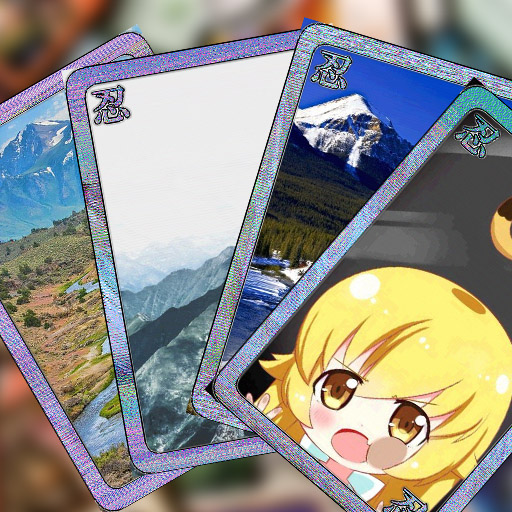
You may download an image like on the left and when it is read by my Unity game, it will unpack a hidden embedded image from the pixel information. The tech is complete and currently 1 card (a simple 512x768 png) will store a hidden 512x512 image within! This is what a card looks like:

If you were to load the image above into my game you will get this exact image:

How it works is a bit tricky to explain if you don't know much about images. A png image is composed of pixels. RGB. Red Green Blue. Each color channel is 8 bits long (1 byte long). Like so:

If we were to trim away the last 2 bits of each color channel, we would get the same image RGB but with 6 bits for each channel (666). Meaning we lost 2 bits of color information for each channel. This translates to 4/256 or 1.5625% color accuracy loss. This is hard to detect by our eyes in most circumstances so we can safely say that we can ignore those 2 bits. Therefore, I can use those bits to store any information. And that's what I did. Using the mountain landscape example, the mountain image's lower 2 bits were repurposed to store the Shinobu image.
This is great and all but it turns out that this trick is not enough to store a 512x512 image. So I used the border to pack the rest of the image data (6 bits as well to reduce usage).

This is why the border looks glitchy and noisy, it's the result of being used to store pure data. So basically, every single pixel whether it be the border of the card or the actual center of the card, is being used to pack hidden information.
The whole purpose of using steganography (concealing data in data), is that the card will serve as a preview of the clothing piece as well as the actual data itself. This is incredibly powerful because it will make sharing cards extremely easy. I will open up Discord channels dedicated purely to share cards amongst the community. An even cooler thing is that this tech can be extended to store anything. I can pack 0.59MB of lossless data. I could pack 3D models if I wanted to! Sharing 3D custom models would be pretty freaking epic but let's get there one step at a time.
In the full release for v0.5, the cards will have actual rendered images of Shinobu wearing the clothing piece (instead of mountain landscapes, that was just for demonstration purposes). So you can easily see what a clothing piece looks like in-game.
This leads me to the next part of the clothing customization, the menu. It is still a work in progress but it looks like this right now:

Currently it scans my "Deck" folder next to my game's executable for all png images that might be clothing cards. I will make it even easier soon and allow the user to simply drag and drop images onto the game's window.
The menu will be part of the wardrobe itself and appear whenever the user opens the wardrobe. It will be glued to one of the wardrobe doors:

Oh right the wardrobe was given a facelift. It is no longer an ugly brown wood color:

Door handling has also been improved and will no longer be glitchy (like in Beta v0.5b).

So right now I will continue to work on the menu system for clothing. All of the functions for it have been completed such as loading cards and even exporting cards given 2 images as an input. It just needs an interface.
On a final note, I can't believe I've gained 20 patrons in almost less than a week. Thank you for finding this place and I hope you enjoy the development blog. I typically post once every 4 days (minus holidays), and work about 25 hours a week on this game. It is my hobby, my baby, and a result of my professional life as a technical artist leading me into the VR industry.
Stay tuned.
Files