Home
Home

 Artists
 Search
 Recent
 Random
 Posts
Posts
 DMs
DMs
 Tags
Tags
 Random
 Importer
 Import
 FAQ
FAQ
 Account
 Register
 Favorites
 Login
Login

"Nana" Process (Patreon)
Content
I was a little all over the place with this one, so bear with me!
A reminder that if you find yourself confused or want more in-depth explanations of each step, I have standalone posts that explain my techniques and list my tools: I have a lineart post, a coloring post, and a finishing touches post.
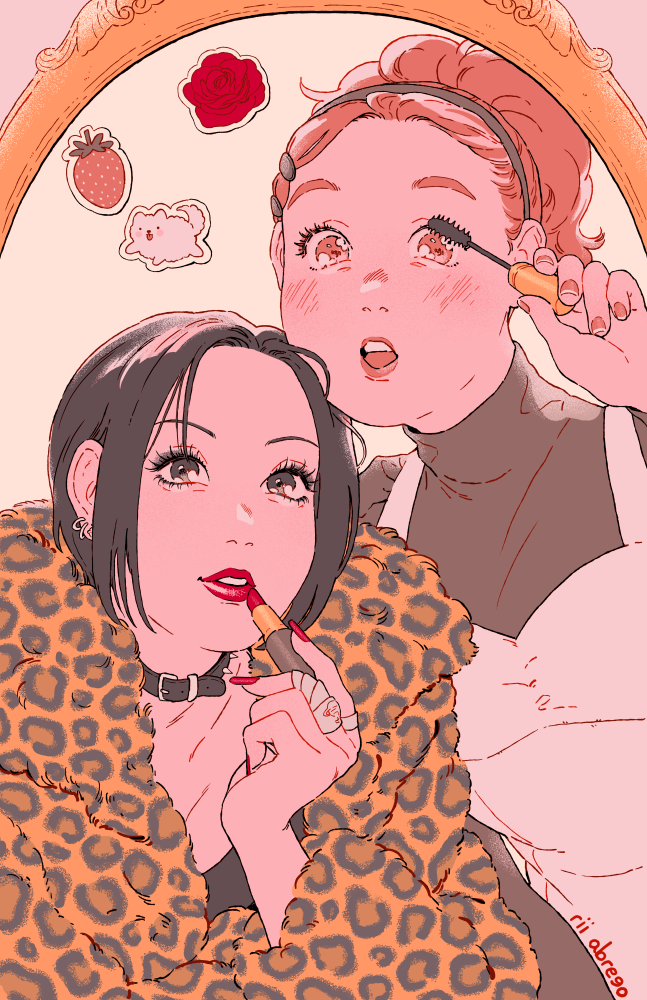
1) The thumbnail, which was drawn in Paint Tool SAI using the airbrush tool. Usually when I plan out a fanart print I try my best to avoid portraits - I like to try to building an image that encapsulates my biggest takeaways from the series as a whole. But with Nana, my biggest impression of the series comes from the relationship between Nana and Hachi and how real and in-the-moment it feels, so I made an exception. I was partially inspired by the shot in the opening that shows their eyes opening together - I like that you can tell which eye is which by the style of makeup they're wearing, so I wanted to try a makeup-inspired image. Their makeup reflects their own personal tastes, which couldn't be more different, but the act of putting it on together in front of a single small mirror is sort of intimate. I wanted to try capturing all of that.
2) Using the airbrush on a new layer, I sketch out a cleaner version that helps nail down their poses and expressions a bit more. At this point I also wade through a few different official images to decide what outfits I want them to wear.
3) ...but I end up making some changes! Even though I thought Hachi's face was cute, the whole thing felt a little too staged. I changed it up a little so that it can either be seen as Hachi talking while Nana listens, or Hachi doing that face people do when they're putting on mascara. In general, something that felt a little more spontaneous and a little less poised.
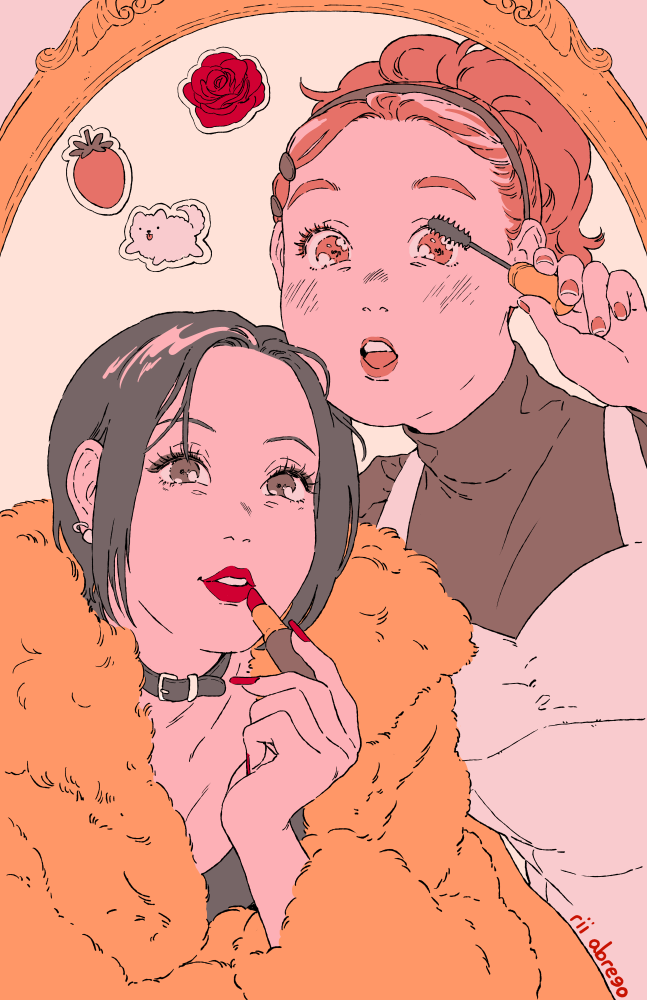
4) I follow the sketch pretty closely during the lineart stage, so I don't have much to add here!
5) Switching to Clip Studio, I flat the image. I try to keep the palette pretty minimal, and I try to balance where each color appears. I want it to have a sort of vintage appeal. At first I had all of the black in the image done in the same hue, but it felt a little *too* flat, and it was harder to tell where each character began and ended, so I gave Nana a cooler hue.
6) Once I have the colors down, I realize I want to make a few minor adjustments to Nana's face that feel a little off. I also add in her ring and color Hachi's arm (which I missed previously)
7) I color a majority of the lines by locking the layer's opacity and start doing some minor highlighting and rendering elsewhere. As usual, I use Clip Studio's "Tone Scraping" a lot at this point. Also, in case it's useful, here's the range of colors I use for the lineart:

8) I finally take on Nana's coat, which also uses the tone scraping brush a lot! I consider coloring it more realistically, but in the end I kind of like the way it looks when I draw in the pattern flatly. It feels a little more graphic. It's hard to see, but I also paint some dark reds under the lines to help them stand out a little more since they were starting to get lost.
9) The image was starting to feel a little dull, so I use Clip Studio's fill tool with "follow adjacent pixel" turned off to replace a few colors - I darken some of the darks and brighten some of the brights. From there I use my usual G pen to make a few manual adjustments.
10) I add a little detail to Nana's hair, which was starting to feel too flat.
11) Some more minor adjustments - a lot of airbrushing with tone scraping to soften the light in the image, some more definition added to the lines in Nana's coat, and some more line color adjustment on Hachi's face.
12) One of those weird finishing touches I like to do - I duplicate the lineart layer, lock its opacity, color it red, slip it beneath the main lineart layer, and then scoot it down and to the right by a pixel or so.
13) Some final line coloring, this time around the edges of the figures. You can see it most easily on Hachi's hair.
14) ...but I'm still not happy haha! Something about Nana's face still bothers me - it doesn't have as much life as Hachi's, it doesn't feel like Nana, etc, so I pull up a bunch of reference images and start adjusting things. I thin and reshape her eyebrows, smooth out her eyeshadow, lengthen her eyelashes, add a little more shine, and change the shape of her lips. While I'm at it I also adjust a few strands of her hair, add the spikes to her collar, and edit her earrings. At this point I feel like I finally have it!
15) A better look at the final lineart colors.
16-17) Some closeups!
And that's it! If you have any additional questions, please feel free to ask them below!
Files