Home
Home

 Artists
 Search
 Recent
 Random
 Posts
Posts
 DMs
DMs
 Tags
Tags
 Random
 Importer
 Import
 FAQ
FAQ
 Account
 Register
 Favorites
 Login
Login

Car Wash - Process (Patreon)
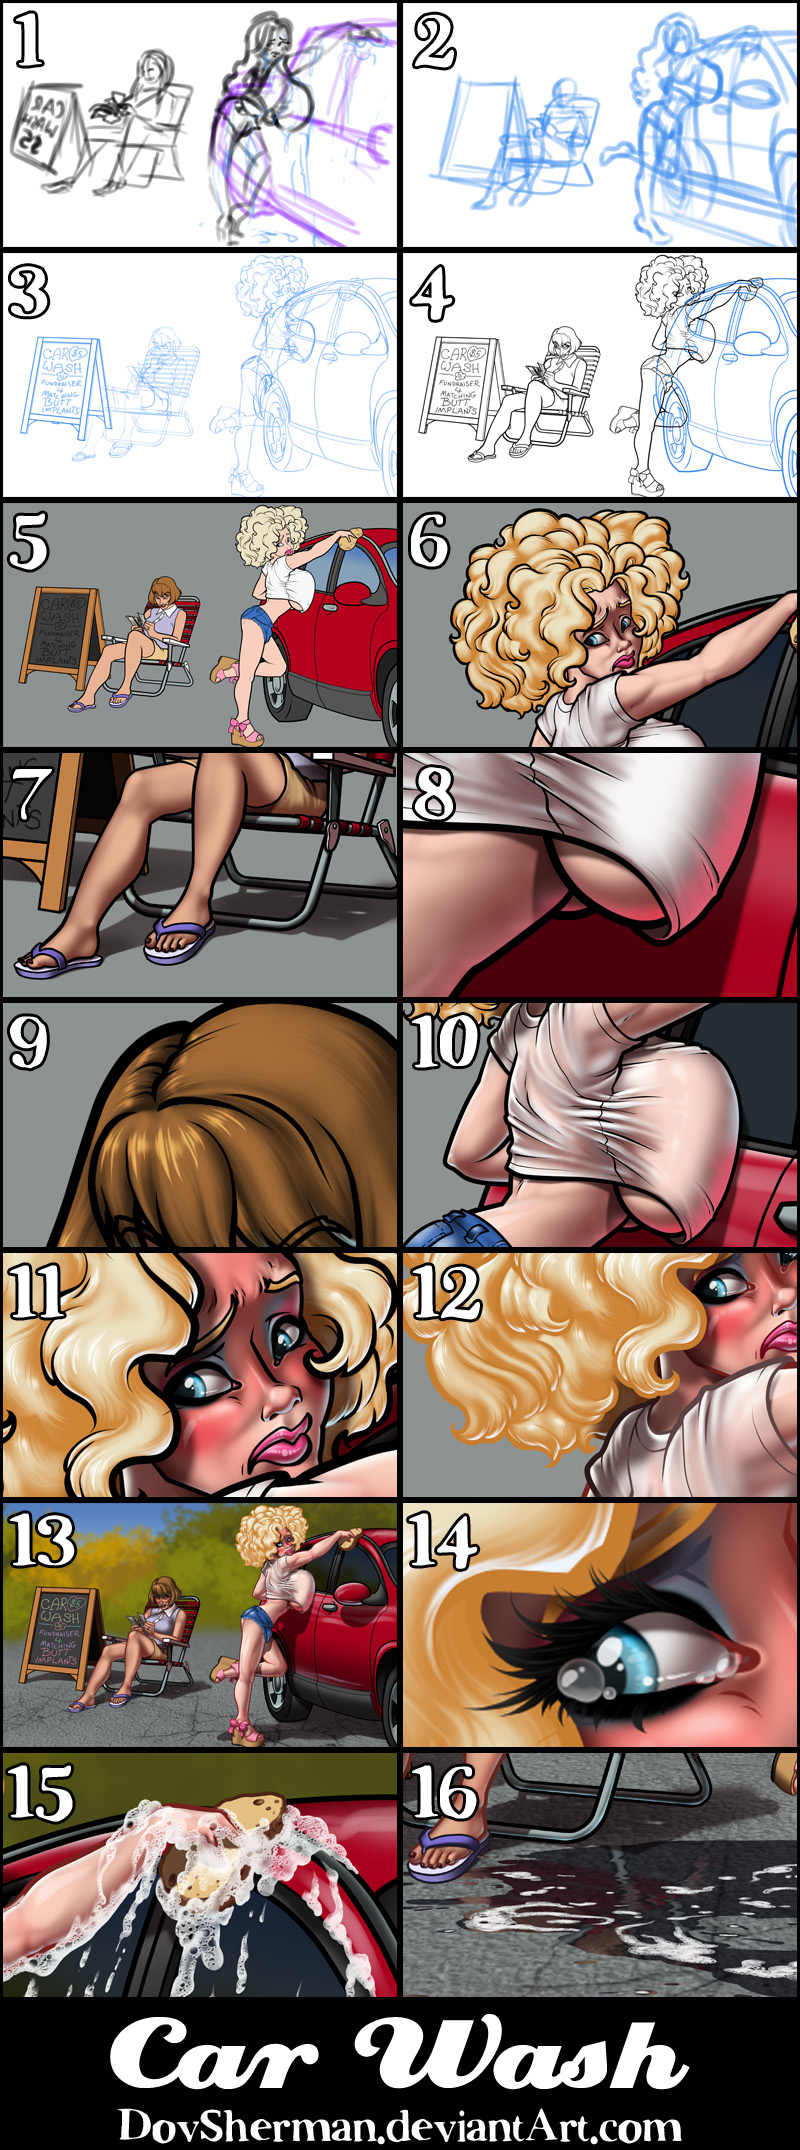
Content
2. Next, a more formal sketch to work out the layout, pose, and proportions. I used perspective rulers for the chair and vehicle.
3. Final sketch. I sketch the characters in full detail.
4. Inking. I use a variable-width inking brush for the character and a constant-width brush for hard things on vector layers. I use lots of different layers for different parts, which makes it easier to overdraw and erase as needed. I also went ahead and inked the shape for the eyelashes because the brush stablization in Manga Studio makes it a lot easier than doing it in Photoshop later.
5. In Photoshop, I convert the imported lines to a folder with a mask and put a solid black layer in the folder. (CTRL-click RGB in the Channels tab, invert the selection, create a mask from the selection.) This will come in handy later when I color the linework. Then I create another folder and start creating the basic color blocking. I like to do all my color blocking by making a folder and then filling it with different solid color layers for each section of color, whch makes it easy to change a color later. This is a very fussy way to do it and it's probably much simpler to just fill a single raster layer with flat colors.
6. Form shading. I create a dark brown solid color layer (linear burn) and start painting in the basic form shading with a soft airbrush. I always start with shading at full and then use the airbush to paint away the shading, painting with light. For the hair, I used color burn for richer shading and start with a general, soft airbrush for the overall shape, then used a variable-width soft airbrush to smudge detail into the shadows, picking up the shape of the hairs.
7. Cast shadows. I make a new brown layer set to multiply and start painting in the cast shadows with soft brush, using a smaller brush in places where the object casting the shadow is closer to the thing the shadow is on.
8. Backlight. I used a desaturate solid color layers (screen blend mode) painted with a soft airbrush. When I combine it with the form shading, backlighting really makes the characters pop. I don't use any backlight on non-reflective objects.
9. Shiny. I used a solid white layer for the primary shine and painted spots and streaks using a hard variable-width brush. After painting all the shine, I use the cast shadow layer to make a selection and delete the shine from anywhere covered by shadow. For the shine on the hair, I started with thin strokes with a variable-width brush, then use a smude tool to add detail and softness to the tips, then use an airbrush to add a soft glow to groups of streaks, then use an airbrush to fade the tops and bottoms of streak groups, and finally use a soft round brush to erase a few streaks in the middle of each group.
10. Wet T-shirt. Giving the t-shirt a wet look is mainly about letting the color of the skin show faintly through in places where it touches the skin directly. I made a copy of the t-shirt color layer, changed it's color to match the skin, then carefully painted out the places where the skin does not does the material and around the outside edges where the curve of the body is more perpendicular to the camera angle. Then I lowered the opacity to 80% so that the skin would only be showing partially through the shirt since it's just wet, not torn open.
11. For the blush, I add in a light red layer, airbrushing just on the same area as the skin for the cheeks and places where bone is near the surface of the skin. I use the same approach for the make-up.
12. Colored linework. Going back to the linework folder, I started adding new solid color layers, using the mask to paint the color of the linework. Since the new layers are inside a folder with a mask defining the linework, I don't have to be very precise when coloring the lines. I always add new color layers below the ones I already did so that I can be sloppy in the areas that are already covered by colored linework. I like to keep using black lines on the hardest objects to give it a contrast with softer objects.
13. I added a simple backdrop using a flat gray for the pavement and blobbing some bushes in several matching colors with my branch brush (which is a simple scatter brush I made which looks like three branches pointing out from the center of the brush). I added some asphalt and cracked pavement texture to the ground, using distortion to match the perspective. Then I blurred the whole backdrop from just past the characters but blurring everything but keeping an unblurred copy of the pavement and masking it with a gradient so that the unblurred version appears in front.
14. Eyelashes are done with a folder containing a solid grey layer and a solid black layer. Using the lashes I made earlier with a variable width brush, I add a few thin streaks on the grey layer mask to add depth to the lashes and soften the look with a few strokes of a soft airbrush. For the sweat and tears, I used a white layer with the fill turned down just a little and add a layer effect with white inner glow set to 100%, a bevel effect set so that the highlight as on the bottom, and a subtle drop shadow. Then I use the mask to soften the edge where it touches the skin. After, I add a new white layer to paint in the shiny highlights.
14. I added a nearly transparent white layer to the glass of the mirror, then added some faint white streaks for shine. I also added fainter white shine streaks to the screen of the phone.
15. Soapy suds. This part was tricky. I made a folder for the suds and put a white layer inside it. I added a cloudy texture to the white layer. Then I set the folder to screen blending mode and used a mask on the folder to paint in the overall shape of the suds. Then I used a simple round circle scatter brush with variable size on a black layer in the folder (above the white layer), to make lots of little holes. Because the folder is set to screen, the black dots make holes instead of black dots. I added a layer effect to the black dots layer, added a white outer glow and a bevel with a white highlight and the shading set to zero. Now the black dots look like little bubbles in the white layer. I adjusted the brush to make give it variable roundness, based on pen presuure, and rotating to match the pen direction. Then I added more or this skinny black dots around the edges so it would look like shallow bubbles seen at an angle, giving the suds more sense of form. Then I added a new white layer on top of the dots and airbrushed in around the bottoms and middles of suds to give it thickness.
16. Puddles. For the puddle, I made a new layer and roughed in a puddle shape, drew some soft white wiggly lines on it. I also made some more suds to lie in the puddle. Then distorted the puddle and suds to match the perspective of the ground. Then I saved out the puddle by itself to a PSD, then changed the puddle to a dark desaturate blue and made it partially transparent and set to multiply on the pavement. Then I took copies of the characters and vehicle, flipped, cut, and distorted them to work as reflections, painting in a rough approximation of the underside of the chair and vehicle. I bluured the reflection so that the mismatches won't show, then applied my saved PSD as a displacement map, giving the reflection a rippled look. I them masked the reflection to the shape of the puddle and turned down the opacity.
Files