Home
Home

 Artists
 Search
 Recent
 Random
 Posts
Posts
 DMs
DMs
 Tags
Tags
 Random
 Importer
 Import
 FAQ
FAQ
 Account
 Register
 Favorites
 Login
Login

Momiji WIP4 (Patreon)
Content
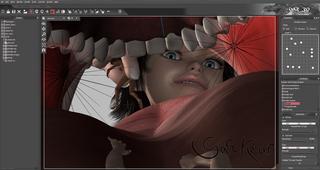
This is the part where it gets a little tricky, setting up lights and preparing for rendering. The preview window in DAZ Studio isn't entirely accurate; for an easy example, that bright red on the right is preview-only, the actual render comes out almost completely dark. Preview lights don't account for shadows cast by other objects, so that's something else to factor in; it's not going to be as well-lit in the render as it is in the preview. And things like specular (shiny stuff), bump and displacement maps (bumpy stuff)... those are all in the material settings, so they don't show up in the preview either!
The workflow I've settled on is not to try and make everything perfect for one big render, but rather to do multiple passes and then start to stitch them all together in Photoshop afterwards. This view for example is with a setup of UberEnvironment lights (a slightly more advanced lighting set for DS), but I also like how the default lighting tends to look, so I'll go back and do a render with that set as well. The lights in this one are coming primarily from behind Yuumi's head, but since that makes her face look pretty dark, I'll do some extra renders with the lights flipped around and tweaked, too. And finally, there's going to be a (simple) backdrop, which I'll do in a separate render; usually I'd do that first, so I can set it as a scene background to ensure any anti-aliasing has the correct colors, but for this picture I'm going to wash a lot of it out with white anyway, so it's not a big deal.
There's a few renders that still need to go, but we're almost there! I'm starting another one right now - the third with UberEnvironment set up - and from there it's going to be one or two with default settings before I finish up with a different angle for Yuumi.
Files