Home
Home

 Artists
 Search
 Recent
 Random
 Posts
Posts
 DMs
DMs
 Tags
Tags
 Random
 Importer
 Import
 FAQ
FAQ
 Account
 Register
 Favorites
 Login
Login

Dev Deep Dive 03: Character Art Pipeline, Part 2 (Patreon)
Content
Retopology & UV
Tools: Topogun, Maya
The first step in getting a character ready for animation and ingame rendering is to create a low polygon version of the high poly model. This is the first step in the character pipeline that is primarily technical instead of artistic. Mesh topology is also an art, but it is a craft created out of a technical necessity. Topology is too model-specific and technical to talk about here in detail, but the basic goal of good mesh topology is to create a wireframe that allows the mesh to deform in a convincing manner when animated. Amelia’s high polygon sculpt is around 100 million polygons - way too much data to render and animate. For most of the retopology work for Amelia, topogun was used to create topology for one side of the model. Topogun’s built-in symmetry features are kind of terrible so Maya mirroring was used after the topology is finalized.

After retopology and mirroring is done, Maya is used to create UV maps for the model. It is also at this point that the material IDs and UV spaces are figured out. There’s nothing special about the UV techniques used. Most of the work is also now moving into Maya, and the primary workspace is now in Maya instead of Zbrush.
Next, the low poly model is re-imported into ZBrush and the detail from the previous high polygon sculpts is reprojected into higher subdivision levels for the new, remeshed model. This is to allow changes in the sculpt to propagate to the new low poly model easily, since the lowest subD is now the new low poly. If there are any changes in the vertex positions after reprojection, the new low poly is exported from Zbrush into the working scene in Maya.

Materials
Tools: Substance Painter, Marmoset Toolbag 3, Photoshop, Maya
The first part in authoring the materials for a character with this pipeline is to bake the information from the high poly model onto the low poly model. I prefer using Marmoset Toolbag 3 for this, though it can be done with a lot of tools. The baked maps provide a basis for creating the textures in Substance Painter.


Materials for Mahou Arms are physically-based, which means that the data being fed to the renderer itself are based on real life physical values. To best create texture maps for a physically based renderer, a tool like Substance Painter is used since the way these different texture maps interact with each other can be previewed in realtime, which authoring separate maps in Photoshop one at a time doesn’t allow. In a physically based renderer, it’s important to be able to preview how different texture maps interact with each other and the lighting in the scene. Painter also allows certain details like edge wear and dirt to be procedurally driven, which saves a lot of time and allows the textures to be created independent of texture resolution somewhat. Even with Substance Painter’s physically based viewport, there are slight differences in how Unreal and Painter render the same textures, so the texture is constantly re-exported into unreal to test how it looks in engine.

Eye Shading
Some special tricks were used to render eyes. Nothing makes a character fall apart faster than badly rendered eyes, so MA uses a couple eye rendering tricks used in modern AAA games.
Iris concavity:
Irises for actual eyes are flat or slightly concave while the clear cornea above them is convex. To simulate this, the diffuse texture for the eyes uses parallax occlusion mapping to simulate concavity, but the rest of the maps are kept as normal so that the specular follows the geometry of the cornea. This rendering is a simplified approximation; in actual eyes, the cornea would also distort the iris a little when viewed through the edges of the eyeball, and the iris would receive lighting, which simply distorting the diffuse texture with POM does not allow. There is also a corneal bulge in real eyes that isn’t represented.


Ambient Occlusion, waterline
A mesh was also placed above the eyeball to simulate the waterline on the edge of the eyelids, and another mesh was placed above that to add ambient occlusion where the eyes meet the edges of the eyelids. The waterline can be very subtle but the ambient occlusion is not. This occlusion is very important.

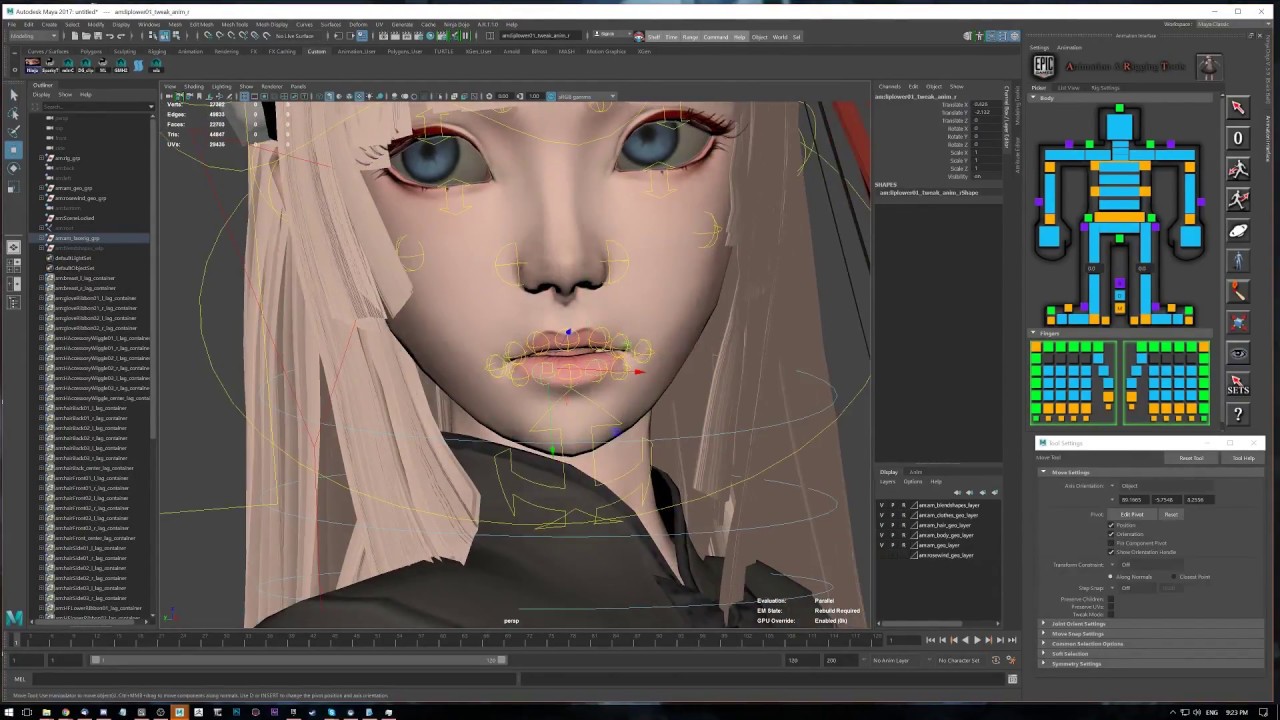
Rigging
Tools: Maya
The final step before animation is rigging, which sets up a skeleton that drives the mesh and animation controls to control that skeleton. This step can go on forever in its own DDD, so I will summarize it briefly.
A.R.T. is used for the base rig for humanoids in MA. Additional rigging for things like hair, faces, and genitals are done manually after the base rig is done with A.R.T.. The face rig is a combination of joints and blendshapes based on FACS. FACS blendshapes were sculpted in zbrush. Corrective blendshapes were authored in Maya using SHAPES, though SHAPES's built-in shape driver wasn't used.

A demo of the rig being used for a pose is attached to the top of this post.
That’s the summarized pipeline for Mahou Arms’s character art. There are a ton of parts that this deep dive could have gone on in nearly endless depth, but then this would end up being 200,000 words instead of 2500. I hope that was useful, and feel free to let me know in the comments if you have any questions. Thank you!