Home
Home

 Artists
 Search
 Recent
 Random
 Posts
Posts
 DMs
DMs
 Tags
Tags
 Random
 Importer
 Import
 FAQ
FAQ
 Account
 Register
 Favorites
 Login
Login

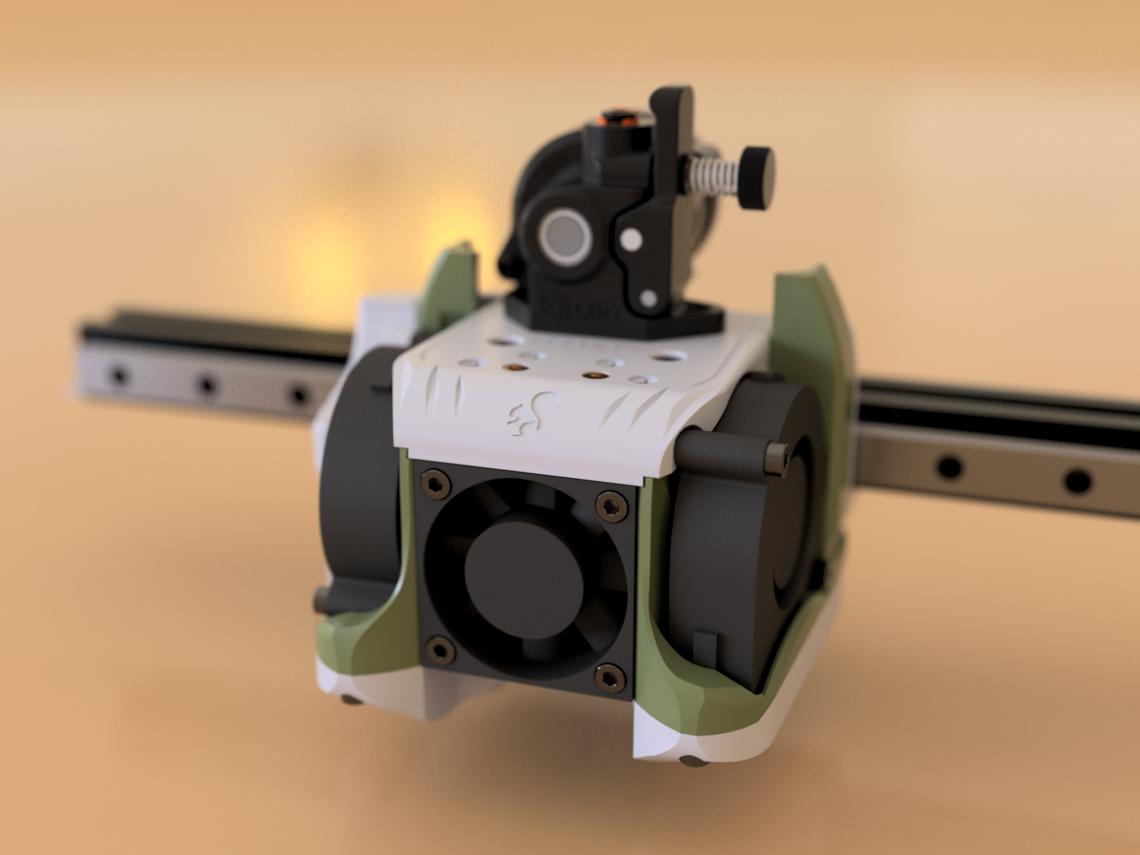
Apollo on rail - installation (Patreon)
Content
Download : HERE (store page)
On ender3 series you'll need a MGN12H 300mm, on ender3max (and I believe CR10) series you'll need a 400mm rail. Linear rails will need m3x8 and m3 t-nuts for 2020 profile

The X endstop will need to be relocated, you'll find the files in the Apollo zip (the current file works perfectly well, but will be reworking it soon to make side accessories work well on both rail and wheel setup )
I also made a X tensioner (totally optional, stock will still give you full printable surface on X) that allows the toolhead to moves further toward the right outside the bed area, for a larger probing surface when using a side probe, or for the klack probe,
On Y you might lose a bit of printable surface (since the hotend is moved further out), to gain in back use my Y Axis upgrade setup: HERE (store page)
Most screws are M3x8, with a few M3x6m and a few longer ones (M3x25, M3x18, M3x16 depending on setup), but also you'll need four m3x10 (to mount it to the linear rail)
Random note about overhangs and a slicer setting, I noticed that changing the wall order setting in your slicer can greatly improve prints and overhang, night and day difference.
Default is usually outer/inner, but instead change it to inner/outer/inner. you will get great overhang, because the overhanging outer wall can now bind to the wall beside it, instead of having nothing to hang on by default and you will also get better dimensional accuracy.
I did build the Apollo so that even a printer with bad dimensional accuracy can print it without issues.
Heat inserts: M3 x 4mm length x 4.6mm Outer Diameter OR 5mm Outer Diameter
Part list and print settings:
Main body (you can use the Universal or Extralock version, extra lock is what you will see on the renders as it was an evolution of the linear rail model of the Apollo to solidify the Apollo fully. However for the universal main body I have made an upgrade path resulting in the same thing, called "ExtraLock upgrade", which are two little angle brackets that secures to the back of the ducts, I don't think it's in all the Apollo zip yet, but eventually will be )
Print setting: 4+ perimeter walls and 20%+ infill - only place you might want support is inside the front fan opening (I don't usually do it, as any small defect is easily fixed or just hidden)
Material: anything, even PLABackplate one that fits your extruder, if going Bowden select the orbiter 2 back motor or sherpa mini. you will find an adapter plate to connect the Bowden tube
Print setting: 6+ perimeter walls and 30%+ infill, no print support needed
Material: PLA+ is fine, and in some cases may actually be better than some overly flexible PETG (depends on the brand, ), but I've done both PLA+ and PTEG without issues. A higher temp resistant material that is also rigid is most appropriate, but ABS and ASA have toxic fumes so they need a filtered enclosure or room ventilation (I've never printed with those)Ducts (found in the common_accessories subfolder ) : you will find many different type of ducts among the files, (most hotend will use the baseline ducts, or UHF ducts for volcano height), they are hard to compare but have all been tested and give good cooling and all should work with most hotends. In doubt just go with the ApolloOG duct, they are a small variation of the original ducts and fit all hotends.
Print setting: 4+ perimeter walls and 20%+ infill, no print support needed
Material: PETG or better, but they are easy to swap so PLA+ is fine and will last months without issue (assuming the hotend has a silicon sock)Beltholder + backbrace: you'll find those in the common_accessories subfolder -> linear rail upgrade.
Print setting: 6+ perimeter walls and 30%+ infill, no print support needed
Material: PETG or better (PLA is too brittle under stress)Any extra accessories needed, like probe mount, bowden mount, led mount, camera mount found in the common_accessories subfolder.
Print setting: 3+ perimeter walls and 15%+ infill, no print support needed (unless very clearly specified, very rare)
Material: if close to the hotend, PETG or better, otherwise PLA is fineYou will also find Printer mods subfolder, but first check the store page for the most recent version of those mods, as the one in the apollo zip may be a bit outdated.
No print support needed (unless very clearly specified, very rare)
Material: I tend to print those in PETG, but PLA is fine too (except no PLA if touching/hoding a motor)
NOTE: You will find a FanMod variation of the main body along with specific FanMod ducts to work with it. This is the setup I use, the right fan is modded to have a larger opening, but not sure how improved the cooling really is. However it's fun just to swap fan covers (non destructive mod) with printed ones, you can also just swap the fan cover without using the FanMod, just print two of the left fan cover ( they are a 1 to 1 replacement )
You will also find a Superfan and Ultrafan version of the main body, those are not ready for use yet, meant to be used with the drone based printed blower fans I made (you can find those in the store page). I have yet to make ducts for them, but if you want to try them, do let me know and I'll make ducts asap, will also be make a enclosure for the buck converts and ESC needed to run those motors. You can still use those drone motor based printed fan with the normal Apollo body and it just wont' be a symmetrical setup.

----
Installation:


Side note: that larger recessed rectangle area is a place to hide the nozzle camera PCB behind the side fan.


Depending on the type of ADXL345 you might need to use the other heat insert holes instead.


you will only find those on rear mounted hotend setup. Make sure the heat inserts are pushed further back so that the adjacent screw head can be inserted fully. If your soldering iron is too big, heat them up first, and then press them it with a long screw.

Normal, direct to linear rail block mount:

Below is a special case for Hermit Crab only, not a setup I have tested. This was meant for the v1, but I assume the V2 is backward compatible with V1 mount,
Since we are on the topic of other backplates, the Apollo also supports the Whabmam "Universal X Gantry Plate Linear Rail Kit", this was done by request, and allows a top mounted rail, you do lose the extra lock setup and requires the universal main body. — The four outer holes you see on the sides is for that setup. I have not tried it.

Those are meant for the Beacon3d standard model or cartographer3d also standard model.
Those same mounting point are also used for the ExtraLock upgrade when the universal main body was printed instead of of the extra lock version of the main body.


if your want to save some heat inserts, you only need two of those in the back, wherever the belt will be going through, the backtrace is important as overtime without it, this belt holder can start stretching out.

I rarely secure the optional one, but they are there.


You can secure the belt at the very end of the install or do it now, the belt can be mounted like the stock ender plate was, there are two slots depending on the belt length you have (on my ender3v2, I have them on the inner slots unlike the render below). You can keep using the stock belt (I do). If you did change belt and don't have the crimped ends, I have a more recent version of the belt holder in the zip where you can thread the belt through teethed slots (picture in that folder), have not tested it myself.


On some hotend (Dragonfly BMS, V6, etc), you might need to remove the little ptfe clip on top, along with the second piece that goes with it (keep those as they are handy for other little projects, like reverse Bowden and such)

Some top mounted hotend may have an additional printed mounting part, like the dragon, dragonfly BMO.
Taller hotend like Rapido dragon UHF (without the extender nut), etc, won't need that middle printed piece so that the nozzle height ends up at the same level as normal hotends.
Those little M2.5x8 screws sometime unscrew themselves over time (matter of months), (or could be that my noctua fan isn't fully adequate), so make sure they are quite tight, you can just try and wiggle the hotend to check, and anytime you have the opportunity to recheck those screws do it.


You can also use a 40x10mm fan, with a spacer (included in the files) or without spacer (in that case you can use M3x14~M3x16 screws)


Extra lock can be done later, you can run the machine without those screws, to make sure everything is good.


Side note: This is what the ExtraLock upgrade looks like when using the universal main body(the two red pieces)

You need a PTFE tube between the extruder and hotend that is as close to the exact length needed, to avoid the filament forming a bow or catching an edge when loading it (if you trimmed it too much by 0.2mm or so that shouldn't be an issue )


The ADXL345 can be left there or installed/removed as needed, it's not meant to be wired all the time anyway. the XYZ orientation doesn't have to match the silkscreen, only important part is that each one is aligned with an axis.


Files