 Home
Home

 Artists
 Search
 Recent
 Random
 Posts
Posts
 DMs
DMs
 Tags
Tags
 Random
 Importer
 Import
 FAQ
FAQ
 Account
 Register
 Favorites
 Login
Login

How I make the most of my Ender 3 V2 (Patreon)
Content
Writing this in 2023, there are many new printers newcomers can choose to start off with. I still think that the Ender 3 is one of the cheapest and effective ways to introduce a someone into the 3D printing hobby, namely because of the care they will have to put into it. I wrote this guide to put down into words exactly how I configure and standardize my Ender 3 V2's to share with those who ask me about printing as an entry point.
The Creality Ender 3 series initially is an affordable and reliable printer to get into the hobby for about 300.00$ USD back in 2019 or so, but Micro Center as of recently has been offering new-customer promos for 100$ Ender 3 Pro's, and more recently 100$ Ender 3 V2's. The upgrades that the user will eventually have to do over time as part of maintaining their Ender 3, coupled with the assembly the user will do to put it together make it a great place to start from. If they choose not to pursue the hobby further, they haven't lost any more than 100$ generally.
For my V2's, I follow the steps outlined in this process guide to get them to the same configuration to making slicing, print farming, and troubleshooting easy. Each section has a link or simplified steps in its own discrete how-to for you to follow where needed.
This process guide / playbook is an overall guide that focuses on the Ender 3 V2, where you can get one for cheap from Micro Center, and how you can immediately upgrade with quality-of-life enhancements it out the box with mriscoc's "Professional Firmware". I'll also mention some upgrades if you want to maintain a bowden tube set up, or go with something a little more advanced (but easy to install and use) with a new direct-drive offering from Micro Swiss.

Micro Center has a new customer promo for a 100$ Ender 3 V2 for new customers, in store.
Getting an Ender 3 V2
Ender 3 V2's are relatively affordable, ranging from 100$ to 300$. As previously mentioned, you have a few options:
(A heads up- I may receive a small commission from some of the links below. Please consider using them to support my content if you enjoy it!)
- Micro Center's First-Time Customer Promotion (100$): https://www.microcenter.com/site/content/specialoffer3dprinter2g2.aspx
- Amazon - Ender 3 V2 (195$ with coupon) https://amzn.to/46dANHY
- Amazon - Ender 3 V2 Neo (250$) https://amzn.to/3rhQcbw
Choose this if you want these upgrades out the box, or choose not to use the Micro Swiss NG:
- All-Metal Extruder
- CR-Touch (Bed Leveling)
- Flat Coil Bed Springs
In addition, you will need the following basic hardware upgrades used in this guide:
- *All-Metal Extruder (12$) - https://amzn.to/3mBSaPb
- CR/BL-Touch (40$) - https://amzn.to/2Y4rJY9
- *Flat Coil Bed Springs (10$) - https://amzn.to/3J9wm6n
- *Capricorn PTFE Bowden Tubing (13$) - https://amzn.to/3kyggYd
- Filament Sensor (13$) - https://amzn.to/3ZE7Bri
- (if applicable) Swiss Micro NG Direct Drive Extruder (120$) - https://amzn.to/3LMryqz
*If you are getting an all metal extruder, PTFE tubing, AND flat coil bed springs, you can save some money by getting them all in a bundle here for about 20$: https://amzn.to/3PCjJVh
If you are looking to get the Micro Swiss NG Extruder, you'll only need the CR/BL-Touch and the flat coil springs. Note that a Micro Swiss NG will allow you to print TPU as a direct drive extruder, whereas a bowden tube will make it difficult, if not impossible, to do so without jamming and frustration.
When you get your printer, assemble it per the included instructions. Here's a few tips during assembly:
- Be sure you are torqueing down the frame screws appropriately, and connecting the aluminum extrusions on a square and flat surface. (So don't put it together on carpet!)
- Ensure there is no wobble in your bed or x-gantry. You can use the eccentric nuts to ensure a snug, but not overly tight, fit from the gantry to the aluminum extrusion.
- Ensure your belts are appropriately tightened.
Installing your basic hardware upgrades
If you bought an Ender 3 S1, you can skip the most of this section, unless you want to install the filament run-out sensor.
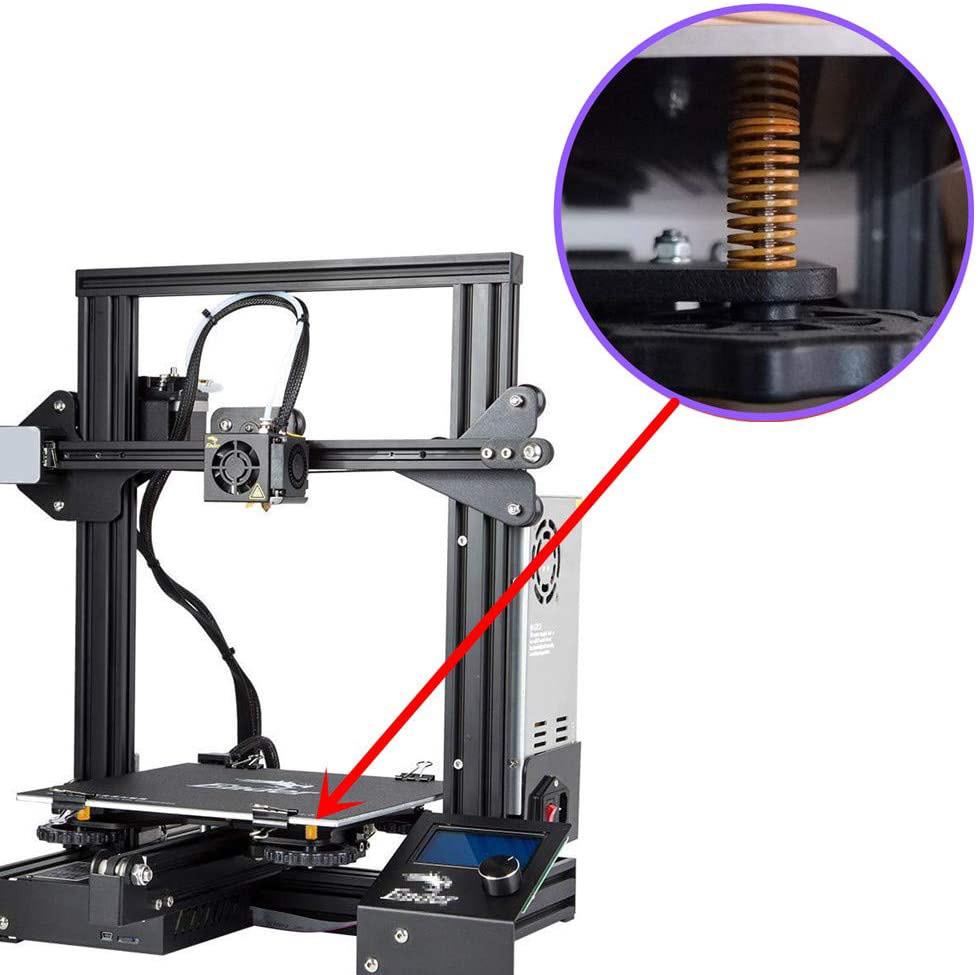
Installing the flat-coil bed springs
The flat-coil bed springs are stiffer and aren't as prone to come loose compared to the standard coil springs. The last thing you need is find your bed level adjusters have fallen off after printing!
These are easy to install. Simply remove the bed level adjusters, lift the heated bed, remove the previous springs, replace with the coil springs, and then tighten down all the way.

Installing the filament runout sensor
The filament sensor does what it says- it detects when your printer no longer has filament going in, so it can pause the print and wait for you to insert more before continuing. This can save your day (and print).
The filament runout sensor package from Creality comes with a replacement gantry mount for attaching to the z-axis rod. You will need to assemble your printer with this replacement mount rather than the one that came with your printer while putting your gantry together. This will require swapping over your hardware, such as the brass screw interface for the z-axis rod, and the extruder too. (When replacing the extruder, refer to the steps below if you already have your all-metal extruder!)
If you choose to use the Micro Swiss Revo NG, you'll have to relocate the filament run-out sensor, but not before we print a bed-leveling sensor first, so keep that in mind. If this is your ultimate goal, you don't have to replace the gantry mount, and can omit installing the sensor until later, as we will print a sensor mount that will sit on top of the printer.

Reference image from Amazon's product page. This isn't actually installed on an Ender 3 per-se, but the parts are compatible.
Installing the all-metal extruder and Capricorn PTFE Bowden tubing
If you intend to use a Micro Swiss Revo, you can skip this section.
An all-metal extruder exists simply for enhanced durability and reliability of feeding your filament. The standard plastic extruder tends to crack, and if not that, then miles of filament passing through tend to literally cut through the brass and plastic.
Replacing the extruder is rather easy. Start with disassembling it.
- Disconnect the bowden tube from the extruder.
- Disassemble the extruder arm, remove the spring, and then the other screws securing the plastic extruder to the motor.
- Align the metal extruder, then secure it against the motor and put the arm and spring back together.
- Remove the old tube from the hot-end, and from the extruder.
- Using the old tube as a reference, use the tube cutter (important as to preserve the flat flush face of the tube) to cut the new tube to the same length as your old one.
- Reattach the bowden tube to the new extruder.

Installing the bed-leveler (BL Touch / CR Touch)
The bed leveler is an essential upgrade in my opinion. While it won't eliminate bed-leveling entirely, it will help address any small rises and valleys in your bed, and mitigate any subtle leveling offsets after tramming. It does this by probing the surface of the bed to discern hills and valleys that may be present.
The bed-leveler requires the mainboard cover to be removed, as you will need to run the bed-leveling harness from the mainboard to the sensor itself.
Installing is simple:
- Remove the cover for the mainboard. (While you are here, take note of what version your board is. It should be printed on the board itself, and be either a 4.2.X number of sorts for the firmware section after this.)
- Attach the larger end of the sensor harness to the mainboard.
- (Optional, but helps with keeping tidy) Snake the smaller end of the harness (that goes to the sensor) through the cable loom all the way to the gantry. Alternatively, just run the cable and zip tie it against the loom if you are looking for a quick solution. Leave a little amount of slack between the harness and loom on the gantry- if it is too taut, it could damage the sensor or cable.
- Attach the sensor to the mount.
- Attach the mount to the gantry.
- Disconnect and remove the z-stop on the printer.
Upgrading to the Professional Firmware
Mriscoc's "Professional Firmware" is an exceptional open-source and free Marlin-based firmware upgrade for the Ender 3 V2. Not only is it more polished and stable than Creality's default offering, it offers handy wizards for bed leveling, mesh building, z-offset tuning, and even PID tuning, and much more.
You can download it here: https://github.com/mriscoc/Ender3V2S1/wiki#versions
Installing it is very easy- for the Ender 3 V2 in my experience, you identify the board version the printer came with (either 4.2.2, 4.2.3, or 4.2.7), shorten the name and place the downloaded .bin file onto your SD card, and start the printer. After a small wait, it will be ready to go.
Select the firmware with bed-leveling support (BL Touch or CR Touch) for your board version. In my case, I downloaded "Ender3V2-422-BLTUBL-MPC-20230904.bin".
Configuring and calibrating the printer
After installing the Professional firmware and the upgrades (if applicable), the printer will need to be configured. This will include leveling/tramming the bed, building an auto-bed-leveling mesh, finding the perfect z-offset, and enabling the filament sensor.
Leveling/tramming the bed
This is critical and essential to ensuring you have successful prints. Leveling the bed is easy thanks to the Professional firmware's wizard. Simply heat your bed to 60 degrees Celsius, and select the bed leveling wizard on the main screen.
Why heat the bed for this? Heat causes material to expand and warp ever so slightly. If you level your bed while it is cool, it might not be at the same height when heated for your prints.
You will need a piece of paper for this. Ideally, for each point on the bed, you want to be feel a slight amount of resistance tugging the paper back and forth between the nozzle and the bed. Repeat the wizard until it tells you that everything is within tolerance.
More information on the Bed Tramming Wizard can be found on the Professional Firmware wiki.
Building an bed-leveling mesh
After your bed is trammed, we'll use the BL Touch / CR Touch sensor to build a mesh of the bed. With the bed still heated, select the "Auto Build Mesh" option on the main menu, and let it complete the process. When it is done, select "Save", and cooldown your bed.
This is a rather quick and hands-free automated process.
More information on Mesh Leveling can be found on the Professional Firmware wiki.
Finding the right z-offset
Now that we've leveled the bed and built a mesh, we must tell the printer at what height to begin printing initially. The bed leveling sensor only detects a range of distance relatively speaking to that particular sensor- although it may know how far the bed is and the hills and valleys across it, it doesn’t necessarily know how far away to start the nozzle from.
Start this process after you have leveled your bed and built your mesh:
- Select "Z-Probe Wizard" on the main menu.
- Select "Auto Home"
- Select "Move Z to home".
- Using the piece of paper from earlier, adjust the Probe Z Offset up or down until you feel a slight amount of resistance tugging the paper back and forth between the nozzle and the bed
- Select "Back" and you should see a message that your settings have saved.
Configure the filament sensor
Since we are using Creality's physical-switch run-out sensor, we have to configure the firmware to not only use it, but use it correctly.
This is easy, but important:
- Go to the Filament Settings Menu
- Select "Enable Runout"
- Set "Runout Active" to "LOW".
What does HIGH or LOW mean? In electrical engineering terms, high and low mean whether a discrete or input has current through it or not. Think of it as "1" for on, and "0" for off. In the case of this filament sensor, the sensor we are using has the switch depressed, which will send a signal (high) which per the design of the sensor means there is filament inserted. When the filament is no longer present, the sensor sends nothing (low). As such, we set the "Runout Active" state to detect a LOW.
You can check the end-stop diagnostic page to confirm your Runout Active settings by going to Advanced -> End-Stop Diagnostics. If the filament end-stop is TRIGGERED with filament inserted, then you did the set up correctly.
More information on the Filament Settings menu can be found on the Professional Firmware wiki.

Configuring Cura
After you install the upgrades above, there is one change that needs to be made to your printer's prepended GCODE- namely to tell the printer to use the mesh that is stored on the EPPROM with the inclusion of the M420 S1 command.
On the Prepare tab of Cura, click your printer name, then "Manage Printers". Select your printer, and click "Machine Settings".
Below is a copy paste of what I use on my start G-Code.
Start G-Code
; Ender 3 Custom Start G-code
G92 E0 ; Reset Extruder
G28 ; Home all axes
;G29 ; BLTouch do full bed level ; This is commented out since we are going to load the mesh with the M420 command below
M500
M420 S1 ; Use the mesh
G1 Z2.0 F3000 ; Move Z Axis up little to prevent scratching of Heat Bed
G1 X0.7 Y25 Z0.3 F5000.0 ; Move to start position
G1 X0.7 Y200.0 Z0.3 F1500.0 E15 ; Draw the first line
G1 X0.8 Y200.0 Z0.3 F5000.0 ; Move to side a little
G1 X0.8 Y25 Z0.3 F1500.0 E30 ; Draw the second line
G92 E0 ; Reset Extruder
G1 Z2.0 F3000 ; Move Z Axis up little to prevent scratching of Heat Bed
G1 X5 Y20 Z0.3 F5000.0 ; Move over to prevent blob squish
Installing advanced hardware upgrades

Installing the Micro Swiss Revo NG
If you intend to use the Micro Swiss Revo NG on your printer, and you have BL/CRTouch, you need to print the mount before you proceed. (https://store.micro-swiss.com/pages/installation-instructions)
In addition, if you wish to use the filament sensor with the Revo NG, I recommend printing the top mounted filament runout sensor from chais82 for direct drive extruders on Thingiverse. You will need M3 x 4 x 5mm threaded brass inserts to make use of the included screws that came with your sensor.
After you install the Revo NG, follow the steps outlined under "Configuring and calibrating your printer" again.
Don't forget to set your retraction settings in the slicer according to the Revo NG instructions!
Models worth printing for your Ender 3 V2
Here are some models that I printed that I found rather handy or enhanced my quality-of-life with my printer:
- Ender 3 V2 Tool Holder by mikelawrencez
Other suggested upgrades
In addition to the items outlined in this guide, I recommend a few other upgrades that are worth your time and consideration:
- Buying a backup battery (aka a UPS- uninterruptible power supply)APC UPS 1500VA - https://amzn.to/3t8KXLH (can handle three Ender 3's)
APC UPS 600VA - https://amzn.to/45qZEr7 (minimum, can handle one Ender 3) - Consolidating your cable loom
References
Mriscoc. “Home.” GitHub, github.com/mriscoc/Ender3V2S1/wiki. Accessed 29 Sept. 2023.