Home
Home

 Artists
 Search
 Recent
 Random
 Posts
Posts
 DMs
DMs
 Tags
Tags
 Random
 Importer
 Import
 FAQ
FAQ
 Account
 Register
 Favorites
 Login
Login

Pirate Sora Tutorial - PART FOUR - Keyblade (Patreon)
Content


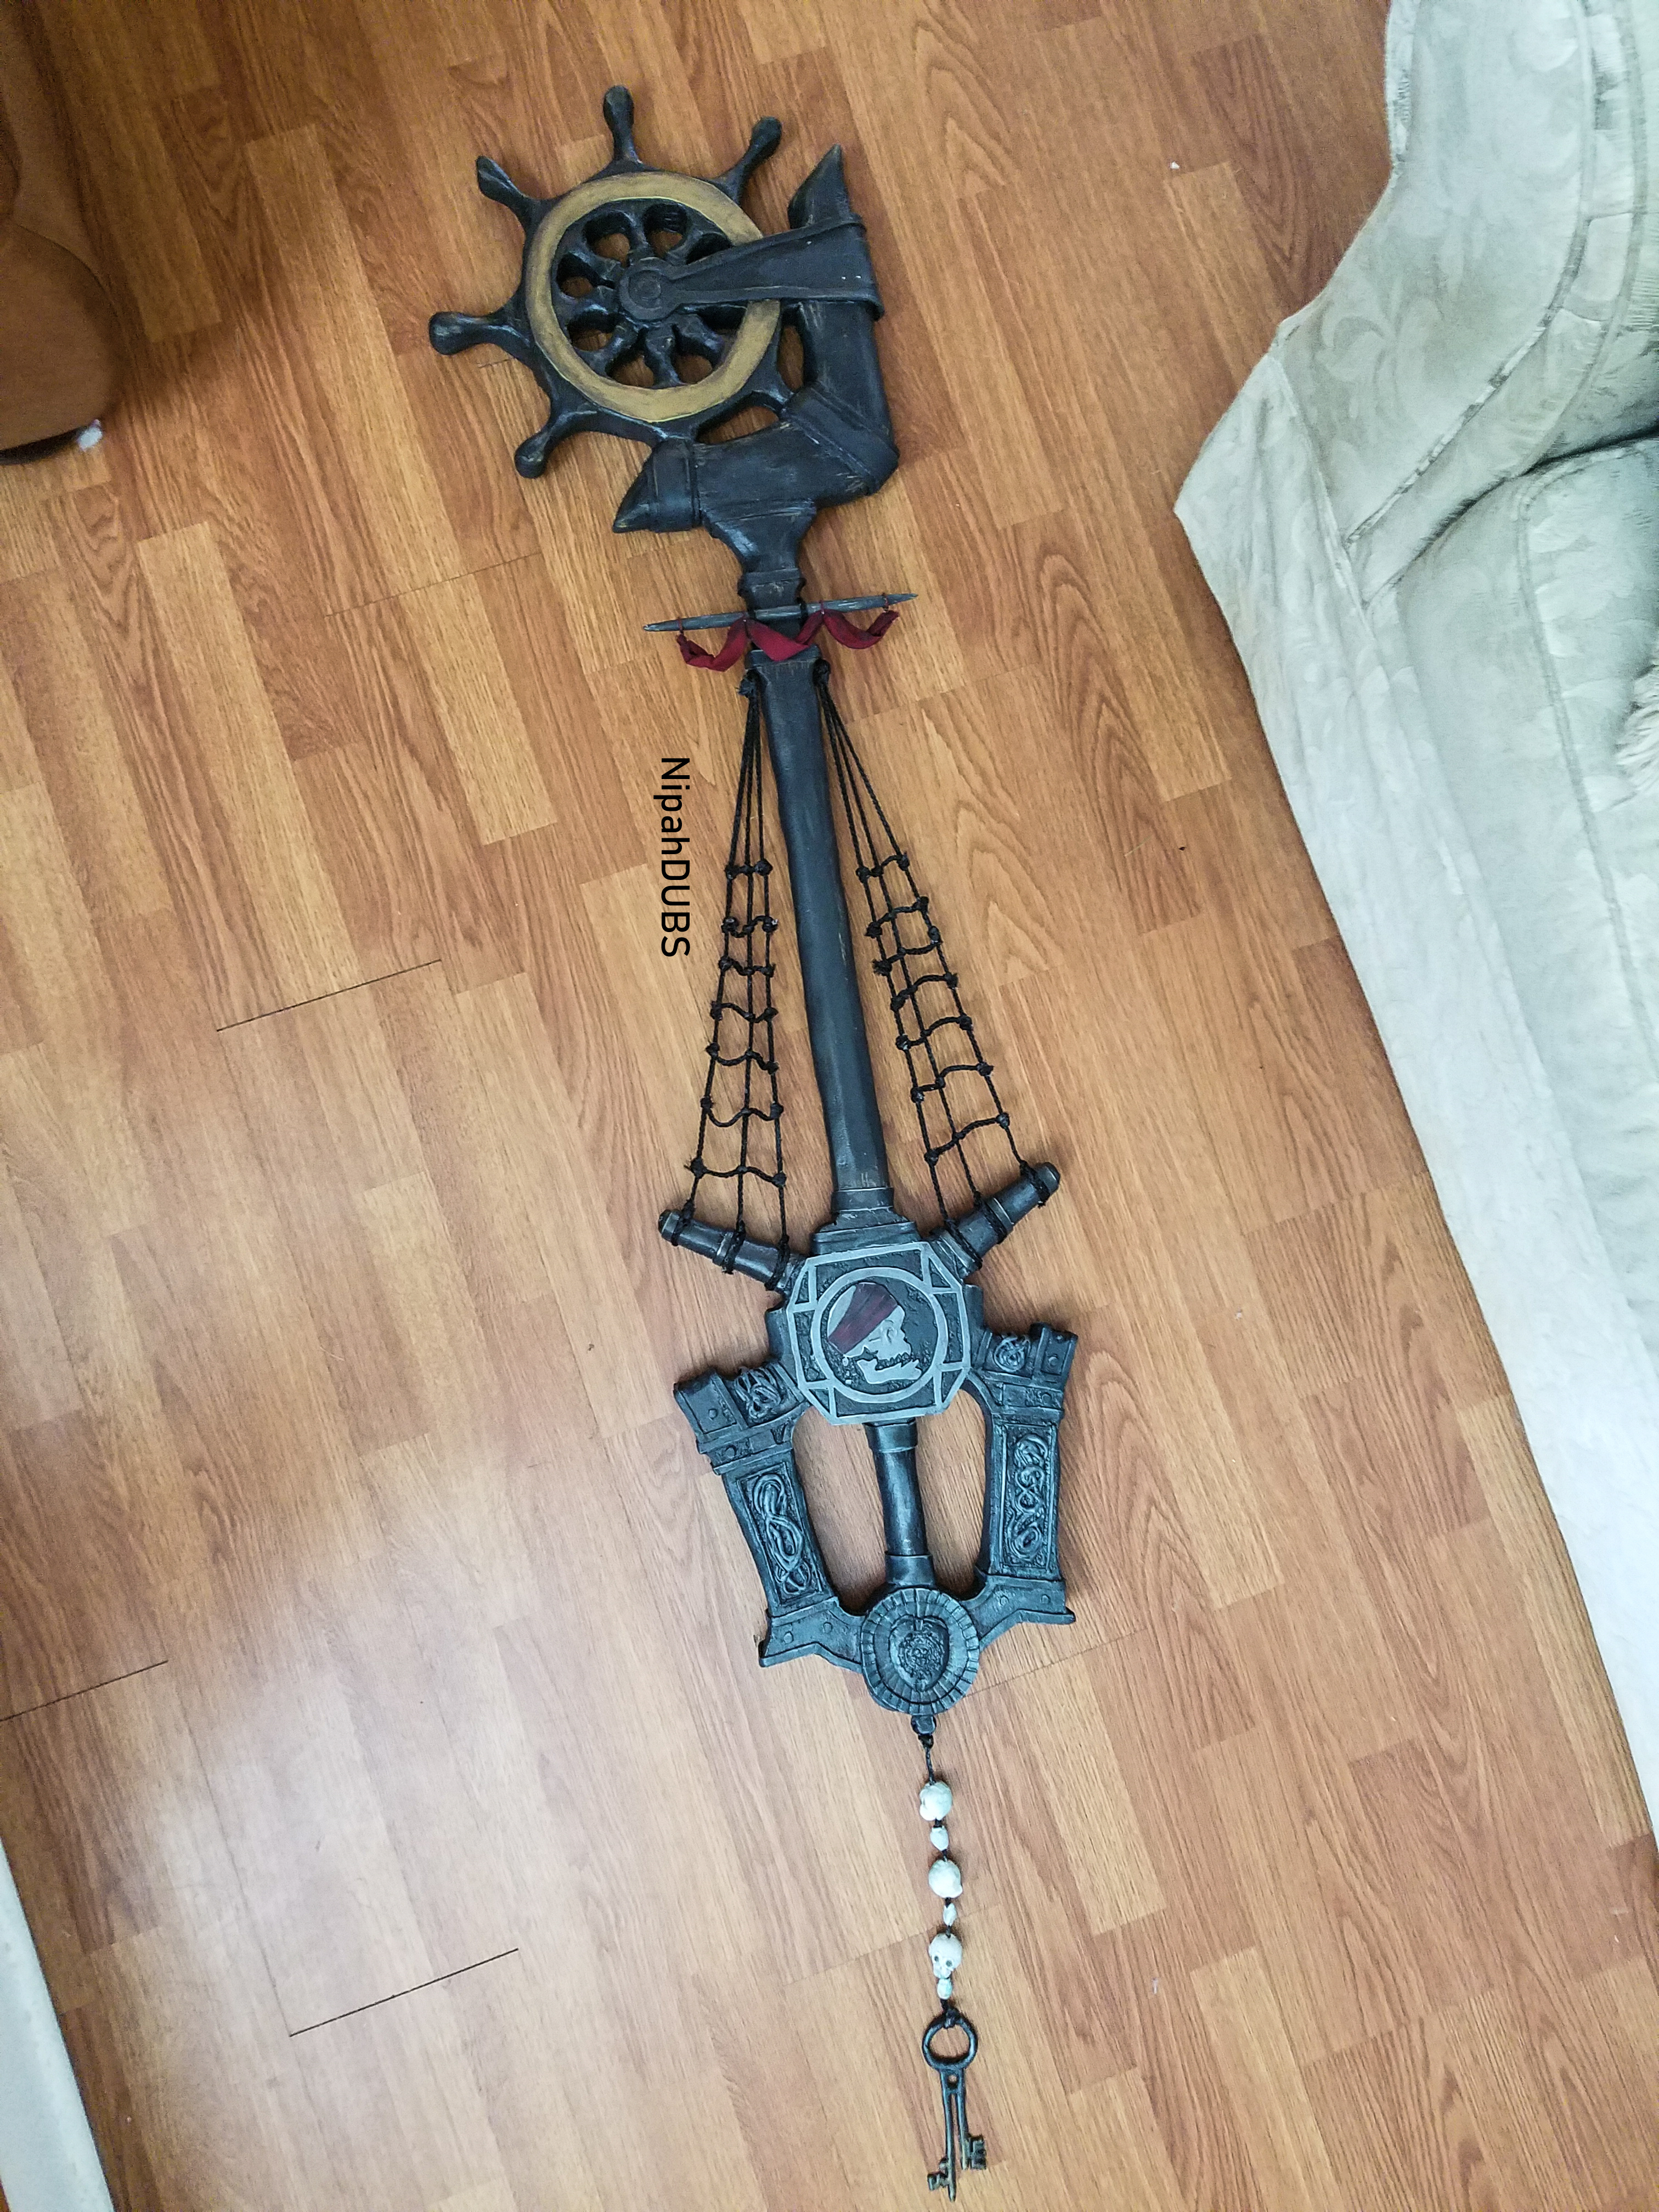
All my props are made from insulation foam, insulation foam is supposed to be used for the interior of walls but I used it for props! It is a light weight sturdy dense foam and once sanded and carved can be shaped into whatever you can imagine, to me it is perfect for keyblades. I have already stated some of these things in my Riku keyblade tutorial, since I follow the same guide for the beginning part of keyblades so I will restate them here again!
First, you want to print out a picture of the prop you are working on and scale it to your height (most of the time I just make them 48"). Make a grid over the printed out picture of the keyblade with 1 inch squares and count how many squares tall and wide it is. Soras's keyblade ended up being 11 squares tall and 4 squares wide, so now we have our ratios and it's time for some fun math. 2/8 is our printed picture ratio and x/48 is our real size ratio, where x will show how big we make our squares onto the foam.....that's a lot of math haha, I am bad at explaining this part BUT this wikihow explains scale drawing rather well! You will need to do the scaling to your size! Once you have the squares and scaling done you can then sketch out the keyblade onto your foam, there are many ways to do this such as screen projecting the silhouette onto it and drawing over it, printing out multiple pictures and piecing them together and drawing the outline but for me I just free hand and draw it on.


The hardest thing to stencil on the other side was the middle emblem thing, so I traced my first draft atop of some clear screen protectors and then cut that out and used it has a reference for the back side, this way to the front and the back would look identical for this section!

NOW RELEASE THE BEAST FROM THE FOAM! In order to cut out into the foam I use a heat wand, you can buy these at hobby lobby! You want to be VERY gentle with this and do not rush the process or you can snap your heat wand. Also do this in outside with a protective mask on, fumes do come off the foam as its being melted/cut and you do not want to breathe those in.

Now that you have it cut out you are going to want to sand it all down! I first take my dremel and sand down all the rough burned edges we have leftover from cutting the foam out, this is a long process so get comfy. I also bevel the foam with my dremel as well, again, make sure to be wearing a face mask during this part AND some protective goggles so the bits of foam don't come into contact with your eye.
Once dremeling was done I went back over the sections I dremeled with sandpaper (150 grit) and then once more with 200 grit sandpaper for a nice smooth finish to the edges.

Now comes the repair and build up process, when you sand some pieces of the foam will chip off but do not worry, you can fix this. I use a really light air dry clay to fill in any holes and spots that need fixing up. I also use this clay to make the raised pieces found at the base of the handle (the white part). I took some craft foam and bordered the edges of the handle with this as well (attaching it with wood glue) to give the keyblade more dimension! EVERYTHING that is black is just 2mm craft foam I got from Michaels in a HUGE roll and for the light grey parts (those tentacle..things lol) I used thibra! Thibra is like worbla but is more better used for fine details like this, when heated it turns into a putty like quality and worked great to make these tentacles! I DO NOT suggest using this for armor as it does not adhere well to craft foam BUT it adheres to insulation foam rather well and plastic!

For the emblem on the hilt of the prop I cut out a circle and then made a circle border for it, both out of craft foam. Then I took the heat wand we used to cut the insulation foam out and I pressed the side of it gently onto the foam to create these indents! I then sculpted out the middle badge piece out of soft air dry clay and for my own personal touch, I took one of the pirates of the Caribbean coins I have and pressed it into the foam to get that design indented into the clay!
Anything I attach to the keyblade I use WOOD GLUE. NEVER USE ANY GLUE THAT HEATS UP/IS HOT TO BEGIN WITH! You will melt your prop and your really do not want to do that, so no E6000 or hot glue!
ANNNDDD....
Now that you have everything patched up and built onto your keyblade you need to prime your prop! For foam props like this I used gorilla wood glue! This works wonders for protecting your prop and making it that more sturdy, it also helps keep everything you just placed onto keybalde stay put. I do three layers of glue (brushing the glue on with a paintbrush). In between each coat of glue I also took my 150/200 grit sandpaper and sanded down the glue, you want to make sure to sand down each layer so your prop will have a smoother finish at the end.
This is a lot of waiting for the glue to dry, just keep going at it. I have found that three coats usually does the trick.
Once that is done you can now Plasti dip! Plasti dip is just a primer that will help you later on when painting your prop! Plus it is just nice to have base color to paint on. MAKE SURE to lightly MIST your prop with plasti dip from afar and do in layers and build it up, if you are too close the aerosal in the can will cause your foam TO MELT. So BE CAREFUL!!!

Now that you have your black base you can begin the painting!! For Soras keyblade I used a mix of black, blue, teals and greens to get that nice base color shown at the bottom of the keyblade in this pic! I used basic acrylics for this so feel free to use whatever paints you have! WEATHERING is the key thing here, you need to make this look dirty and worn, so in order to do this I took some brown, tans and black pants and dry brushed them over where I saw fit!

I also took some tan paint and with a very thin brush I replicated the effect of the paint peeling and wood showing under that paint! A lot of old painted wood products look like this as the paint begins to chip away and I made sure to replicate this!

The gold circle is painted with a layer of gold rub n buff! I found the rub n buff was too shiny though, so I took some watered down brown paint and painted one layer of it over the gold to dull down the color a bit!

For the mast here it is made from a small dowel rod I got from hobby lobby, I then sanded it down with my dremel to get the ends pointed and I took some silver ring jewelry and slid them down the dowel. The red fabric was remnants from the Pirate Sora vest! The dowel is actually held into place by the rope going over it!

The rope is well...actual rope ahahah, to make the ladder effect I just took short pieces of rope and tied it across and then made knots inbetween, to make sure they didnt come undone I took my heat gun and grazed over the knots to seal them closed!

The key for the end of the keychain I made out of black worbla, I first cut out the base design from craft foam and then covered it with the worbla!

The skulls were made from balls of thibra also, as were the beads! They were place of the same rope I used from before. And with that the last piece of the keyblade was done!!
A lot of this was me repeating stuff from my Riku keyblade tutorial but I hope this gave you more insight on this and mayeb can help you with your own future props!
Files