Home
Home

 Artists
 Search
 Recent
 Random
 Posts
Posts
 DMs
DMs
 Tags
Tags
 Random
 Importer
 Import
 FAQ
FAQ
 Account
 Register
 Favorites
 Login
Login

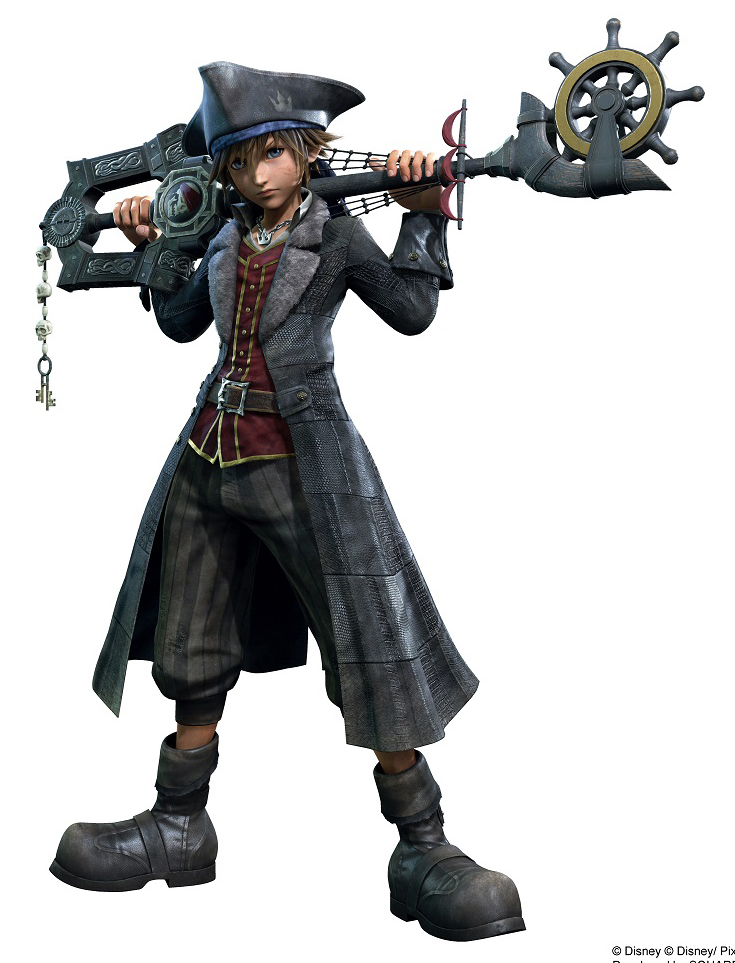
Pirate Sora Tutorial PART TWO: The Coat (Patreon)
Content

It all started with finding different textured pleathers! Soras jackets has multiple leather textures through it all down the design and its quite intense at first glance. I went to every fabric store in my area looking for different pleathers and settled on these five! I also went to goodwill and bought old cheap leather jackets and even cut those up to use for the coat! I just wanted as many leather textures as I could get my hands on.

THE PATTERN
The pattern was really tricky to figure out cause Soras coat is really form fitting but leather material like this are anything but form fitting, so I after many trials and error this was the pattern I came up with! If you need a 2D render draft of the pattern let me know and I will sketch one 


After I had the base pattern for the coat part done came one of the most tedious parts, measuring and deciding how I would patchwork this. I settled on a seven row patched per pattern, 6 inches tall per patch! For the back and front sections I did notice that those parts on Soras coat are longer then the other 6 inch ones so those ended up being about 12 inches.

Then after I was done with the basic squares I went back and divided the squares up randomly, Soras patchwork IS NOT even so do not make it look even, I split some down the middle, some by 2/3's and so on. This takes a lot of patience cause you also want to make sure you do not have two of the same textures next to each other unless you plan on continuing that same texture onto the other part of your pattern.

So I would know what pleather texture would go to each pattern I came up with a symbol for each kind of pleather that I quickly doodled onto the corner of each pattern.

After all that was done I then sewed all by mock up patterns together and made adjustments with the fit where they needed to be! Patterning this was a nightmare ahahha but I do hope my patterns can help you out in someway!

Hours and hours of pleather
Now, after seam ripping my mockup patterns it was time to transfer each individual patch pattern to the various pleathers, put on your favorite TV show from the start and begin to have that in the background, cause this is going to take a long time.

The very first of many.

And the I just straight stitched them together and top stitched the seam down so the fabric would lay flat.

And after sewing all the patches to ONE pattern, here is how it looks, it takes a lot of patience (Im saying that a lot ahaha).


Make sure you top stitch down EVER seam line, it keeps the fabric from bunching/bulging and overall just looks nicer.

To give you a better idea of just how many patches went into this thing

And with that, you will be done with the patchwork of the coat! The most tedious part is behind you!

For the cuffs on the end of his sleeves I came up with this shape since the cuffs flared out at the end! Basic rectangle with flared ends. These are rather simple to do, just sew the smaller side down your sleeve and roll them over your cuff seam!
In order to make sure the cuff is the right measurements for your sleeve end, make sure to take you measuring tape and measure how long your cuff is before making this part.
FUR
For the fur lapel/collar I took the pattern from earlier and transferred it to the pleather material (which would be the lining) and the fur for the top base fabric.

I folded the fur over the pleather and top stitched it down


Your fur will look like this now due to being top stitched down but this is easily fixed, all you need to do is take a brush and brush the fibers GENTLY out of your stitches.


Go ahead and do the exact same for the collar piece!

Now that those are done you can stitch them to the coat!
LINING
You have to line this, if you don't you will really uncomfortable in this lol, basically what a lining is is your base pattern but sew inside out! BEFORE you begin the patchwork you should take your base pattern and lay it over your lining fabric and cut out all those pieces. Linings are rather simple, your basically just sewing the jacket again but you will be sewing down the seams to the shoulder seams of you base coat and the edges/bottom of it as well!


Buttons
I really wanted to make the buttons for my cosplay, you by no means have to but this is how I did it! I got these cheap plastic buttons from my local craft store as the base.
And I also got these small skull details from there as well, you can get these from Jo Annes I believe!

I used a thermoplastic called thibra in order to make these buttons! Thibra is like worbla in a sense, you heat it up and it turns soft enough to mold into whatever shape you need. I heated the thibra over the buttons and while it was still hot I pressed the small skulls onto them. Then as they were cooling down I took an exacto knife and carved the circle around the borders of the buttons to give them more detail.

And after they were done I spray painted them gold and gave them a light mist of brown spray paint atop the gold to give a weathered look!

I sewed these guys down onto the coat and with that the coat was done!!
Though, the very last step I did that you don't have to do was I weathered the coat! I took some brown/tan and grey paints and went over the coat in places I felt would look dirty/older (the seams and the very bottom of the coat)! I will make a proper tutorial on how to weather clothing for you guys soon.
I know this was A LOT of information thrown at you and a lot to take in, if you need me to elaborate more on a certain part PLEASE as always, let me know and I am free to talk with you more about it.


Files