Home
Home

 Artists
 Search
 Recent
 Random
 Posts
Posts
 DMs
DMs
 Tags
Tags
 Random
 Importer
 Import
 FAQ
FAQ
 Account
 Register
 Favorites
 Login
Login

Pokemon Moon Text LP: Part 16 (Patreon)
Content
First off, obligatory reference to the fact that it's been a few days since the last update. I will now provide an extremely in-depth explanation as to what I did on those days. Trust me, it's not much, even if it looks like it at first.
Wednesday, December 7:
I decided to check out Haina Desert, since it was now available to explore but the game isn't specifically telling me to go there yet, so I'm curious if I can actually do anything. Pretty much right after getting inside, I get attacked by a wild Trapinch, which I catch. Turns out that it's apparently the rarest encounter here, so that's kinda cool. I also catch a Sandile almost immediately after, and then start to explore the area a bit. I had been warned beforehand that this place was pretty annoying, and the guy outside of the desert explains the correct way to get through it, so I keep that in mind. It's very hard to pay attention to where I'm going with the constant battles every few steps though, so I get annoyed with it pretty quickly. At the time that I was playing this, I wasn't able to take notes as I went through the game anyway, so I figured it was for the best to wait until later.
Later that night I reload the game, take a few steps, and find a wild Dugtrio, which I hadn't encountered yet. Very early on in the battle it summons a Gabite, which I know to be a weather-specific SOS encounter, and those are generally considered pretty rare, so I figured it's definitely something to go after. Unfortunately the Dugtrio knows Magnitude, which hits all targets, so it weakens the Gabite quite a bit and threatened to knock it out before I had a chance to react. By the time the Dugtrio was defeated, Napstablook fainted and the Gabite was down to the low yellow HP range. It's here where I learn that Gabite also knows Take Down, a recoil move, and this puts me in a pretty bad place because I really don't want it to faint from recoil damage. I'd switch to Napstablook, whose Ghost type would block Take Down, but he's already fainted and I wasn't entirely willing to risk spending a turn reviving him when one more Take Down could probably end the battle. So I decided to just throw a ball and hope for the best. Nope, it breaks out.
At this point, it proceeds to use Slash for a number of turns, bringing Lubba (who's not damaged by the sandstorm going on, thankfully) slowly down to a very low HP. I throw a ball every turn, and despite getting to use about ten of them, none of them succeed in catching it. If I was smart, I'd take advantage of the low HP (and therefore low recoil damage if it used Take Down at this point) to use the Revive, but I didn't think about that and just kept chucking balls until eventually Lubba went down from Slash. So I switch to Skeeter and decide to risk a turn with the Revive, and wouldn't you know it, the Gabite uses Take Down on that turn and faints. Well crap. Annoyed, I catch the next Dugtrio I run into and call it a night because I didn't want to deal with this at the moment.
Thursday, December 8:
While at the laundromat, I go through the desert more thoroughly and somehow bumble into a Psychium Z along the way. I'm not sure if it was required to enter that screen or not, since this is a very Lost Woods-type area and even with the instructions given, it's still fairly confusing. Mainly though I just find it weird that there's a Z-Crystal here, when every other type-based one up to this point has been given by a trial captain, a kahuna, or at least someone affiliated with them. It seems a bit out of place.
I continue through the desert (using repels, which helps but doesn't completely eliminate the problem due to the Pokemon that chase you through the sand) and eventually find the Ruins of Abundance. They seem pretty much exactly like the last set of Ruins, what with the giant blocks and overall Zelda dungeon feel. On the way back I intentionally try to check every possible dead end, and wind up finding a Comet Shard and the TM for Dream Eater along the way. As far as I can tell, I've gotten basically everything from the area aside from the Safety Goggles item, which is given by an NPC. At some point I also decided to attempt to find a Gabite again and managed to successfully catch one without too much trouble.
Later on in the day, I'm basically stuck with nothing to do for about four or five hours, and still don't have the ability to take notes on the game, so I figured this would be a decent time for me to waste a bunch of time and go after SOS-specific stuff on the first island, where the experience gained from the battles would hopefully not be super high. I first go after a Gyarados, which doesn't pose too much of a challenge. Not really knowing what other things can be gotten, I decide that it's about time to try for a Salamence also, and ... yeah.
In case you don't know the specifics, Salamence is a rare spawn when fighting Bagon specifically on Route 3. Bagon itself only has a 1% encounter rate there. It's more common in Kala'e Bay, but it won't spawn Salamence down there, only Shelgon. The reason people have given for this (which is kind of clever, actually) is that the Bagon are jumping off the cliff, as their Pokedex entries often say they do. That's why there's more of them down there than there are at the top, and when they evolve and can fly, they'll occasionally fly back up to the top of the cliff, but never stay at the bottom of it. Interesting background info, but it doesn't exactly make it easy. I believe I looked for a Bagon for at least an hour before one showed up, and when it did, my 3DS battery was on red and I had no ability to charge it, so that was the end of that for a while.
Later that night when I got home, I figured I might as well continue trying to find the Salamence. I think overall it took about three hours. I didn't count how many Bagons I fought in the process, but it was enough to get Napstablook up to Level 33 (from 30, I believe) and also max out his Attack EVs. When I finally did catch the Salamence, I did so in a Premier Ball and it stayed in on the first attempt. Afterwards I cleaned up the rest of the SOS encounters on the island by catching a Slowbro and Shelgon down by the Bay (where the watermelons grow), but thankfully they were a lot more cooperative and therefore less interesting to complain about. But yeah, that should be every possible wild Pokemon from Melemele Island. It's a small victory, but I'm at least making progress in that regard even if I'm not really progressing in the game yet.
Friday, December 9:
Yet again I didn't have much of an opportunity to do anything major in the game for most of the day. I did check if there were any new clothing shops coming up soon though, and discovered that the one in Malie City was actually the last one in the whole game. So knowing that, I picked out a new outfit which, as usual, you'll be able to see on the trainer card at the end. I also went out of my way to take a photo for the passport specifically when Luna blinked in order to get a fairly dumb-looking picture. It would probably look better without the glasses, I think.
Other than that (and the mandatory checking of the Poke Pelago for beans, berries and treasures), the only thing of note I did this day was trade an Alolan Sandshrew to Joel for its counterpart, Alolan Vulpix. And I also got a couple more trade evolutions added to the Pokedex, but still none of them are actually mine yet, they're just registered as caught. And ... that's about it.
Saturday, December 10:
At last, actual progress occurs! I'm actually going to try and get through this a lot quicker than I usually would, without focusing on all the tiny details. I probably won't succeed at this and it'll come out massively long anyway, but I can try. Where I last left off in the story, I had completed the Ghost trial and the game wanted me to go back to Aether House for some reason. Well I went back, and it turns out that Plumeria is there. She doesn't really give any kind of reason for being there, but she battles me anyway. It doesn't last particularly long, and her team (of a whopping two Pokemon, a Golbat and Salandit) is the same as last time aside from level. With her and the random Grunts (fought off by Acerola and Hau, I believe) out of the way, I go into the house, and OH NOES. That one Yungoos from before was stolen! I'm not sure if I should be impressed that Team Skull actually managed to steal a single Pokemon, confused as to why they bothered doing it, or just amused by the fact that it's a Yungoos of all things. I'll be fair, if it was someone's pet then of course they're going to want it back, but it's just funny that it's one of the most common, disliked Pokemon of the generation.
Apparently Team Skull took it back to their base in Po Town, and I'll have to go there alone to get it back. Well, it's not like I have anything better to do, so that's fine with me. Oh wait, did I say I don't have anything better to do? Because there's actually a little side thing that I'm going to distract myself with first. And since I don't know where else to fit this in, I should mention that in one of the rooms of Aether House, there's a Mimikyu that says "Me...me curse...you...", and that's not only a bit creepy, but also unusual because I'm not sure why it's able to speak.
The distraction that I go and check out is back in Malie Garden. I'm not sure when it became available, since I actually went back there several times to see if the ice cream shop opens (I'm fairly sure it doesn't) and to find the person that gives you an Air Balloon (I still haven't found them). But regardless, some people have taken over the area and turned it into Nugget Bridge from Kanto. And when I say they've turned it into Nugget Bridge, I mean it's an exact replica with the same exact dialogue and the same Pokemon, except higher-leveled. This leads to some excellent things such as battling a Level 29 Caterpie and also fighting things that aren't in the Alola Dex at all (Weedle, Pidgey, Nidoran♀, and Ekans). After beating the five trainers, the final guy gives me a Big Nugget and gives the usual "would you like to join Team Rocket? No? Well too bad" speech. Afterwards he admits that Team Rocket is completely irrelevant to everything, makes a brief reference to Giovanni, and then just like that, they're gone. Like a... like an angel's kiss.
Alright, well... back to what I was doing before, then. I'm supposed to look for a guy in a kimono on the Route 15 beach. And there he is, just hanging out. I go and say hello, and- oh hi, Grimsley. You sure are another random cameo. Y'know, Grimsley! Everyone's favorite Gen 5 Elite Four member that, like basically every other Elite Four member, never did anything of note. Anyway, he says he's going to flip a coin and I have to guess which way it will land. The game gives me the option of "neither", so I of course pick that one to be difficult. He flips the coin, the camera zooms in on him, it zooms in on my grinning face, and then "...Astonishing. I had indeed been planning to have Skarmory snatch it out of the air as it spun in the sky." Except uh, he didn't actually do that, so the fact that I guessed neither didn't really matter there, since I was wrong. I guess I managed to guess his original intent though, so we'll go with that. Anyway as a reward he gives me access to Sharpedo as a Ride Pokemon. It's a Tauros that works in water, basically. Goodbye Lapras, I'll miss your really stupid "swimming backwards" animation when you spin in circles on it at just the right speed.
You should know what this means now - more backtracking! I just gained access to a new thing, so I've gotta go back and use it wherever I can. Turns out there's not that many places actually, just these:
- At Melemele Sea, there's a little island you can access with the Rock Slide TM. I teach this to Malone and consider teaching it to Lubba but decide against it.
- There's a secret entrance to Ten Carat Hill that leads to the Explosion TM. Gonna pass on that one.
- Nothing else at all.
Back on Route 15, I break the rocks that were blocking my way previously and explore this fairly large water route. There's like two whole trainers, as well as another small island that houses the Wild Charge TM. They're really handing these things out, aren't they? I teach it to Crazy Bus and continue onwards to the next shoreline. Here there's a couple swimmers doing sit-ups on the beach, and I get into a double battle with them that's actually somewhat challenging for some reason. Mainly because Aleene dies to basically every single Pokemon she goes up against. Can't wait until that evolution, I've gotta say. Oh, and after the battle, the girl mentions that Pyukumuku keep sticking to her ass. Oh, Gamefreak, you scamps.
After exploring the remainder of this beach and checking for items, I go up the ramp and suddenly it's Route 16. But trust me, not for very long. This is basically about one sixth of the size of Route 15 and is just somehow its own area. In the Pokecenter, I get 20k from showing an Aether person Mimikyu's dex entry, and then elsewhere on the route I crawl underneath a trailer (for some reason you can just do that here) to find the X-Scissor TM. Crazy Bus already knows that, and I prefer Leech Life on the rest of the team that can learn it, so once again, I'll pass. Outside of the trailer are a couple people looking at a group of three Spindas. Spinda's gimmick is that each one has a different pattern, and the people comment on this, saying that they have their own favorites, but the Spindas here all look completely identical, so yeah.
Finally I go inside the trailer, only to be greeted by our good friends Dexio and Sina, the latter of which immediately starts a spiel about Zygarde and the Reassembly Unit. Yeah, that's just kinda here in this trailer. I can use it to combine the Zygarde Cells I've been collecting, and then deconstruct them afterwards if I choose to. At one point Dexio says "Zygarde is said to maintain the order of the Kalos region...then why is it in Alola...? Is it a sign that something is about to happen?", and I have to applaud the game for raising a question and then not answering it. This is slight spoilers, but from what I've heard, Zygarde is never brought up again a single time after this. After they leave, I go ahead and test out the machine, creating a Zygarde 10% Forme (or Zydoge, as I usually call it). Rotom comments on this, saying "You registered a Legendary Pokemon! That's, well, legendary!" I do like how the postgame legendary of X/Y is now just a midgame thing that you can get with no fanfare. Not that it had one in X/Y either, but whatever. Point is, I don't understand what their plans for Zygarde were, because I really doubt that what we got was their original vision.
At this point, I decide to go back and battle the "fight-everyone-else-and-then-you-can-fight-me" trainer on Route 15. This would normally be kind of uninteresting and not worth talking about, and ... it is. But I planned ahead before this battle and made sure that all three of my starters got enough experience to reach Level 34 after the fight, so that means we've got ourselves another triple evolution! Fellana becomes Decidueye, the part-Ghost archer owl, and learns Spirit Shackle, a fairly good Ghost move. El Grapadura becomes Incineroar, the part-Dark wrestler tiger, and learns Darkest Lariat, a fairly good Dark move. And Lena becomes Primarina, the part-Fairy siren seal, and learns Sparkling Aria, a ... rather unimpressive Water move. The problem here is that Spirit Shackle and Darkest Lariat were replacing Shadow Claw and Bite, and was a pretty good upgrade in both cases. They both also have pretty decent side effects - Shackle prevents the opponent from switching, and Lariat ignores the opponent's stat changes. Aria, on the other hand, is replacing Water Pledge, which is only an increase of 10 attack power. Its side effect is that it cures the opponent's burn if it has one, and I can't think of any situation that this would ever be useful unless they have Guts or Facade or something. I mean, I'll take it anyway, but I kinda wish it was a Fairy move instead. Also, I've gotta mention how the first time I did the starter triple evolution, it was in the battle against Sina, and this time it was fairly shortly after talking to her. How ... random.
Since there's nothing else to explore on Route 16, I move on to Ula'ula Meadow. This area is also pretty small, since most of it is not actually explorable for some reason. It's mainly just a series of bridges and like, one patch of flowers that you can go into. In said flowers I catch this island's Oricorio form (Baile Style) and a Ribombee, which is Cutiefly's evolution. On an extremely minor and nitpicky note, I do want to point out here that the Baile Style is usually regarded as the "first" Oricorio form according to the trailer, sites like Serebii, and apparently even the in-game coding (ripped here: https://projectpokemon.org/research/sunmoon/gametext.txt). This goes against the fact that it's the third one you encounter normally through the course of the game, and it can't be explained from a geographical point either, since going through the islands from east to west also doesn't match the order. I'm fine with this, but the Pokedex in-game actually seems to disagree, and it considers the Pom-Pom Style to be the first one. It's weird, I'm not sure why the two sources disagree, and not knowing the proper order of things annoys me. I don't have this problem with any other Pokemon. Then again, the text dump also lists Minior's Meteor Form seven times whereas the Pokedex only lists it once (which makes sense, since they're identical), so I've got nothin'.
Semantics aside, I clear out the area and then battle the beat-everyone-else trainer, who had a pretty great opening line: "Let me guess. You were wondering what a Golfer would be doing in a meadow like this. If you want an answer to that question, then defeat all of the Trainers in this meadow first." Guess what - there was no answer given. This trainer uses a Flame Orb to trigger his Hariyama's Guts ability, and are you freaking serious. The ONE circumstance where Sparking Aria would actually be useful (kind of... it would just trigger a burn again on the next turn I'm pretty sure) and I don't have Lena in my team. Wow.
Also, apparently I had 49 Zygarde Cells when I reached the Reassembly Unit the first time, because the very next one I collect gives the message that I've now collected 50 of them. I go back to switch my Zydoge to the 50% Forme, and I'll admit, I'm a little confused here. It seems like now that I've collected that many, I have no way to actually form a 10% Forme again. I guess if I have 60 Cells then I can have one of each, but what about when I get all 100? It seems weird to be permanently locked out of the previous form like that. And actually, I know for a fact that the 100 Cell "reward" can also be used on the 10% Forme, so yeah, I'm a bit confused. I guess I'll figure that out later.
On the other end of Ula'ula Meadow, there's two different ways I can go. One leads to Route 17, and the other to the "Lake of the Sunne". I do know the significance of this place (sort of), but for right now it's pretty much useless, just a big empty temple thing. Oh, and it contains the Psyshock TM, which none of my Pokemon can learn. So heading back, I guess I'll go to Route 17 instead. It's raining here, and from what I've read, it's never NOT raining here. So I guess it's a pretty good place to look for Goomy once I'm ready to sit through enough wild encounters to find one (which isn't now). This is basically the road leading up to Po Town, the area completely occupied by Team Skull, and the smattering of Skull Grunts around the area pretty much indicate this. There's a police station here, but it's completely empty aside from about a dozen Meowth. Not sure what that's all about.
The rest of the route is kinda bland. It has a section that kind of ramps up a bit and then has ledges going down, which you'll need to go through multiple times to get all the items. These items include *gasp* another TM, this time for Poison Jab. I teach that to Skeeter just for the sake of type coverage. I also catch an Alolan Graveler here, so that's a thing I guess. Towards the end of the route, I encounter a "grand Grunt" who is no different from any of the previous ones, other than she likes Carnivine a lot but doesn't have one. Alright. There's also some old dude who shows up blocking the entrance to the town, giving me an option to head back if I'm not prepared. He also utters one of the most oddly dark lines in the game so far: "If you don't make it, I'll be sure your remains at least get back home." Jeez, dude. Not only is that kind of over the top for this sort of game, but it's Team Freaking Skull, they're about as dangerous as a bag of lettuce.
In an attempt to wrap things up a bit quicker, I'll spare you all the details and stupid Team Skull quotes that this area has to offer and just hit on some of the highlights:
- The whole area is covered with random graffiti, some of which are just splats. Are we sure this isn't a Splatoon level?
- As soon as I enter the town, a couple of Grunts have a barricade in my way (which is identical to the trial barricades, so either they stole it or this used to be a trial site at one point). To get past it, I crawl through a gigantic and very obvious hole in the hedge off to the side. This same kind of mechanic is used a few times in the area.
- The dialogue in the Pokemon Center is on a whole new level of excellence. I'll just go ahead and put the entire thing here:
When first entering:
Ready for fly rhymes in your ear, yo? ♪ But, yo, what’re you doin’ here, yo? ♪
Yo, it’s darker than Darkrai up in here, yo. ♪ I’m gettin’ scared like I met with a Fearow! ♪
Ain’t nobody around. I’m feelin’ kinda down, ♪ but I’m still holdin’ it down here in Po Town! ♪ Hey, yo, spin it, Spinda!
Spi-spin! ♪ Spi-spi-spin! ♪
When trying to heal:
So listen up, intruder. ♪ She wants money, but it always eludes her! ♪
Team Skull, represent! We can’t pay the rent! ♪ Had a lot of fun, but our youth was misspent! ♪
This Pokémon Center is where we cower, ♪ but we can’t pay bills, so we got no power! ♪
If you give us $10, we will help you out, ♪ by healing your team before your next bout! ♪
When agreeing to be healed:
I knew we could count on you, yo! ♪ Thanks to you, we can make do, yo! ♪
Cash makes us perky. ♪ So even though you were a bit jerky, ♪ I’ll heal up your team so you can do work-y! ♪
Talking to them afterwards:
Team Skull, represent! We never forget! ♪ That’ll be a choice you live to regret! ♪
Since Team Skull started cracking, ♪ I’ve been mad lazy like Slaking! ♪
- There's also a Dead Guy Perez on the floor in one of the buildings, who says "That's enough, Grunt! Back into your Ball!" when you try to talk to him.
- I swear, the awful dialogue doesn't ever end. There's some guy who may or may not be Invisible Jason standing on top of a car who busts out this masterpiece: "One, two, hit THREE sandbag. Four, five, we’re ra-SIX-cals." I DON'T KNOW WHAT ANY OF THIS MEANS.
Yeah, this is getting pretty painful, and there's still a lot more. After getting through that mess, I reach the Shady House, and it just keeps going with more of the same. This is basically a mansion that's been taken over by Team Skull, and is about as wrecked as you'd expect it to be. I didn't know this once I first got in, but apparently the entire reason I had to go through all the stuff I did was because of a chandelier laying on the staircase that I'm incapable of walking around, and also a small stack of cardboard boxes blocking a hallway. More excellent quotes include "I always make sweet pancakes or sweet Berry cakes, yo" and probably a few others I'm skipping over.
While exploring the area, I come across some old passwords that include "Beat Up", "Golisopod", and "Tapu Cocoa". One of the notes also mentions that "a true Team Skull member always butts heads and answers with a hearty 'No!'", and this is surprisingly important later on. Also in the area are the Sludge Bomb TM (really handing these things out like candy lately, but I don't teach this to anyone) and a room with a bunch of Wiimotes and a couple Wii U Gamepads. Team Skull knows what's up, yo. They also seem to be shouting random stuff before fights now (at least I don't think they did before), with one of them sounding like "Dartclaw". I'm talking about actual audio clips here, so I have no idea what he actually said.
I suppose I should also mention the one room that everyone else talks about, too. After going in a certain room, there's a couple of female Grunts arguing about whose shirt is whose. The conversation progresses to "we should write our names on them so we don’t mix them up", which is answered with "Uhmm, hello! Our names are all Grunt. What’s the point?". Ok, I'll admit that's actually pretty funny. They also call me a "cute girl" before the battle, which I'm sure is severely overanalyzed by the community.
Eventually after wading through all this nonsense (taking a moment to walk around on the roof outside in the heavy rain, since that's obviously more reasonable than climbing over some cardboard boxes), I reach Guzma's room. He's apparently been hoarding a bunch of Buginium Z crystals because he wants to be the true Bug master or some crap like that, but he doesn't actually have a Z-Ring of his own because apparently he needed to be handicapped or something? I dunno. But either way, Guzma fight! It went down like this:
I started with Dreemurr against his Golisopod. It used First Impression and Dreemurr went down in one hit. I decided to switch to Lubba and set up a Stealth Rock, since I thought it would come in handy later in the fight. Lubba also went down in one hit, but at least he accomplished what was intended. Next came out Crazy Bus, who I used to paralyze the Golisopod with Thunder Wave and then damage it with Wild Charge. This got it below half of its health, so it was forced to switch out, and Ariados took the entry hazard damage. So far, so good.
I mentioned earlier that Aleene has been failing against most opponents, so I sent her in to try and take out the Ariados with Psychic, but it knew Sucker Punch and that kind of put an end to that plan. She did hang on with 1 HP though, so I was able to switch out to Malone and finish it off while still letting the experience be divided. (After that levelup she learned Giga Drain, which I decided to replace Psychic with for the time being just to see if it does any good.) With the Golisopod back out, it took some more Stealth Rock damage, putting it at about a quarter of its HP. I took this opportunity to revive Dreemurr and then switch him in, in order to get the KO with Breakneck Blitz. After that fight, my entire on-hand team managed to reach Level 36. I like when things work out evenly like that.
With Guzma defeated, he let me take the Yungoos back (which I had actually completely forgotten about at this point), and I snagged a Buginium Z from his pile. Before leaving, I decided to take a seat in his fancy chair, only to trigger a cutscene where a Grunt came in and was all "ur not da boss, wut". I'm not really sure what else I expected. After sitting in it a second time, I got the flavor text "The arms of the chair look like they’ve been slammed countless times by angry fists." My boy Guzma's got a bit of an anger problem, methinks.
After leaving the building, that one angry dude from earlier shows up, and so does Acerola. Apparently this is her uncle, Nanu. He seems to stick around because he's interested in protecting the Pokemon in the area, but tries to disguise this with his hardass attitude. The interaction is fairly standard, but he leaves with the line, "Pokémon tucked up in their Poké Balls, Team Skull locked up in their little town... I wonder if either enjoys the experience?". I found that kinda interesting. Not sure what to say about it really, just interesting. And with that, I'm finally done with this write-up. Overall, I'd just like to say screw Team Skull. I'm kind of astonished they managed to take control of this town, to be honest, but for right now I'm just tired of dealing with them and look forward to seeing less of them.
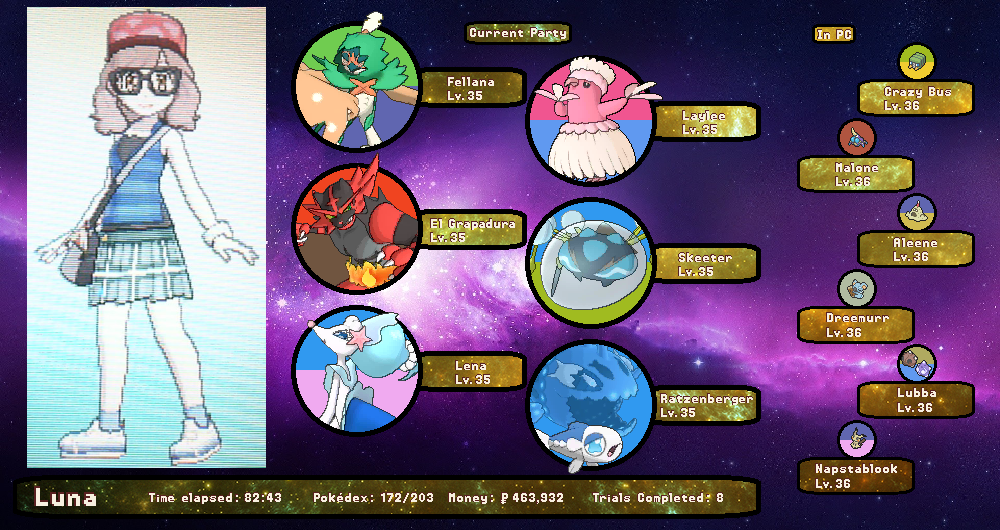
Current status:
Files