Home
Home

 Artists
 Search
 Recent
 Random
 Posts
Posts
 DMs
DMs
 Tags
Tags
 Random
 Importer
 Import
 FAQ
FAQ
 Account
 Register
 Favorites
 Login
Login

Tutored Life Drawing Blog Week 21: The Illusion of Depth (Patreon)
Content
Depth is a property that can allow drawings to convey a sense of three dimensional space around the figure. The are many different drawing devices that do this, and there are different systems of perspective to visualise depth. These tools can also open up avenues to manipulate space for expressive purposes.
This lesson introduces ideas about depth and perspective from a practical stand point, presenting some of the different systems used to describe depth, and their observed effects. It is beyond the scope of this lesson to discuss perspective in detail; it should serve as a practical introduction that can help with understanding these fundamental ideas in drawing.
Image Above: 'Robin'
Perspective and Depth
Perspective systems are used to portray depth on two dimensional surfaces, and can be divided into two broad categories: linear projection and parallel projection. Both systems use straight lines to project space onto the flat page.
Linear projection (or linear perspective) is the system most like real-life experience, although it does not necessarily perfectly match observation. Under this system, as things get further away, they diminish in size until they vanish to a point. If two parallel lines point away from the viewer, the distance between them shrinks to nothing, creating a point where they vanish, in line with the viewer's eye level. As subjects get further from the viewer, the distance between them decreases.

A simple linear perspective set up with boxes. There are two vanishing points (one of which is off-screen), one each for the width and depth of the boxes. Both these sides of the box point into the page. In this situation, the height of the box is aligned with the viewer, and doesn't diminish – a reasonable approximation.
Parallel projection includes lots of different perspective systems, but they are united by the lack of diminishment or vanishing points; everything remains at the same scale. This means if two parallel lines point away from the viewer, they remain parallel and never meet. In drawing, parallel perspective tends to refer to axonometric projections, where width, depth and height are shown without any form of diminishment.

Box in parallel perspective – the sides of the box do not 'pinch' together as they get further away from the viewer, but maintain a consistent depth, width and height.
This is a manipulation of observation. Real life experience shows objects get smaller with distance and change in appearance as they move relative to the viewer – for instance, if a cup moves up or down relative to one's eye-level, the opening at the top will get narrower or wider. However, this is still a valid way to portray space in drawing, as it presents a more 'factual' view in certain ways. For instance, it is easier to determine relative distances and sizes, the placement of objects, and understand structures, as there is no distortion. Parallel projections are common in instructional diagrams for this reason, but can also be found in a lot of historic Asian artworks.
Observed Effects
Certain features of observation can describe depth. It is surprisingly easy to portray a sense of depth and space by simply drawing the shapes you see in front of you, without any knowledge or application of a perspective systems - this is known as informal perspective. Overlap and cross-contours have been mentioned in earlier classes as useful tools for showing depth – see Lesson 2 – Contour, Lesson 16 – Form and Lesson 20 – Foreshortening.
When viewing the figure in space, the placement of any contact points to the ground will indicate depth. This is typically the feet. As things get further away from the viewer, they get smaller, and closer to their eye-level.

The front foot, being closer to the viewer in space, appears larger than the back foot. Note that the back foot is 'higher' on the page as it is closer to the viewer's eye level.
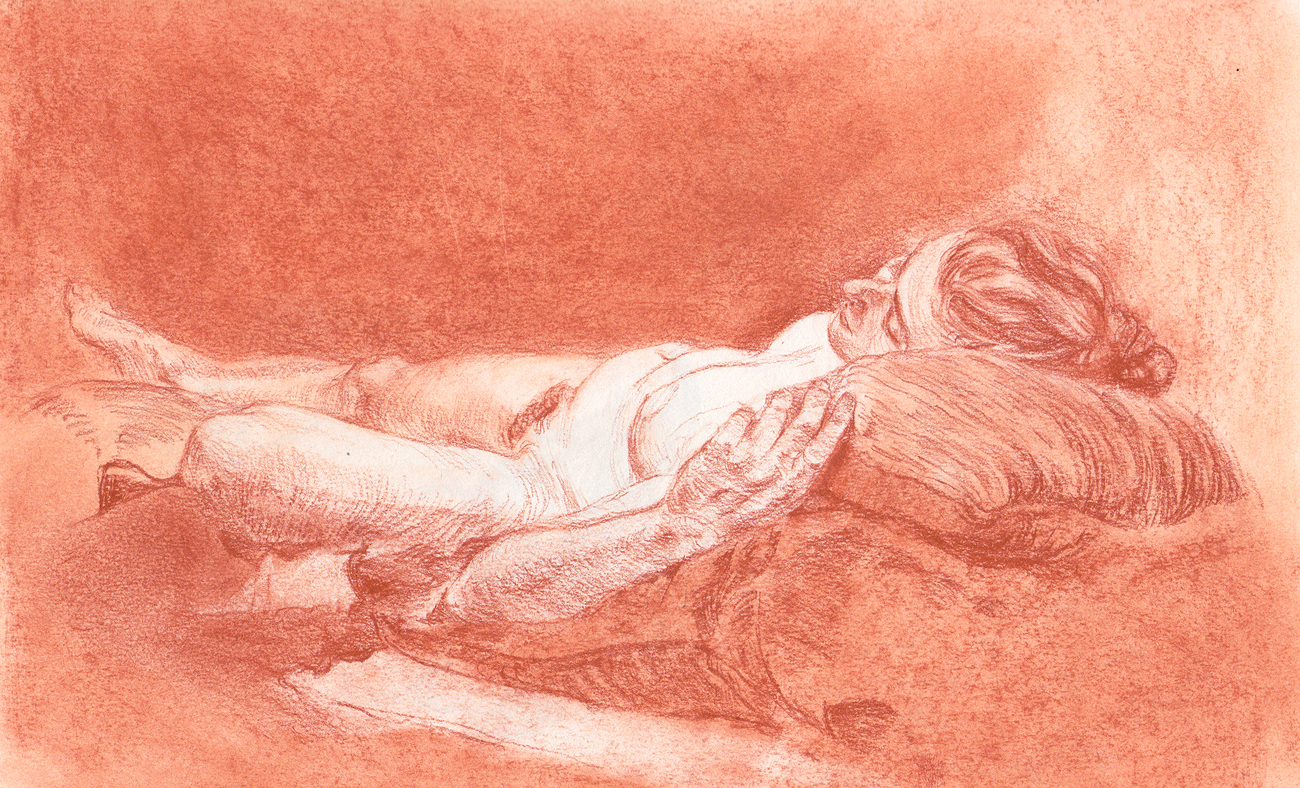
However, this can occur with the body as whole, as can be seen with more obviously foreshortened poses. With wider standing poses, there is space between the feet that might be useful for indicating depth, but for more reclined or stretched out poses, try to keep track of how much space is surrounding the figure by adding some context, even if it is a relatively simple indication of floorboards or cushions.

The cushions and rug in this sketch help indicate depth by providing diagonals that point into the page like vanishing lines – though they may not be accurate vanishing lines.
As context starts to be considered around the figure, it is likely that more obvious diminishing lines will become apparent in more geometric forms, such as walls, floors and furniture. These straight edges tend to create sets of parallel lines that demonstrate depth by reaching back into space to a vanishing point.

The black line marks the viewer's eye level. The red lines create vanishing lines for the wardrobe, left hand sofa and fireplace – these objects align so they share the same 2pt perspective. The blue lines show the vanishing lines for the other sofa, which is at an angle to the other objects.
The general rule of linear perspective is that the separation between any set of parallel lines decreases with distance, until they vanish to a point on eyeline – the eye level of the viewer. If there are multiple sets of parallel lines pointing into the distance, they will create multiple vanishing points.

When starting this painting, I checked the perspective lines for the carpet – they roughly meet at my eye level, helping make the foot placement seem more convincing.
In practise, it is not necessarily a requirement to draw perspective lines, and most artists will not do much beyond possibly indicating the eye level in their sketch. However, understanding and checking the overall effects – that parallel lines converge to a point, and the more distant things are, the closer they get to the eyeline – will help convey depth in linear perspective in a more convincing manner.

Ansel Adams - 'Looking across desert toward mountains, "Death Valley National Monument," California' (Source: The U.S. National Archives) This photo clearly shows atmospheric effects. The mountains get fainter with distance, diminish in size, and lose detail and contrast.
Another thing that conveys depth is atmospheric perspective, which causes a change in tone and colour with distance. As the distance between the viewer and subject increases, the atmosphere between them scatters light, causing the subject to tend towards a midtone and take on a cooler (or bluer) hue of colour. This isn't an effect that can be seen in a life drawing session, as it occurs over significant distances, but it is possible to manipulate observed tone and colour to imply distance this way.

In this sketch, atmospheric depth has been exaggerated around the figure. The nearest parts are darker in tone, whilst the most distant areas are lighter in tone and have less contrast. More distant parts of the figure are rendered in less detail, with the farthest hand reduced to little more than a silhouette.
Another way atmospheric perspective is portrayed is by a reduction of detail in more distant things. This might be done by reducing marks, or their density, omitting visual information and relying on shape and silhouette, or by using less contrast. This reduction in detail can also be expressed by reducing the 'sharpness' of the lines or marks, or using more diffuse tonal edges.
Manipulating Perspective

Henri de Toulouse-Lautrec - 'The Laundress' (Source: Cleveland Museum of Art)
This sketch shows how depth can be conveyed by implying perspective cues, even when geometric rules are not strictly obeyed; there are diminishing lines around the central figure, but they are a little wobbly. This is also a great example of other depth indicators, overlap, which has been discussed in previous lessons (Lesson 2 – Contour and Lesson 16 – Form) and scale. As the figures in the background recede into space, they shrink in size, and get closer to the viewer's eye-level. The rendering also reduces in detail and use lighter lines as the street falls off into the distance.

Katsukawa Shunsho - 'Interior Scene' (Source: Cleveland Museum of Art)
This print is a classic example of parallel perspective, but it also shows that this way of drawing still forms a three dimensional space. Other indicators of depth are present, such as overlap, and the figures clearly occupy different positions on the floor. These ideas combine to show two figures placed behind a door. Views such as this are often referred to as 'flat', but there is a clear three-dimensional world for these figures to exist within.

Felix Vallotton – 'Laziness' (Source: Chicago Institute of Art)
This deceptively simple print combines elements of western linear perspective and parallel projection from Japanese prints. The bed the woman lies on is viewed from above to clearly display the figure and patterns on the drapery. This sort of viewpoint is typical of parallel perspective, as it generates the clearest view of all the elements.
However, close observation of the patterns shows a little diminishment. Embellishing the flatter view with a little bit of linear perspective helps with forming a slightly more convincing space around the figure, whilst benefiting from a viewpoint that best shows off the patterns in the image.

Giovanni Battista Piranesi - 'The Lion Bas-Reliefs, plate 5 from Imaginary Prisons' (Source: Chicago Institute of Art)
In his architectural renderings, Piranesi uses linear perspective to great effect. Linear perspective portrays these imagined spaces as well, with the complex arrangements of arches, stairs, walls and other structures adhering to this system. There is a degree of manipulation at play here, as linear perspective, a convincing way of describing depth, can also show depth beyond the range of the natural human field of vision.
The size and scale of human figures demonstrates the immensity of this space; the difference in size between the foreground figures and those further back is significant, and implies a depth far greater than a typical interior structure. This is pushed even further by rendering the more distant areas of this imaginary scene in lighter tones, indicating atmospheric perspective.
Key Points to Remember About Depth in Drawing
- Perspective creates an illusion of depth on a two dimensional surface, and includes linear and parallel projection.
- Informal perspective implies the effects of linear perspective without using a geometric layout, and includes ideas such as diminishment, overlaps, cross contour lines, and atmospheric perspective.
- Diminishment is the apparent shrinking in size of subjects with distance, and is a key feature of linear perspective.
Over to You – Manipulating Depth and Space
Recommended Materials: Any materials
Further Reading: Lesson 2 – Contour, Lesson 16 – Form, Lesson 20 – Foreshortening
Exercise 1: Tonal Perspective Study
This can be done with any subject – consider trying it with a different scale subjects, from wide landscapes to figures and objects.
In this drawing, use tone to put emphasis on depth. As mentioned above, the more distant something is from the observer, the lighter and less contrasted it appears, due to atmospheric perspective. Try to exaggerate this property beyond what you see to deepen the sense of depth.
This is also a good exercise to attempt in colour – in this case, the tonal changes still occur, but there is a tendency towards cooler hues with distance.

This portrait uses exaggerated atmospheric perspective, with the farthest eye having lighter tone and less detail. This pushes focus onto the nearer eye, and creates a sense of 'roundness' to the head.
Exercise 2: Studying Depth in an Artist's Work
Find a drawings or paintings you find interesting, particularly those with interiors, buildings, or landscape settings combined with figures. This is worth trying with a variety of art styles!
This exercise can be done by drawing over these in digital software or by printing them off, or using tracing paper with books, or you can sketch from the images. Breakdown how the artist has portray depth in the image. Are they using parallel or linear perspective, what kind of informal perspective observations are being used to push depth? Are they breaking rules to aid their image? For tighter linear perspective examples, it is worth looking for vanishing lines and trying to figure out where the viewer's eye level is.

Eugène-Louis Lami - 'Interior of a Museum' (Source: New York MET) For all its complexity, this image relies heavily on informal perspective, exploiting overlaps and the shapes of the vases to create a sense of depth, and consistent eyelevel. There are few vanishing lines to spot, and they are a little inconsistent on closer inspection, implying a greater reliance on observation.

Pieter de Hooch - 'Portrait of a Family Playing Music' (Source: Cleveland Museum of Art) Here I have drawn in lots of vanishing lines. By locating where they converge, I found the eyeline. This is a fairly consistent example, but sometimes the rules are broken to aid composition.
Exercise 3: Translation to Parallel Perspective
In this exercise, set up a simple still life on a table, or by setting out a mat. Ideally the surface should be rectangular, as this will make the exercise much easier!
On your page, lay out a loose grid of parallel lines, two sets at an angle to each other. You may tilt them to one side, or view them symmetrically. From here, sketch the surface the still life is set up from, adjusting your observations to fit in with the parallel line grid. On top of this, add the objects in the still life – because there is no diminishment, think about how observed properties such as overlap and relative placement show depth.
The still life objects themselves will not change due to perspective. For instance, box-type forms will be made of parallel lines, and openings of cylindrical forms will remain the same regardless of height.

This still life was set up on a box. Ignoring diminishment and focusing on placement means the edges of the book are parallel to each other, and the openings of the cup, saucer and bottle are similar ellipses.
–
Further links
>> Watch the Week 21: The Illusion of Depth main lesson HERE (Student & Life Tiers)
>> Watch the Week 21: The Illusion of Depth demo HERE (Student & Life Tiers)
Find links to the whole Tutored Life Drawing Course HERE
Files