Home
Home

 Artists
 Search
 Recent
 Random
 Posts
Posts
 DMs
DMs
 Tags
Tags
 Random
 Importer
 Import
 FAQ
FAQ
 Account
 Register
 Favorites
 Login
Login

Tutored Life Drawing Blog Week 17: Weight (Patreon)
Content
Weight is the result of how gravity affects the body, or any other subject. Gravity is always pulling mass down towards the ground – weight can also come from other forces acting on mass, such as muscle tension. Conveying a sense of weight in drawing is challenging because it cannot literally be seen – unlike how ideas such as shape and contour can be – and must be understood through the effects it has on a subject. In turn, drawing weight may not create a strictly observational result, but something more abstracted.
However, being able to understand the role of weight and express it clearly helps give a sense of solidity to the figure. It can be combined with other elements of drawing to push an observational drawing further with tactile understanding.
Weight can be expressed in numerous ways, such as understanding and drawing how weight is distributed within the forms of a subject, observed effects of weight, and the marks made to describe it.
Above: Tilli
Observing Weight
Whilst weight cannot be seen directly, it does affect many subjects in observable ways. If something is malleable, weight will reshape it depending on how its forms are supported. This is especially true of the figure, as muscle, fat, and other soft tissues will change shape under the influence of weight.
Compression occurs when something malleable is pressed against another form or surface. As form is compressed, it will distort to mould around, or against whatever it is pressed against, generally creating bulging forms. These are clear evidence of weight, where the form's own weight is causing it to compress.

This water balloon is compressed by its own weight pushing against a solid surface, causing it to bulge out to the sides.
Often, compression is most evident when one form is more rigid than another. In figure drawing, when the body is seated on a firm chair, or reclined against a firm surface, soft forms created by muscle and fat will get squashed and flattened, creating bulging forms.

The weight of the figure (red arrow) causes forms to compress and bulge to the sides (blue arrows). This is most obvious against the seat, but the bent legs also cause the forms of the thigh and calf to compress against each other.
Malleable forms will also compress when pressed against each other; the weight of the form on top will push down on the one below it. This means that both forms will change shape. When drawing forms that are being compressed, look for how the curvature of contour lines and cross-contour lines can help show how the forms have changed. More weight means that there will be more compression, which in turn means forms will become more curved. Weight can be emphasised through compression by making these lines clear.
Weight can also be indicated in hanging forms. These are forms that are not pressed against anything, but hang from a supporting point, their own weight creating lines of tension to the support, and causing soft forms to 'round out' at the bottom.

This hanging water balloon is pulled down freely by gravity, creating tension with its supporting point, and rounding out the forms on the lower side.
When thinking about forms hanging from the figure, it is important to remember that muscle and bone can be self supporting – muscles can flex and the skeleton is rigid. However, fat, breast tissue and skin cannot do this, so they will hang from the rest of the body. Loose, inactive muscles may do so as well, though this a little more difficult to see.

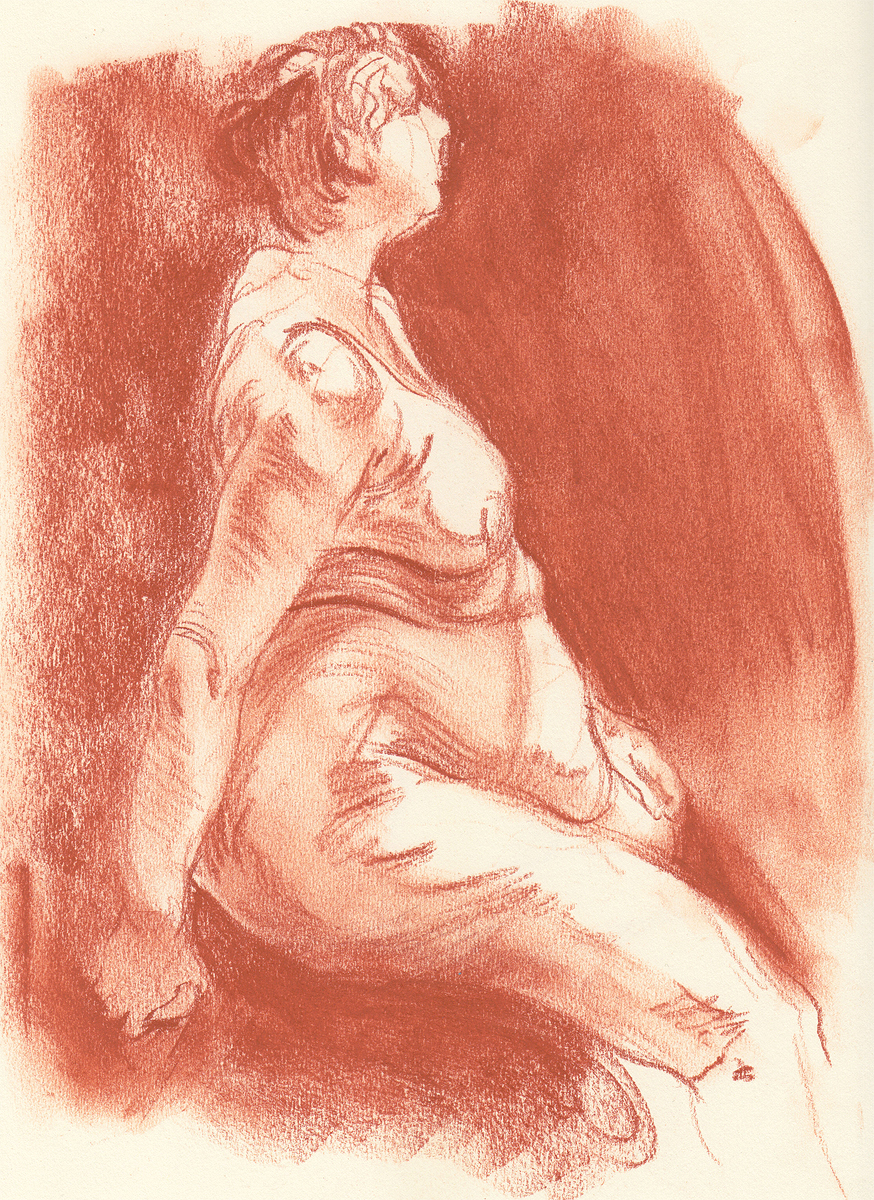
This pose shows some particularly clear examples of how forms change due to their own weight when hanging off the figure, with the weight direction roughly indicated with red arrows, and the rounding of forms indicated in blue.
In the figure, hanging forms may be seen as rounded out in a downwards direction due to gravity, or by creases. This is especially evident with the breasts, and any fat deposits. Loose skin is less heavy, but can also show weight as it is pulled down by gravity.
Aside from the passive behaviour of forms being pushed and pulled around by gravity, weight can also be shown in the tension of the body, specifically in the muscles that resist the downwards pull of weight. Muscles work constantly with the skeleton to resist gravity and keep the body from collapsing to the floor. Active muscles will have rounder, bulging forms, but they will not be hanging down. Tendons may also be visible, following the direction muscles pull in.

Muscles and tendons are usually easier to see when they are active in supporting the body. Look at how the points indicated in red show this, especially in how the legs support the figure. It is fairly common for one leg to support more weight than the other.
Tension is effectively the resistance to weight. By spotting tension in poses, the effects of weight can be implied.
Portraying Weight in Drawing
Whilst weight's effects can be observed, it is another thing to create drawings that clearly show it. There are different ways to manipulate the subject and use marks to create a more tactile sense of weight in the resulting drawing.
It is easy to forget the role of mark-making in a drawing. Intentional marks can make drawings more expressive, and describe properties beyond what is directly of observed, such as weight.

The way the conté has been smeared creates a sense of a downwards pull in this quick gesture drawing.
Mark direction is important because the direction a mark is made will create 'pull' in that direction, and this can help emulate the pull of weight. Vertical, downwards sweeping marks can create an overall sense of gravity, and by extension, weight, even in fairly static subjects.

A predominantly downward direction to the marks building this portrait helps add a bit of solidity, whilst the marks for the beard and body hair are more varied, and some are pulled in upwards directions to indicate a light, diffuse texture.
This can done with simple patterns of straight line hatching in tonal drawing, or with more dynamic and expressive approaches. Consider it one element that could potentially be combined with other drawing techniques.
The pressure and thickness of marks can also play a role in indicating weight. With many materials, pressure can change how dark, crisp or thick a mark is. These variables change with materials – for instance, with charcoal, the greater the pressure, the darker the mark, as pigment is more densely pushed into the page, but with ink, the line might get thicker, but it is always black.

Different ways marks can be varied to express weight. 1 – Lines made with different pressures. 2 – Lines transitioning between hard and light pressures. 3 – Lines of different thickness. 4 – Thick lines of different pressures.
By varying the marks in a drawing, it is possible to indicate and add emphasis to areas where weight is playing more of a role.
Gravity is always pulling down, but the direction of weight itself might not always be vertical, especially for describing compressed and suspended forms. For instance, the rounding out of compressed forms might best be described by an emphasis on curved cross-contour lines that wrap around them. What direction is the weight pushing in, and how is it affecting forms?

Weight has been indicated in this sketch by emphasising contour lines that show a lot of compression, and indicating the downwards flow of suspended form with cross-contour lines.
Shape is another property that can imply, and add emphasis to the idea of weight. This is especially true of the influence stance has on the overall shape of a pose - wider stances tend to indicate a greater sense of heaviness as they are more stable than narrow ones. Different shapes create a different perception of weight, and it is possible to emphasise weight by manipulating them.

The stances in these poses are all different, from the light, hopping on a single foot conveying an upwards thrust against weight on the far left, to a very compressed and wide stance on the far right conveying a strong downwards pull.
Shapes with broad bases are generally perceived as heavier and more stable than shapes with narrow bases. Carrying this over into a posed figure, the stance of the figure can either push the sense of heaviness by being wide, or in turn, convey a sense of lightness with a narrow stance. This is also true wherever the figure makes contact with the ground or a supporting surface (such as a chair) – a wide 'spread' of contact points can convey more heaviness.

The previous poses with a rough shape enclosure. Note that the wider the base, the more stable and 'heavy' a pose feels. Poses with a wider upper half start to have the opposite effect, with more of an upwards lift.
Key Points to Remember About Weight
- Weight is the effect of gravity, or other forces, pulling the mass of a subject, and drawing it aims to express that.
- Compression and suspension show weight in passive forms, whilst tension shows an active resistance to weight.
- Marks can help express weight in drawing, in contour, cross-contour, and other means of directional indication.
Over to You – Identifying Weight
Recommended Materials: Anything you enjoy drawing with that offers versatile marks.
Further Reading: Lesson 02 – Contour, Lesson 16 – Form
Exercise 01: Drawing from Sculpture
Sculpture is an excellent subject to draw when thinking about weight, as its distribution is key to a piece being self supporting, and if not, we can see how it is held up by supports.
For this exercise, use either a good quality photograph (many museums include high resolution images taken at multiple angles) or if you are lucky enough to have access, draw from life. Study any sculptures that you are interested in, abstract or figurative.
Try to think of firstly of how the sculpture's weight is distributed – what parts are giving it support, what areas add the most weight? Use your marks to express weight, and hold off just copying the contours. For extra challenge, avoid drawing any contours at all until the latter stages of your drawing. Secondly, as the bulk is built up, look at how the sculptor has emphasised weight, either through the 3D design, or any painted marks on the piece.

These sketches were taken from a Mesoamerican sculpture (Chupícuaro site – Geometrically Patterned Female Figure (Source: Cleveland Museum of Art)). Besides offering interesting forms, weight is also expressed in the pattern painted on it – for instance, the contour of the waistband of the clothing flexes to further express the weight of the figure.
Exercise 02: Drapery and Weight
Find some references of clothed figures to draw, preferably in loose costumes with plenty of excess fabric.
Drapery is influenced by its own weight and whatever it is supported by, hanging from the support – such as the figure – and being pulled down. Unless it is very rigid indeed (such as a thick felt coat) fabric has no means to support itself. Weight creates folds in the fabric that show the tension between its weight and its supports. Look for the direction the folds take, and how the fabric forms suspended between supports 'round out'.

These gesture sketches show how drapery hangs from the figure, or any supports – the left-most image shows how the fabric hangs between the body and supporting hands.
Exercise 3: Modelled Weight
This challenging exercise will not create pretty drawings, but is a good way to investigate the distribution and flow of weight through the figure, without the distraction of observable properties such as shape and contour. It can be done from both figures and still-life objects.
For this exercise, use the density of marks to indicate the relative distribution of weight. For instance, supporting points with the ground, such as the feet in a standing figure, will have a very high density of marks. This goes similarly for muscles that are flexing in order to support the body. In contrast, relaxed muscles, and lighter structures not supporting any weight, such as raised arms, will have a low density of marks.
Don't worry too much about modelling form for this exercise, but do try to interpret the body as it is placed in space. For instance, if a leg is hidden from view, try to imagine how it is taking its share of the body's weight.
It can be challenging to sense where the figure's weight is distributed in a pose just by looking. One thing that can help is imitating the pose. Similarly, with objects, try picking them up and turning them in your hands to get a feel for where they are heaviest, and lightest.

These pen sketches make an effort to explore the distribution and passage of weight through the figure to the ground. The density of marks generally increases for areas where weight presses down more, and marks are made whilst considering obscured body parts, such as the leg in the centre sketch.
–
Further links
>> Watch the Week 17: Weight main lesson HERE (Student & Life Tiers)
>> Watch the Week 17: Weight demo HERE (Student & Life Tiers)
Find links to the whole Tutored Life Drawing Course HERE
Files