Home
Home

 Artists
 Search
 Recent
 Random
 Posts
Posts
 DMs
DMs
 Tags
Tags
 Random
 Importer
 Import
 FAQ
FAQ
 Account
 Register
 Favorites
 Login
Login

Tutored Life Drawing Blog Week 07: Ink & Wash (Patreon)
Content
Ink is a versatile medium that can applied to the page with a brush for a more painterly application to the linear approaches we have previously explored. This lesson introduces the materials of ink and wash drawing, alongside some possible approaches.
Ink and wash lends itself to both quick and longer drawing approaches. It can be challenging to control for precise work, but opens up a rich vocabulary of organic marks.
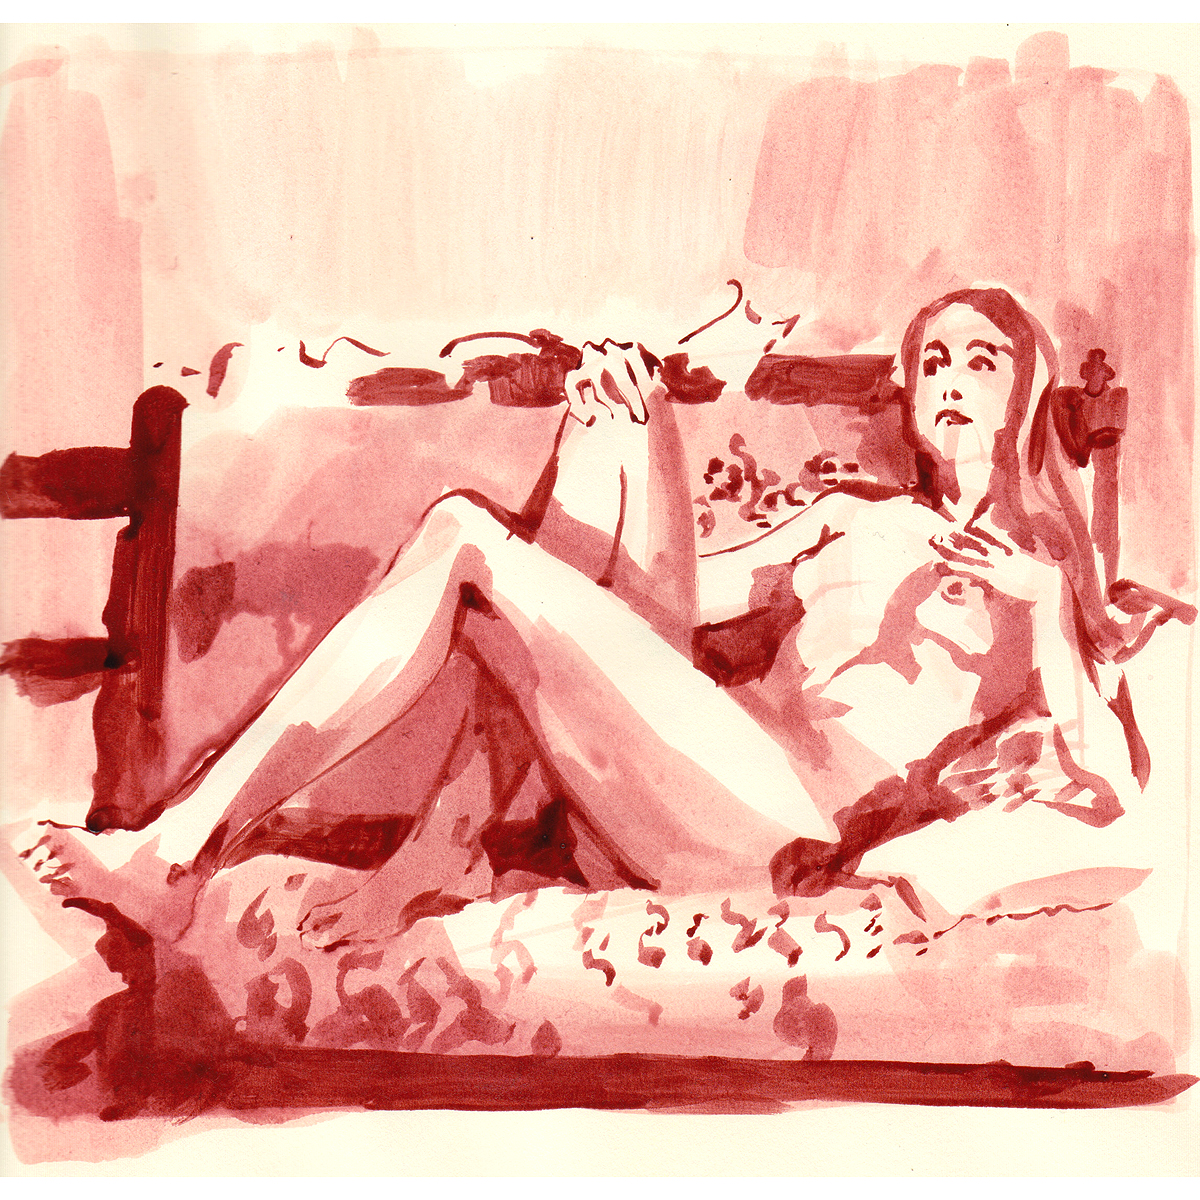
Main image: 'Katie'
Materials for Ink and Wash
There are a broad variety of approaches to ink and wash. The information below is a starting point, but definitely not a limitation, as the diversity of inks and brushes is huge.

Different inks, from left to right: Sennelier Colour Inks, Indian Inks by Jacksons and Sennelier, Winsor and Newton Coloured Inks, Chinese Ink, Home made Walnut Ink, Manuscript Fountain Pen Ink
Many different kinds of ink work well for ink and wash. Black Indian inks are a good place to start because of their versatility and low cost. However, there is a wide range of coloured inks out there to try – they behave different depending on their formulation, with some brands being thicker and darker, and others being runnier and more vivid.

Different dilutions of blue and brown inks in palettes. A pipette is used to add water.
Most inks can be watered down into more translucent 'washes'. Different pigments may need more or less water to do this. If a particularly pale tone is wanted, consider starting with water and adding ink drop-by-drop. The generally three to five different dilutions, including neat ink, should be enough.

Different brushes; from left to right: Chinese brushes (made with goat hair), synthetic brushes, squirrel hair brush, and a kolinsky sable brush.
There are many different brushes out there. Nice brushes do make a difference, especially when creating precise marks, but most of the time, decent quality synthetics should do. When working with ink, it is best to use softer, more flexible brushes. Flexible synthetic brushes, or soft hair brushes such as squirrel, or sable allow for the best flow of ink. Natural hair brushes tend to be more absorbent, and can form a finer point for making thin lines – especially sable brushes.
In terms of brush shape, anything can work, depending on the marks desired. Round brushes are a common go-to for ink, as they allow for thin lines, but can produce thicker shapes as well. It is generally a good idea to go for larger brushes, as fine ones cannot hold much ink, and thick brushes allow for a broader range of marks.

Dish soap is fine for washing out brushes, though olive soap or specialist brush soaps are great for cleaning especially dirty brushes, or brushes made with real hair.
Ink can be hard on brushes as it can be difficult to wash out. Always clean brushes with soap after using them, or the ink will dry between the bristles, ruining the brush. Wash until the soap comes back clean and rinse out thoroughly, though do be gentle. If you are not prepared to run a brush over your grandmother's white blouse, it is not clean.

Brush pens loaded with different dilutions of ink, plus one with water and a brush pen with soluble ink.
A portable option to ink and wash is to fill several water brushes with different dilutions of ink. Water brushes are a type of brush pen with a water reservoir. It is essential that fountain pen-friendly ink is used for this – many other kinds of ink, especially those with shellac in – will clog the pen. Fountain pen inks come in a wide range of colours as well.
Approaches to using Ink and Wash
There are lots of different approaches to drawing in ink and wash, ranging from quick, gestural drawings to longer, layered approaches.
Brushes allow marks to be produced quickly, useful when drawing quick or moving poses. When making these marks, there often isn't time for the outline, or any details to be resolved. In this situation, it is important to focus on what the figure is 'doing'. This won't result in a photographic result, but will record the pose with minimal marks.

These drawings were drawn from a moving figure. There are many different ways to record movement, such as overlaying drawings, observing changing contours, or focusing on specific body parts.
With a bit more time, it may be possible to combine different dilutions of ink into shorter drawings. More dilute inks can help indicate shadows, different local tonal values (darker hair or fabrics) or enhance negative shape, among other things.

Three minute poses in ink and wash. Dilute ink is used to indicate shadows or initial gestures.
One issue that may occur is the bleeding of wet ink, if there is not enough time for it to dry. A bit of planning ahead and working on different areas of the figure can prevent this; alternatively, the natural and random bleed patterns can be incorporated into the drawing.

Ink bleeds into wet areas in this image, softening shadowy edges, and adding an organic texture.
Ink and wash can be effectively combined with other media. This might be to add tone to a line drawing, or create a loose wash drawing that can then be worked on top of. Be careful when working on top of a line drawing, as water-soluble inks will run. Pick a waterproof ink (water resistant inks will hold their marks, but still run) to avoid this.

This figure was sketched in fountain pen, and a water brush full of dilute ink was used to add the darker tones. White chalk was added at the end to help contrast the figure against the toned paper.
The above image starts as a layout in very dilute ink to show the basic shapes of tone, and colour. In the second stage neat ink in used to start building up the darker shadows and refining the shapes around the figure and dress. I've avoided outlines for this drawing, though ink and wash combines well with linear drawings. One big strength of ink and wash is that it can be used to draw directly in shape, allowing more information to be expressed in fewer marks.
In the third stage, small shadow shapes are defined and placed into the mid tone areas, whilst the background has another layer of ink to darken it. Even smaller details are added in step 4, many picked out with fairly dark ink. In the final stage, white gouache is added to the drawing to bring out highlights and the white of the dress.

Steps of a longer ink and wash drawing, done in two colours with gouache highlights.
Ink Wash Artworks
Ink and wash has been applied on top of some quick sketches to help devise shadow shapes for the differently posed figures. These are brief studies, from an early stage of planning for a larger painting. Ink wash is useful for quickly indicating shadows in this way, as it allows the artist to draw directly with shape.

Paolo Veronese - 'Various Sketches of the Madonna and Child (recto)' (Source: Cleveland Museum of Art)
Tonal washes in ink build up the environment around the figure, with dilute mid tones creating the walls and floor, and darker tones helping to define the blankets. These allow for the paler skin tones of the figure to stand out in the composition. The line work, created with a quill, has an organic, slightly wobbly quality as it defines contours and patterns in the fabrics. Close ups of this image show an initial drawing in crayon or pencil, but the lines are not slavishly followed.

Victor Hugo - Sub clara nuda lucerna (Source: Victor Hugo House - Hauteville House)
Japanese ink drawings are a great source of inspiration for drawing with ink. In this example, the line work is quite minimal, and simplified to show the action of things like the swoop of drapery, rather than the precise contours of the fabric. Ink marks directly show the texture of the hair and beard, mostly likely from a dry brush being dragged lightly over the paper. The collar of the robe is also drawn with a single line.

Kono Bairei - The Wandering Hermit (Source: Cleveland Museum of Art)
Key Points to remember about ink & wash:
- Ink can be watered down to different dilutions to create lighter tones.
- When drawing with a brush, it is possible to create lines or shapes directly.
- Ink and wash can be combined with other drawing materials, as well as delivered through water brushes for a portable option.
Over to You – Experimenting in Ink and Wash
Recommended Materials: Ink, water, palette, brushes, paper towels
Exercise 1 – Drawing a Moving Subject
Moving subjects are a challenge to draw, but are an excellent thing to practise, as it helps strengthen observation and memory. For this exercise, use the brush directly, and try to work with fast marks. If possible, try working from life, but if there is no moving subject available to you, video is fine. When working from video, try to find footage that shows a full body (or object) in motion, rather than cropped heads and shoulders – sports, clown acts, nature documentaries, and many kinds of theatre are a good starting point.
Don't worry if it takes some time to get comfortable working with a moving subject. If materials are a worry, select a cheaper ink and paper, as this can produce a lot of quick drawings!

'Esme – Tae-kwon-do patterns' Drawings from a moving pose session.
Exercise 2 – Copy a Portrait Painting
This exercise is to create a transcription of a portrait painting in ink and wash. Pick a piece you like – it is fine to select portrait that forms part of a more complex artwork as well. Try to work directly in ink, using a dilute wash to create the initial sketch and build up tone on top. Doing this in ink and wash lets us start to think about the brushwork and edges artists use, as well as tonal values, without the extra complexity of colour mixing.

Study after Van Dyck's 'Portrait of the Artist Marten Pepijn'
Exercise 3 – Drawing a Dark Scene
This exercise is best done from life, but can be done from photography as well. Drawing dimly lit environments presents an interesting challenge as it often means a lot of tone needs to be put down, and lit areas make up a minority of the image.
Again, try working directly in ink for this exercise. Build up layers of dilute ink for shadowy areas, and think about where to use neat ink to indicate the darkest darks.

Shutters
–
The blog posts in the 34-week tutored life drawing course are available to all supporters, the full course of videos and reference photos are available to life and student tier supporters.
>> Read the Week 07: Ink & Wash Inspiration post HERE (All Tiers)
>> Watch the Week 07: Ink & Wash main lesson HERE (Student & Life Tiers)
>> Watch the Week 07: Ink & Wash demo video HERE (Student & Life Tiers)
Find links to the whole Tutored Life Drawing Course HERE
--
<< Watch last weeks class (Week 06: Cross Hatching) HERE
>> Watch next weeks class (Week 08: Tonal Value) HERE
Files