Home
Home

 Artists
 Search
 Recent
 Random
 Posts
Posts
 DMs
DMs
 Tags
Tags
 Random
 Importer
 Import
 FAQ
FAQ
 Account
 Register
 Favorites
 Login
Login

Lesson - Anatomy of Fat (Patreon)
Content
Here’s a quick lesson about the basics of fat, and how to draw it!
NOTE: This is not a comprehensive guide, nor is this a substitute for anatomical studies. There is soooo many variations in how fat appears in a person/character, so make sure to do your own research and studies!
Introduction
First, let’s start by understanding the basics.
Fat tends to form in the body in roughly 3 different ways:

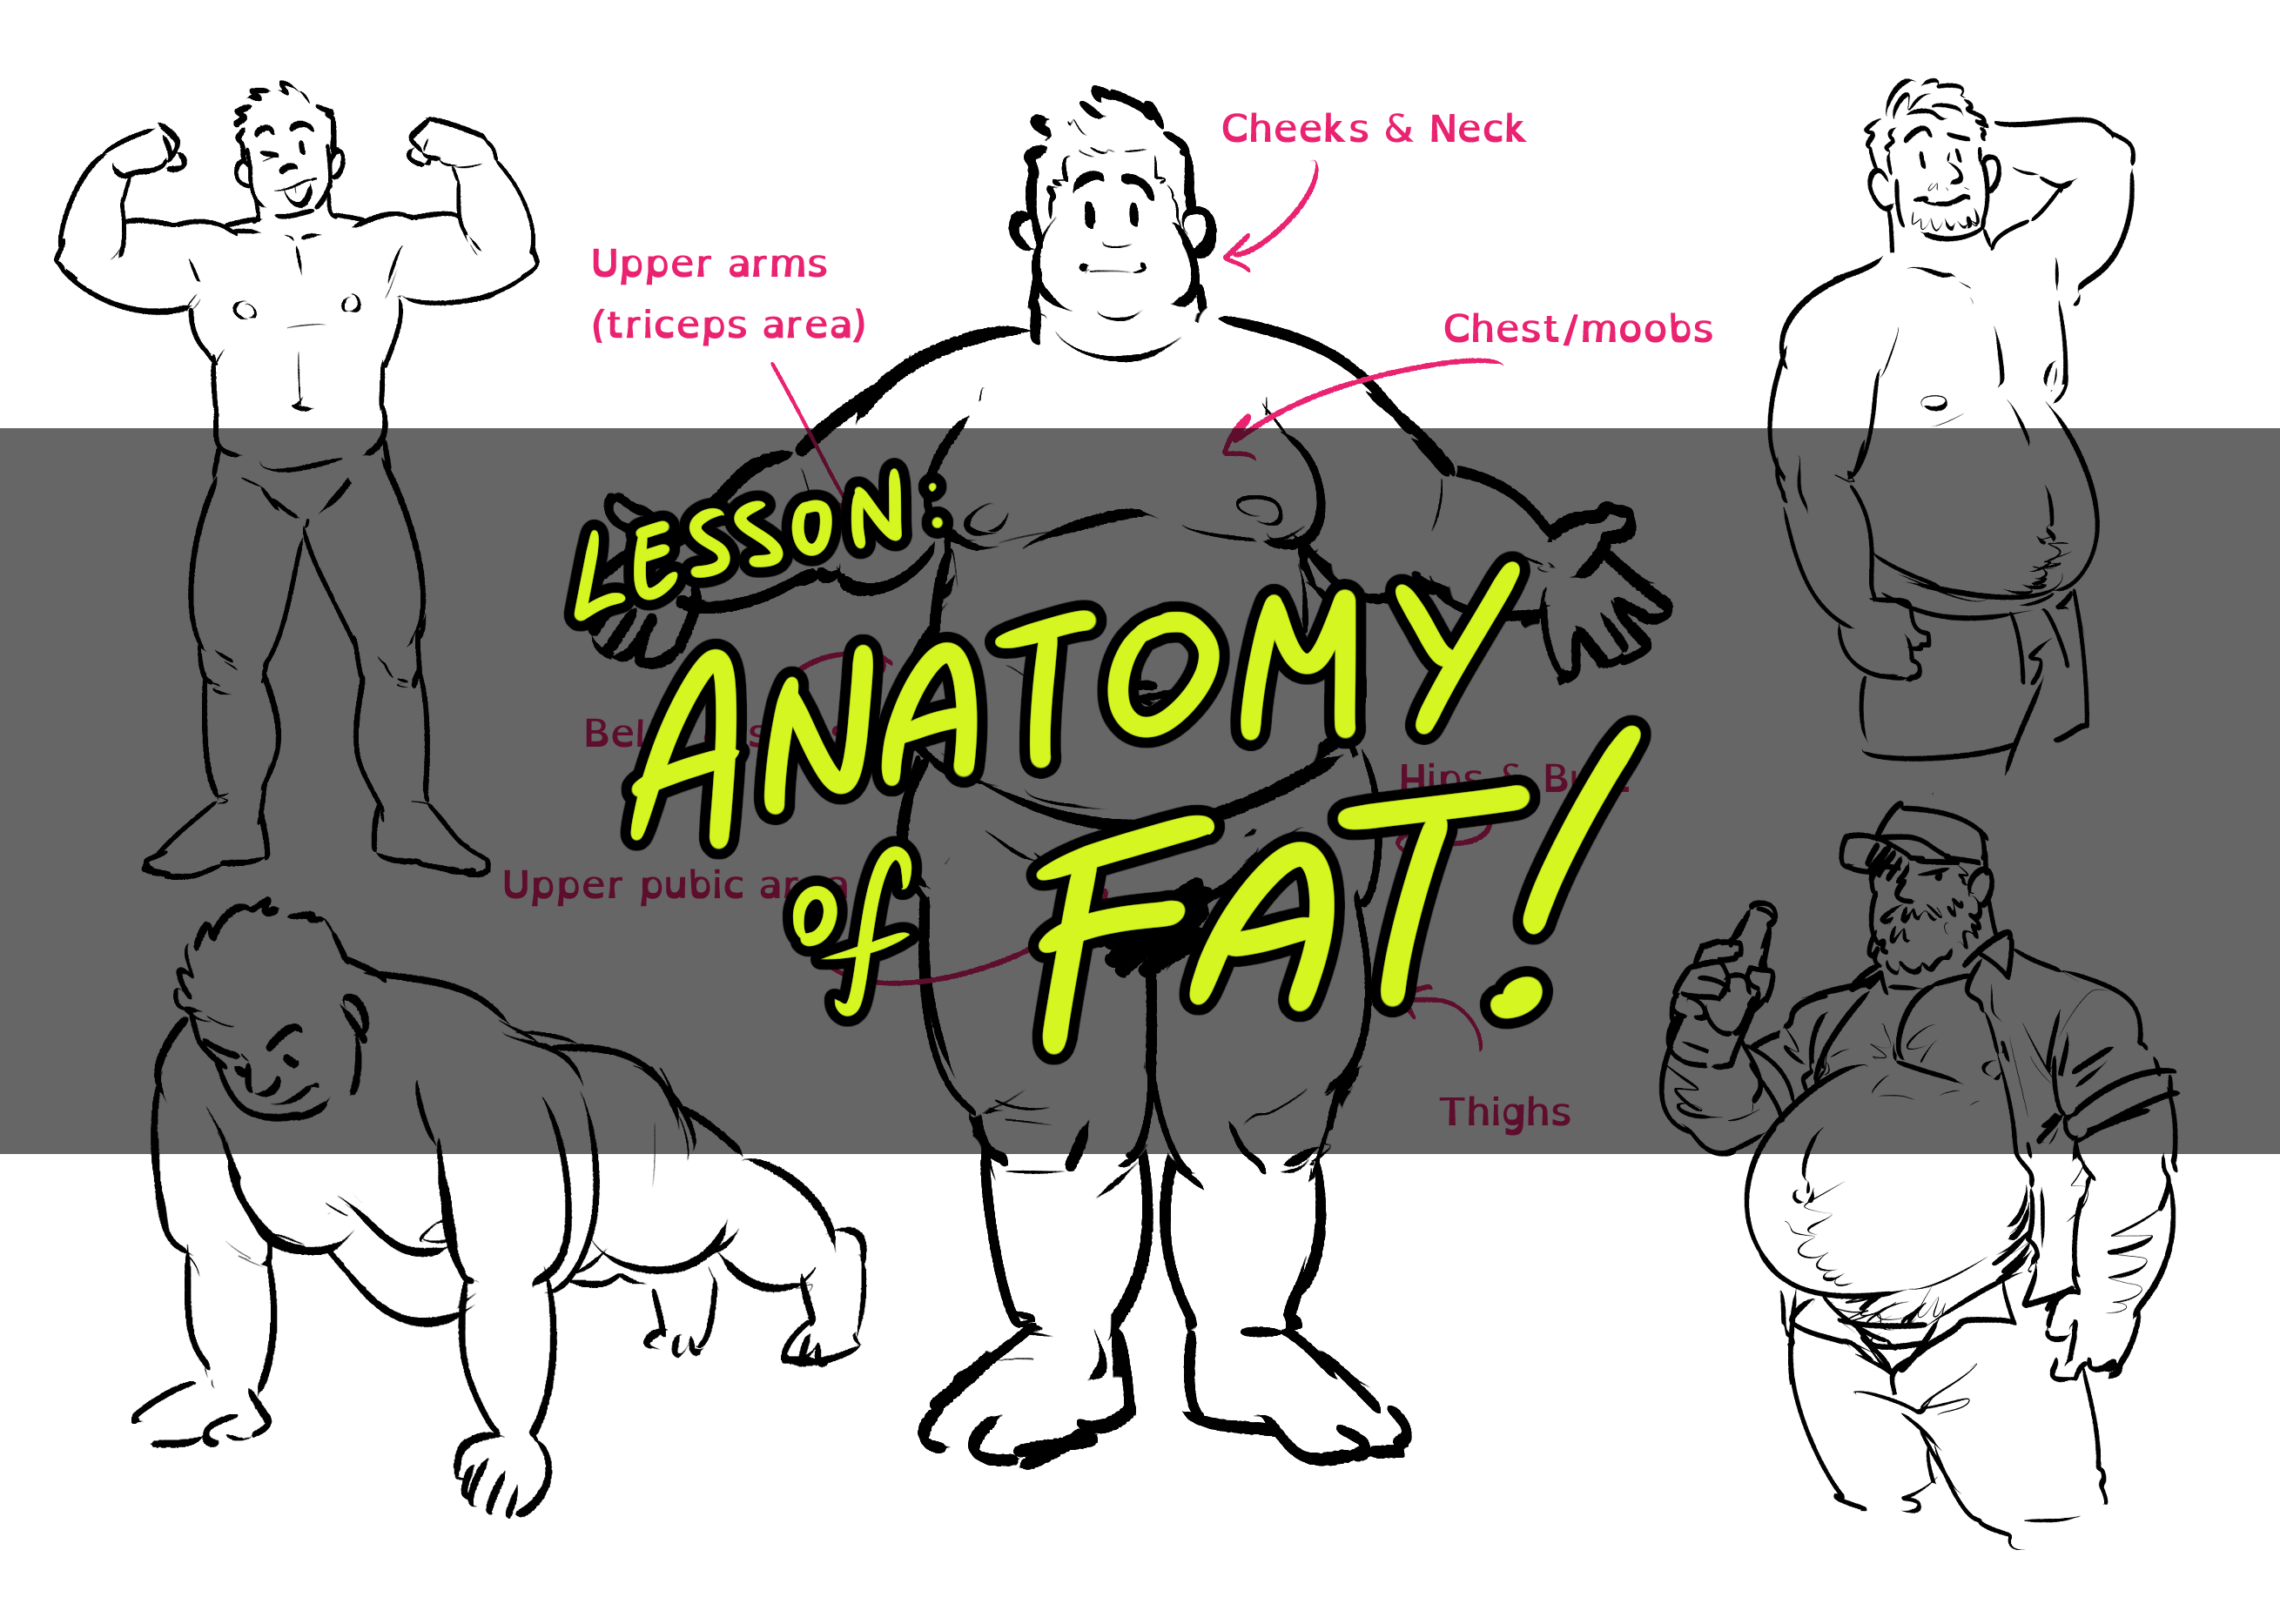
1. It forms as a consistent layer around a body part. This kind of fat conforms to the shape of whatever it’s attached to. This can be seen in the arms, legs, the hands/fingers, the cheeks and facial area, and around the body in general in less-chubby individuals. The keyword for this kind of fat is Soft, or Baby-like
2. It builds up into a mass. This is most easily seen in the butt and the breasts/boobs, and is often associated with feminine figures. However, this can also be present in the belly, thighs, upper arms, the sides of the torso, and around the face and neck, depending on how fat the person is. The keyword for this kind of fat is Plump and Localized
3. It forms deeper inside the body, i.e. visceral fat. This is the fat responsible for a big gut/beer belly in men. Because it’s deep inside the body instead of being near the skin, it might make the belly look big and round, but not necessarily soft. Muscle guts are usually because of this kind of fat as well. The keyword for this kind of fat is Gut.
Let’s get into more detail about these three types.
Type 1: Soft, Baby-like
This type of body fat forms an even padding around the entire body. Because of that, it ends up doing two things:
- It fills out the valleys of the body, softening areas like the armpits, abs, and the general shape of the pecs.
- It evens out the mounds of musculature, obscuring details and turning certain parts of the body into one even curve instead of several detailed curves.
So, on bodies like these,

It looks kind of like this:

Note the areas where details have been softened and evened out by the fat.

The cheek fat, in my observation, is commonly forgotten by most artists, even though it can be one of the first areas in the body to plump up when someone gains weight.
Also, note the areas where the fat doesn’t appear as much.

Elbows, wrists, the hipbone, the knees, and the ankles. The top of the skull technically counts too, and sometimes the collarbones as well.
These are areas where the bone is practically exposed, covered only by skin; fat doesn’t seem to build up here as much.
Lastly, note how Muscle and Fat are not mutually exclusive. Someone can be fat and have obvious musculature under that fat, just like the example on the left above.
I also should mention that there are various levels of chubbiness in people. Some people might only have a little bit of fat, while others have a nice thick layer. Here’s a couple more examples.

This kind of fat usually forms at an even pace. So when someone gains or loses weight, the appearance of this fat will change evenly in accordance to that.
Type 2: Plump and Localized
This type of body fat forms around specific parts in the body. The location of where this kind of fat appears is unique to every individual, but in general, here are the most common hotspots:

A very fat person is likely to have multiple (or All) of these fat build up areas, while someone who’s only a little chubby might only have 2-3.
Here’s a few examples of how this type of fat might appear on a person.

It’s worth noting that this kind of fat is generally more resistant to change. Therefore when someone gains or loses weight, these areas take longer to grow or shrink.
Type 3: Gut
This type of fat is likely the simplest to draw. Rather than developing right below the skin like Type 1 and 2, this type of fat grows deep inside the body, around a person’s internal organs. And, it primarily only develops in the stomach area, as there’s the most room in there for it to build up.
Because it’s located below the muscle layer, it’s possible for someone to have a solid set of stomach muscles while also having this fat.

This type of fat is most commonly associated with older men, as indeed, older men are the most likely to develop this kind of fat. Depending on the amount, this fat can give someone the impression of a Dad bod, a Musclegut, a Beer Gut, etc.

Application Principles
To apply this into drawing, aside from the knowledge above, you should also keep in mind these principles.
1. Each person’s fat distribution is unique.
The way fat builds up in every individual is different, therefore no 2 people can ever have the exact same body shape, even when their body weight is the same. One person might primarily have the type 1 of fat evenly distributed in their body; another person might be mostly lean but with a couple of plump areas like a big butt or belly, etc.
For examples of this, you can use this website: https://myprogresspics.com/, to see the variance in people’s appearance, even with the same body weight.
2. Fat is heavy and voluminous.
This means that fat in certain areas can push nearby body parts aside, affecting a person’s posture, and sometimes the way they move or walk.

At a certain point, this also means that fat can be restrictive to movement.

3. Fat is Greatly affected by gravity.
This means that its shape changes depending on various factors, such as the pose, whether or not the character is moving, if the fat is free-hanging or resting on something, etc.
Here’s a few examples.

Practice
At this point you might be like, “okay, but how do I Actually draw it?”
I greatly recommend starting with doing photo studies of fat people. Try to get familiar with the kinds of shapes that fat tends to make.
If you’re someone who’s more used to drawing non-fat characters, you might be tempted to start your sketch of a fat character the same way as you would draw a non-fat character.

But, remembering Principle 2, there might not actually be enough room for the fat that you’re gonna add onto the sketch.

I greatly recommend starting the sketch with the fat already accounted for. This might not come naturally at first, but the more you study and practice using references, the easier this will be.

The advantage of doing the sketch this way is that you can adjust the pose as you go, making sure the fat will end up looking good in the final product, instead of being restrained by the original sketch which may not be suited for a fat body to begin with.
If you really had to use a non-fat sketch as a start, here’s some common adjustments you might need to make so that it’ll be better-fitting for a fat character.
- Tilt the front of the chest up, and draw the top of the belly in accordance to this tilt.
- Tilt the front of the pelvis down, and make sure to have the fupa (fat upper pubic area) accounted for.
- Keep the shoulders the same, but move the arms apart, again, to make room for the belly, as well as the fat in the sides of the midsection or the moobs.
- Widen the hips and the butt, simply because fat tends to build up around there.
In the earlier sketch, it might look like this

Which gives a lot more room to accommodate the fat, like this

Final Note
I’m just gonna remind again that this is NOT a comprehensive guide, this is just something to get you started. You will need to practice and study to master this like any other skill, but I do hope this helps you in getting that initial foundational knowledge.
---
As always, if you have any questions, feel free to hit me up in the Art Labs channels in the AA Labs discord!
Files