 Home
Home

 Artists
 Search
 Recent
 Random
 Posts
Posts
 DMs
DMs
 Tags
Tags
 Random
 Importer
 Import
 FAQ
FAQ
 Account
 Register
 Favorites
 Login
Login

Lesson - Arms Anatomy (Patreon)
Content
The arm is probably my favourite body part to draw on a body. Drawing it comes naturally to me, but I’ve noticed that a lot of people have trouble figuring out the muscles in it, as I used to many years ago.
To start, here’s a sketch:

And then here’s a common way I’ve seen people draw arms.

It might not be very apparent, but many things are off in these drawings! In particular: the biceps are too prominent on both poses, while the triceps are almost nonexistent. Did you know that the triceps make up half or up to 2/3 of the mass of the upper arm?
In this lesson, I’ll be breaking down all that and more, so that you have a better understanding on how the arm works.
Note: Before anything, I should mention: unlike thighs, a character’s arms tend to move around a lot more. Therefore, there are a LOT of different positions that it can be in. Here are a few poses I quickly drew.

See how almost all of them are completely different from each other?
So, for the purposes of this lesson, I’ll first focus on the two neutral poses, and later on I’ll give you tips on how to approach the different positions and angles of the arms.
Anatomy of the Arm
To start, I’ll break down the major parts of the arm. I’ll divide it into 6 parts.

1. Biceps
The star of the arm muscles, the part that everyone loves to see and show off. Its job is to bend the arm at the elbow.
One thing to note about the biceps is that it is not a circle, and it changes form depending on both the position and the rotation of the arm. Note that the Rotation matters a lot too!

In this example, on the left, the position of the arm is why the shape is different.
On the right, the position is basically the same, but the rotation changes the shape significantly!
With that in mind, make sure to study, and keep references handy, so you don’t accidentally draw the biceps circular when it’s supposed to be more oval.
Another thing to note is that the biceps actually only makes up less than half of the mass of the upper arm. The rest is made up by the other big part:
2. Triceps
The less-famous half of the upper arm muscles. A lot of people tend to put too much attention on the biceps, and not enough attention on the triceps. This results in an imbalanced-looking upper arm.
It might sound counterintuitive, but depending on the angle, reducing the size of the biceps and balancing it with the triceps is the key to making the arm look more appealing. This is especially true when you’re drawing hyper muscles.


Do note that the main mass of the triceps are concentrated near the top, near the deltoids.
Also note that the triceps changes shape a little bit depending on the position and rotation, but not as much as the biceps do. Even so, always use references!
3. Deltoids
The deltoids is the muscle that covers up the shoulder. Its main job is to lift the forearm and the elbows. Because of this, its shape tends to change drastically depending on the position of the arm. Here are some examples

It’s important to note that even slight changes in the way you draw the deltoids can influence how the rest of the arm would look.

Note how some parts of the arm changes when the deltoid changes position. This will be important later when we get into the application section.
4. Brachioradialis
The Brachioradialis, sometimes called the “jerk-off” muscle (lmao), I think, is simultaneously the most important part of the arm, as well as anatomically the least influential muscle in the arm.
Firstly, it’s the most important because the way it’s drawn will quickly signal the rotation and position of the rest of the arm and the hand. Here’s an example.

Just from this, can you imagine what the rest of the arm looks like?
If you’ve built up some visual library in your mind by studying arms, you should be able to guess what the rest of the arm looks like.

Like that!
At the same time, it’s the least influential, because its shape is fully dictated by the position of the hand and the shoulder.
In any case! Some notable details about the Brachioradialis:
- It’s on the thumb side of the forearm
- It’s more prominent from the outer side of the arm
- It tends to form a wide v-shaped line near the elbow


5. Forearms
The rarely paid-attention to part of the arm. As much as I love the triceps, whenever an artist draws the forearm really well, I can’t help but to be enamoured by it.
The forearm is made up of a bunch of long, spindly muscles and tendons that control your fingers. Because of that, the forearm can never really be bulky and rounded like the other 4 muscles above.

I won’t go too deep in explaining the individual muscles, because frankly I also don’t know much about it.
Also because the individual muscles are small and spindly, the overall shape of the forearm doesn’t change that much, regardless of the movement/position of the hand. The only exception is when you rotate your wrist, but to understand how that works, we have to look at the bones!
The forearm has 2 bones: Radius on the thumb side, and Ulna on the pinky side.

Having two bones here is what allows you to rotate your wrists, like so:

Note this part: the Radius moves, but the Ulna doesn’t.
With this fact, and the fact that the Brachioradialis is on the thumb (Radius) side; it’s why the brachioradialis changes shape when you rotate your wrist.
In terms of muscles I think the most important part is that there’s some muscle protruding on the pinky (Ulna) side.

This’ll be your starting knowledge about forearms. I definitely recommend doing your own studies of the different positions to fortify your knowledge, because I don’t think I’ll be able to fit a comprehensive explanation of all the positions in this one lesson lmao.
Pop quiz!
In this position of the arm, which part is the Brachioradialis?

I’ll put the answer at the very end of this lesson!
6. Hands
Technically not part of the arm, but it sure is attached to it!
I won’t explain it in detail here, because that would need its own lesson. For this lesson, I’ll focus on this simple concept: The hand is King.
What does it mean? The hand is King, because the hand commands the position of every other muscle in the arm.
If the hand wants to point forward, the rest of the arm muscles move to accommodate that position.

If the hand goes up to scratch the head, the rest of the muscles move to accommodate that too.

If the hand, idk, pinches the nipple. Same deal.

We could even see this in action in one of the previous figures from the Brachioradialis section.

The entire arm changes position because the hand was rotated.
On the left, the inward twist of the hand causes everything else to twist the same way.
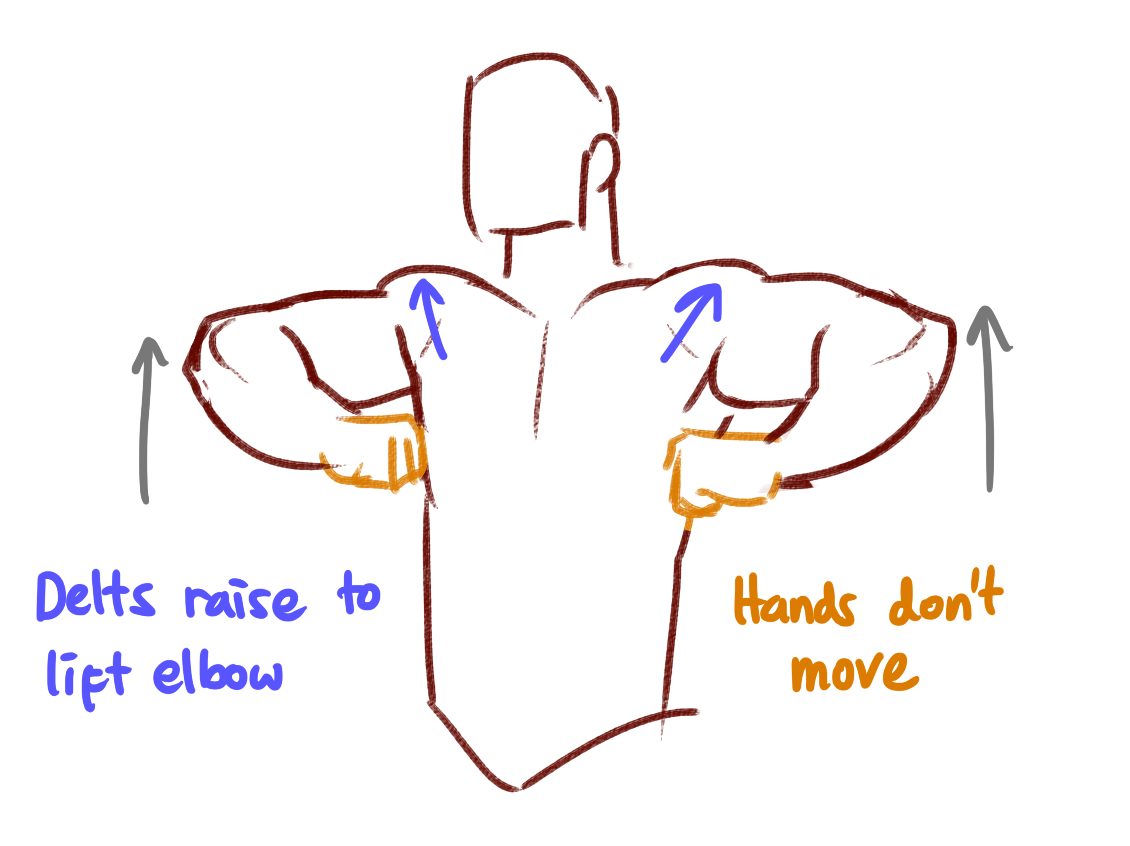
On the right, the straight position of the hand causes everything to be in their “default” resting position, except the deltoid, which is still raised slightly to lift the elbow.
Speaking of the Deltoid, it is actually the only muscle that still has some independent control outside the influence of the hand. One very apparent example to illustrate this is the chicken dance.

The main takeaway point from this is: Decide the hand position first before you draw the rest of the arm. Use references whenever you can, and pay attention to how the position/rotation of the hand affects the rest of the arm.
Application
Now that we’ve learned the basic anatomy of the arm, let me show you how I would apply it.
First we’ll go back to the sketch that I did the first time.

How would I approach this?
Step 1. Decide the hand position
You don’t actually have to draw the whole hand at this point, as long as you decide on the general position and rotation of it.

I’m doing a mostly neutral/standard hand pose on both of them. There’s a slight twist on the left pose, and a bigger twist on the right pose.
Step 2. Draw the Brachioradialis
This is the next step, because as mentioned before, the shape of the Brachioradialis will help to signal what the rest of the muscles will look like.

Remember that the Brachioradialis is on the thumb side, and that it forms a wide V line near the elbow. This should help you draw it.
Of course, if you’re having difficulty, references will always help!
Step 3. Draw the Upper Arm
From here, I use the Brachioradialis to help me position the biceps/triceps. For me, it’s usually easier to draw the biceps first, but feel free to do whatever works best for you!

This is also where you can adjust the deltoids' position depending on your vision. Should it twist more forward, or to the back?


I usually find the forward twist gives the character a more stout, bulked-muscle appearance, while the back twist gives them the illusion of a wider shoulder, kind of a dorito silhouette.
I’m gonna go with the back twist for this one, and finish up the triceps and elbow.

Step 4. Finish the rest of the forearm and hand.
This step should be simple enough!
First you follow the line of the ulna, from the elbow to the pinky side of the wrist, and don’t forget to add a bit of muscle!

And then you can finish detailing the hand and all that. Use references and do adjustments if necessary…

By the end of it you should have a pair (or more) of good-looking arms!
Note: This is just a recommendation based on how I draw arms, this isn’t the One True way to draw. Feel free to explore other techniques as well, and find one that works best for you!
As long as you have a good foundation of anatomical knowledge, you should be good!
Other Poses
For fun / For the sake of studies, I recommend giving a try at drawing the arms in the other poses I drew earlier!

You should at least find one ref for each arm position, but of course the more the better!
Here’s my attempt:

And you can see the recording of the drawing process here: https://drive.google.com/file/d/1JfC7572hcLuN2o_6MQriScEeDZj8HN9e/view?usp=sharing
Feel free to post your attempts in the visitor area on the discord, or post it in #general-anatomy if you'd like me to give you feedback!
Conclusion
This lesson is made so you can have a basic knowledge of the anatomy of the arms, and a basic idea of how to draw it in different positions.
However, you’ll still need to do your own studies and practice.
In case you don’t know, I have a folder of my old references on gdrive, so feel free to snag that to start your collection. I also have several links to websites where you can find references on the pinned message on #general-anatomy on discord, so feel free to use those.
Lastly, the answer of the pop quiz!

The brachioradialis is over there! Remember that it’s located on the thumb side of the forearm!
---
As always, if you have any questions, feel free to hit me up in the Art Labs channels in the AA Labs discord!
Files

