 Home
Home

 Artists
 Search
 Recent
 Random
 Posts
Posts
 DMs
DMs
 Tags
Tags
 Random
 Importer
 Import
 FAQ
FAQ
 Account
 Register
 Favorites
 Login
Login

Lesson: Shading in Major vs Minor shapes (Patreon)
Content
Here's actually a lesson I forgot to post on here. Mainly bc I wasn't sure if it was clear enough... But I'll post it anyway!
When doing shading on something with a lot of details (like a muscular body), it’s easy to get overly fixated on the smaller details. For example, colouring in individual abs, or fingers on a hand.
This can sometimes lead to overshading, like this example below.

While not necessarily bad per se, this can become a problem. Because all the parts are shaded the same way, everything demands the viewer’s attention at the same degree, making it so that there is no focus to the drawing. In certain cases, it can even be overwhelming to the viewer and unpleasant to look at.
To prevent this, we can practice making a distinction between major shapes and minor shapes.
Major and minor shapes are relative, but in the context of drawing guys, the major shape would be the overall body and/or limb, while the minor shape are the body parts and other details like facial features or hair.
Observation
First we can take a look at a real life example, like this photo below. I’ve made it into grayscale mode so it’s easier to see the light and dark values.

You might be able to notice the differences between this and the first drawing at a glance. But, I’d like to highlight a few key observations.
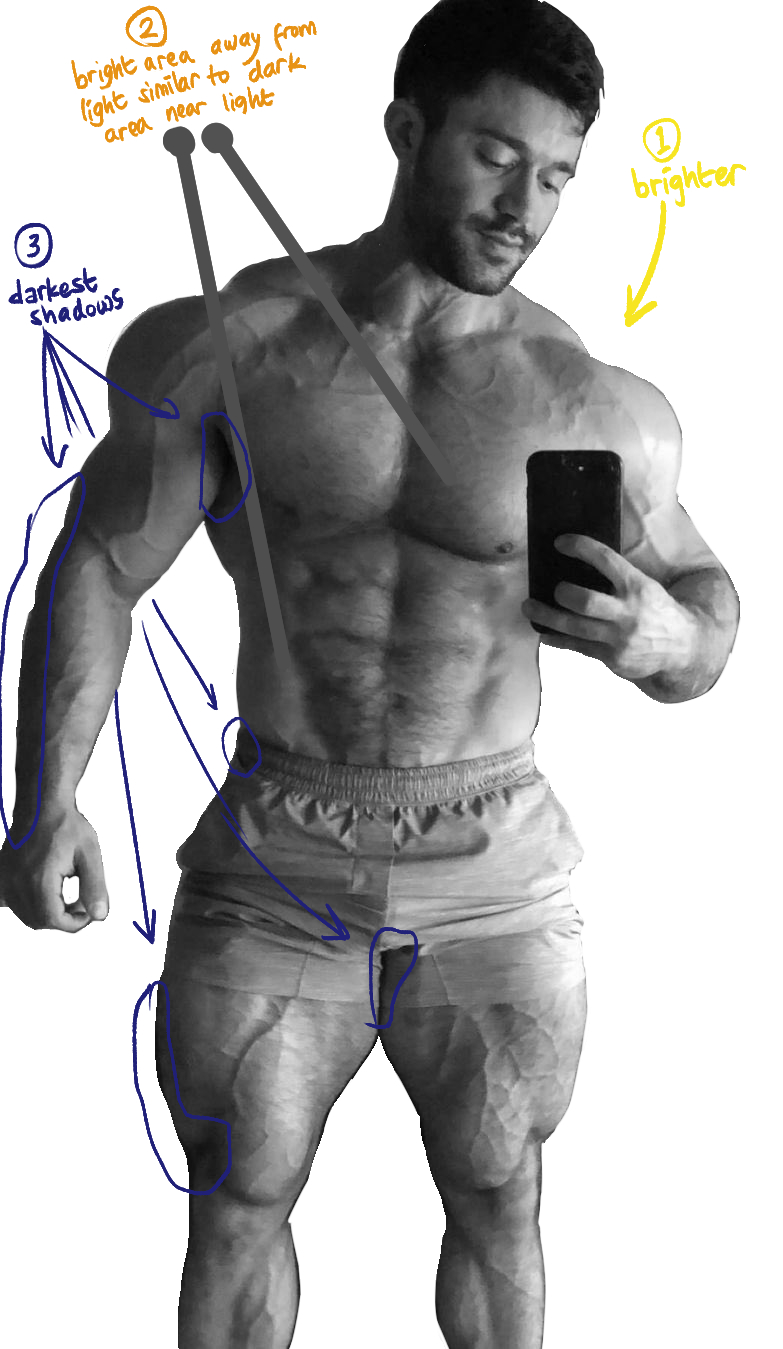
1. The camera-right side of his body is generally brighter than the left side, because the light source is from the right side.
This observation correlates to how the person’s torso can be considered a major shape. In your mind, you can imagine that it’s sort of a cylinder shape that has its own shading.

The individual muscles, like the pecs, abs, obliques, etc. will be considered minor shapes. They require their own shading, but the way shading works on them will be partially defined by the major shapes.
This brings up the second observation
2. Some of the bright areas on the left side of the photo are similar in value to the dark areas on the left side.
This is because the muscles on the left side of the photo are located in shadow to begin with, as defined by the major shape. Therefore, the bright parts of those muscles can only be as bright as the shadow of the major shape.

3. The darkest shadows occur primarily in areas furthest away from the light, or in areas of ambient occlusion
This is mainly a reminder that muscles located in the brighter part of the torso will generally not have super dark shadows on them, except in the case of ambient occlusion (see Light Theory for more info). We’ll see how this comes into play in the Application section below.
Application
Now we can apply some of this knowledge to do a second version of the drawing up top.
First, I’m going to add shadows following the major shapes of the drawing.

And then, I’ll start refining the shape of the shadows according to the individual muscles.

I’m still only using midtones and a light shadow at this point. This is important, because if you rush to add darker shadows, you might be tempted to over-shade and lose sight of the general shading of the major shapes.
Now at this point, you can choose to either add light first, or start adding the deeper shadows.

I generally like adding light first to make sure I don’t fall into the trap of making the piece too dark, but this is up to your preference, really.
From there, add the darker shadows and ambient occlusion, refine the shapes more if needed…

Notice how the right side remains generally brighter than the left side, even with the darker shadows added. This is to keep in line with the shading on the major shape, and creates a more believable drawing.
Now you can add some brighter highlights and/or some rim lighting to make the piece really pop

Notice again that the left side of the drawing doesn’t get much of the brighter highlights.
And at this point I like to go in with a big, very soft airbrush on a multiply layer to further emphasize the shadows on the major shapes.

And we’re done!
Let’s compare with the original shading

Putting it side to side, you can probably see the difference.
The body shape in the original shading ends up looking less realistic than the redone one. The muscles bulk out a little weird, kind of like balloons in some parts. While the redone one is more solid and cohesive. You can see the bulk of the entire body as well as the bulk of the individual muscles.
The best part is that it’s actually less work this way, because you spend less time shading the details of every single muscle.
In closing
When colouring, it’s important to visualise the subject as composed of major shapes and minor shapes. The major shapes will define the general areas of shadow and light in the subject, which then affects how you add shadow and light to the minor shapes.
In the context of porn, this generally applies to muscles, facial features, and even stuff like veins. In other contexts, this applies to stuff like engravings/carvings on metal, wood, or stone, or even objects that are composed of smaller objects, like grapes or a bowl of rice.
If you want to reference artists that regularly use this concept, I recommend the works of Uleez, Adam Graphite, and Zoroj.
---
As usual, if you have questions, feel free to send a message on the Art Labs channel on our Discord!