 Home
Home

 Artists
 Search
 Recent
 Random
 Posts
Posts
 DMs
DMs
 Tags
Tags
 Random
 Importer
 Import
 FAQ
FAQ
 Account
 Register
 Favorites
 Login
Login

December Progress Update! (Patreon)
Content
We have a lot to report on our progress with the art overhaul this month. A lot of groundwork has been made in terms of getting battle ready as well as developing a procedural environment and workflow for fluid simulation (for H scenes and whatever else), To top it off, I have new genitals and nipple grafts working with our character bodies. We’re at the point where you can begin to see it all coming together in the update video, and can probably start to get a gist of what v0.06 will look like.
Before I get started I wanted to shout out to the $40 and $50 tier patrons to send me a message if you’d like one of the current print designs. Alternatively, if you’d like to wait for a new design (I’ll be making new designs using the new artwork style once things are finalized and we get closer to v0.06), please let me know that as well and I will make a note of it to message you once they are ready. Lastly, apologies if you’ve sent me a message in the last week or so and I haven’t gotten back to you – I’ve been troubleshooting these boobies hardcore to get this update ready and will be responding to my backlog within the next day!

Police Overhaul
The first thing TK and I did this month was knock out basically the entirety of the police enemy overhaul for the new art style. As I mentioned in some of my comments on the last monthly update thread, this guy will serve as our test enemy as we make adjustments to battle visuals for the new style. You can check out the high res images of our work here:
This guy posed a few challenges, and may yet require some more work. We had created the original version of him at the end of last year, and at the time I was experimenting with the first iteration of the Genesis body system. I had originally intended to convert him over to Genesis 3, but at this point I’m not sure it’s necessary (I think he looks pretty good :D). That said, if we make the move over to Maya later we will probably need to convert him at that point, but even so it should only take a couple of days.
The biggest issue we had with him was probably the helmet. It looked okay with our old style, but upon making physically based materials for it I realized how bad the geometry was. TK put probably three days into redoing the geometry topology, as well as improving the UVs and adding bevels for realistic corners. The result is pretty huge improvement!
Another thing we’ve considered is dirtying him up to add to the realism. I really liked the look of the judges’ armor in the 2012 Dredd movie, so I was using that as a reference when discussing it with TK. He’s made a bunch of dirt and damage textures for the helmet and baton in Substance Designer, but I’ve yet to merge them into the existing textures. Not sure if we want to take the time to add it to the entire outfit, as it’d take us a couple of days.
Assuming we don’t take on any of the above, the only thing left aside from some rigging issues with his pants is to create his “exposed” version. I should be able to use the new Genesis 3 genitalia I picked up for the Corruptor (even with his Genesis 1 version), so that should go smoothly.

Malise Progress Update
In a perfect world Malise would have been finished when we showed her off last month, but alas, she’s a complex lass :o. That being said, what’s been done this month and has yet to be done is largely groundwork for the revised character art workflow for the new art style.
The first major accomplishment this month was succeeding in pose conversion from the old Victoria 4 character body type to the new Genesis 3 body. All of Malise’s old poses need to be converted to the new body. The good news is that I now have a working system for doing so, and have already completed half the steps for all of Malise’s poses. The bad news is the remaining steps require manual edits, but it’s probably for the best since I get to give all the poses a bit of attention and correct any weirdness. From this example image you can see hair and facial expressions aren’t automatically converted, but I at least was able to fix the issue with positioning shown here.
Accomplishment number two is that TK’s morphs and rigging for Malise’s suit are finally done! By morphs, I mean that we now have the unzipped and “wide-open” versions of Malise’s suit working perfectly. This was a big stepping stone for further clothing development, as this is the first full outfit we’ve rigged and created a joint correction/morph set for from scratch in Maya/Daz. Not only is it rigged way better than the old suit, but it also responds correctly to breast movement (meaning far fewer manual corrections will be necessary). Here are the high res shots from the video that were meant to show this stuff off:
Also shown in the above image is the reason I took approximately an extra week getting this update posted: new nipples! These new nips are what’s called grafts; basically, extensions to the Genesis 3 body. Not only are they fully poseable and provide for a ton of different shapes (all of which are better than the amorphous lumps that Daz’s bodies have for nipples), but they allow for fun stuff like nipple penetration! Unfortunately, Malise has such a unique character shape that I had to work for three days with the asset creator to improve compatibility and overcome some challenges, then another two days on my own of making the fixes. The good news is I now know how to add them to any character. Perhaps more importantly, we now have excellent genitals for Genesis 3 females that are far easier to work with than the ones for the previous bodies :D. Regrettably, I didn’t have time to perfect the look yet for Malise’s, so I’ll show it off next time ;(.
The last thing to report is that Uber has revamped the revamp of Malise’s gun in order to dramatically reduce the polycount (while retaining the quality). Due to an issue with how Daz processes geometry, it was impossible to get the old model to behave properly without being ridiculously high poly. Since we’ll be using the gun model a crap ton, it made sense to attempt to resolve the issue now. To achieve this, Uber actually learned the basics of how to develop game-ready low poly assets (for real time 3D game engines like Unreal / Unity) from existing high-resolution assets (CAD models, movie assets, or most of the assets we use).

AltairPL’s Programming Progress Update
November was extremely boring and taxing for me. The reason for it is simple – the majority of it was spent on battle engine testing/fixing. You have no idea how tedious this process is... especially if there's an issue requiring specific conditions to rear its ugly head... ugh. That said, most critical and problematic issues were resolved. Not counting one possible crash in certain conditions, the remaining issues are more or less minor. Since nobody but me knew about those bugs and the prior battle engine state, listing them would be kinda pointless.
Some of you probably want to ask: "why the hell testing battle engine takes so much time?", which is a fair question. To answer it, I need to go a bit in depth of how the new battle engine works. It probably was mentioned in passing, but it was probably pretty vague and a long time ago, so a refresher won't hurt. The current battle engine iteration is much more advanced than previous one... some parts of it were simplified, but most of it became a lot more complex. In the end, however, the new version is much more manageable and customizable then previous one. I shit you not.
The first major change was the battle time flow overhaul. Previous MATM versions had a few time modes, which were implemented to allow players some level of customization, and in turn make the game more accessible to people not into games requiring high reflexes and dexterity. The idea was good, but the difficulty gap between some of those modes was pretty big, without anything in between. Also, the way it was made prevented us from easy expansion if needed. The new system is a bit similar to the old, but a few boolean flags representing battle situations where time flow should be paused were replaced with time flow speed multipliers. This means that the player will have better control over how battles are played. For example, there’s now a multiplier value that determines battle speed when a character is waiting for action input:
- 0%: time flow paused - same as "Wait for input" or "Wait for input and action" in previous system.
- 100%: time flow unchanged - same as "No wait" or "Wait for action" in previous system.
- 1-99%: respective in-between speed value - not attainable in old system.
On top of that, the new system also allows for changing the base battle time flow multiplier, which can be set to value between 50% and 150%. So now no matter whether the default speed was to your liking, was too slow, or was too fast, you should be able to make battles more enjoyable for yourself.
The time flow overhaul also allowed us to unify how escape and manual struggle works. Also, the latter is no longer restricted to any time flow modes. If the player triggers escape or manual struggle, all multipliers but the base speed are ignored and battle time progresses at normal speed while escape/struggle is active. The same thing applies to the SHIFT key, which was, in previous versions, used to force time to pass in a situation where time was stopped.
Now for the fun part. Someone suggested it around v0.05, and my answer then was something like "I would love to, but I'm too inexperienced to do this at this time". When I started planning/implementing battle time flow overhaul, however, it started bothering me and I even started considering it as possibility. What is it? You need to be patient for a little while, because I need to go back to MATM's RM (RPG Maker) roots first... you should figure it out pretty quickly, though.
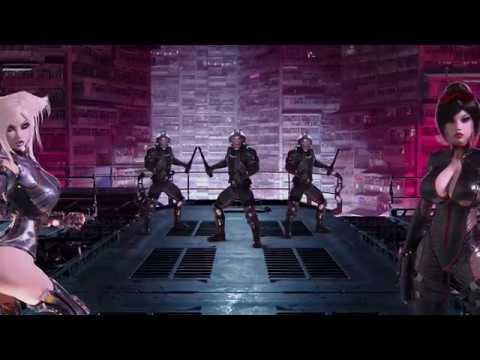
So, vanilla RM battles are entirely turn based; every turn, all battle participants perform their actions based on stat-based order... rinse and repeat. This approach is very simplistic and very limiting, e.g. if enemy is two times faster than PC (player character), it should be able to perform twice in the same time PC can perform once. This assumption became the base of first MATM battle engine (before my time), but even though much better than RM version, it still had one of its major limitations: only one action could be performed at any given moment. We needed a battle engine capable of real-time/full action concurrency. To put it more simply, battle participants can now perform actions at the same time (here are some images showing just that). This is the main reason why so much time was spent on the battle engine overhaul before URGE development, and why so much time is needed to test/fix it now. Thankfully, the battle time flow overhaul simplified some things in the battle flow itself, so changes to it needed by full concurrency were relatively small. On top of it, however, a lot of existing structures had to be modified, including some rewritten almost from scratch, and a few new structures had to be implemented. Even without full concurrency, MATM's battle engine was extremely complicated, so it was a lot of hard work to make everything play nice with this new addition. It was a long road already, and there's still a long road ahead, but I'm really proud of what I've achieved so far and it's already paying off. I'd say that 90% of full concurrency stuff is implemented, but the remaining stuff is not as important as stuff already done. It's still hard to say if and when full concurrency will find its way into MATM releases, but considering how the battle engine is structured now, the more stable full concurrency is, the more stable the non-concurrent mode becomes.
The hold/grapple system is now the least advanced and most problematic battle engine sub-system. It needs an overhaul as well, but not everything related to it is properly planned and I have no idea if I'll manage to squeeze it in v0.06.
Back to the current update. Around the last IC update I had to take a break from battle engine testing. While fixing battle stuff, I've noticed how shitty some aspects of battle sprites display are. Well, they were working, but my paranoid obsession with performance (in RPG Maker, every bit of performance counts) made me do some things in a very hard to read and maintain way. I've been playing around with custom sprite class and in the process I've managed to improve their functionality and readability a lot while maintaining basically the same level of performance. With URGE on the horizon, I'll probably have to revisit some other similar pieces of code and restructure them to make them more manageable and readable as well... for the sake of my sanity at least.

Battle and Portrait Lighting
One of the major things that was bugging me at the beginning of the month was how we intended to make the character portraits and enemy sprites look good in battle. We learned when we had to create a new sprite lighting system for map sprites that the new art style demands that things be lit properly else they look completely out of the scene-- obviously not a good thing at all for pre-rendered graphics. Unfortunately, a system like our map sprite lighting system won’t work with portraits or enemy battle sprites; they’re just too detailed and faking it would look bad.
Well, APL and I spent half a day discussing it and we’ve decided to pull the trigger on an idea of mine. The solution is very low tech, but will look great. Basically, we intend to expand the sprite versioning system we started using back in v0.03 (originally a system for making the map sprites fit with the color of the maps) to enemy battle sprites and character portraits. What this means is that for each different environment, there will be an appropriately lit version of necessary character portraits or enemy battle sprites. I made a few basic examples just to give an idea of what I’m talking about (see the battle mock-up section below for an example of what it may actually look like in battle):
Shitty Character Portrait Lighting Examples (not actual in-game environments)
Shitty Enemy Battle Sprite Lighting Example 1
Shitty Enemy Battle Sprite Lighting Example 2
The good news about this method is that It won’t tax system resources in any way over what we already have… oooother than hard drive space, which it will consume a lot of. To counter this, we’ve decided to use a PNG compression plugin that we scoped out awhile back (I think I even showed some results from it). The visual quality loss is really minimal (only really noticeable on smooth gradients), but the disk space savings are fantastic. Here’s a set of example images: Uncompressed, and Compressed. The compressed version is 70% smaller, and I personally can’t tell the difference without zooming in. Even with this however, I still think MATM will have the largest file size of any H game once it’s completed (potentially up to 15 GB).
This does lead to some bad news, however at the same time it’s kind of a weight off my chest. We’ve basically been scrounging for resources to poooossibly, maaaybe one day be able to do animated portraits in battle. Given the above, I simply don’t think it’s realistic with a pre-rendered game of this size, so I’ve officially decided we won’t pursue that route. Honestly though, this is as much a production decision as it is a technical decision (we’d simply need more people to even consider pulling that off). Instead, we’ll use those resources to make what we’ve done all along look amazing.
Obviously, all these versions of portraits/sprites will require a lot of rendering. Luckily, that won’t really add a lot of work. Since we don’t have to post-process our renders anymore I can create a relatively simple lighting rig and rendering automation system and let it go to town (which I’ve already started working on, and you can read about in the next section). The downside (of course there has to be one), is that we really can’t do much post-processing if we need to since we’d have to do it like five or even ten or more times to fit with the various lighting situations. What’s that mean? Well, for one we can’t paint all our juicy liquids by hand, since fluids look way different under different lighting conditions. Therefore, I’ve tasked Ubercharge with developing our 3D liquid simulation system early so that we can use it for v0.06. You can read about our progress there in the last section of this update!

Battle Mock-Up and Art Workflow
Above is the mock-up battle image I’ve worked on over the past week. This is very likely what v0.06 will look like in every aspect (minus the fact that it’s in 1080p… v0.06 will be in 720p).
I’ve made a small gallery to give some details about the changes you see in the image, as well as how our workflow has to change and potential improvements we are considering for down the line.
A big thing I was worried about was whether the user interface would mesh with the new art style, largely due to the UI being kind of cartoony. While I can’t say it fits great, I think it will actually be okay for v0.06. We don’t have the money to right now, but I’d really like to hire a legitimate UI designer to help improve the aesthetics of it to better match with the new look of the game. Besides, it would make more sense to do this once we’re in the new engine, have a better grasp of what we can do with shaders, and are looking more closely at 1080p graphics.
One last thing I want to bring up is that while it’s important for us to get v0.06 out soon, I want to remind everyone that it’s important we get this foundation correct for smooth sailing once we start pumping out content again. We had a lot of inconsistencies with battle artwork in the previous style that were bound to create issues later, and I don’t want that happening here.

Fluid Simulation
To start off here, you’ll find a short example in the video above showing our fluid simulation working in Houdini (actual simulation time was about 5-10 minutes… this is playing back a cached version). We’re finally to the point with our simulation and processing workflow where we can begin integrating it into the new art style. (check here for a full resolution version of the finished Malise test from the video)!
After pulling the trigger on scene-specific lighting for battle, we had decided we needed to put maximum priority on getting 3D liquid working in order to have it for battle portraits for v0.06. One of Ubercharge’s primary goals this month has been to create a procedural system and workflow that will allow us to, as simply as possible, pop a scene from Daz or Maya into Houdini and start spraying buckets o' jizz errywhere.
Houdini is a node-based program for procedural generation of 3D geometry and effects. Fluids, smoke, and explosions are some popular uses, but it's a very extensive and flexible program. I've also spent a lot of time this week learning as much as I can, not only because I'll be the one using Uber's system, but because I intend to create battle FX animations (skill / damage FX, etc.) for the new art style using it. TK, Uber, and I have a huge video tutorial course we're plowing through, but the fluid stuff has proven to be our trial by fire.
There have been a number of challenges we had to overcome to get to this stage, and a few more on the horizon still to get it really good looking. The first was the jizz material, which after literally days of experimenting in different lighting situations and sending it back and forth Uber and I have it looking pretty good (it will no doubt be improved more over time). The second challenge was collision for the fluid simulation. Uber discovered that for proper behavior, the collision model needs to have actual volume (most clothes for characters are just planes, meaning they are infinitely thin). Currently we're fixing it on a case by case basis by extrusion, but an ideal solution would be to have a process for creating closed models similar to what's required for 3D printing. Daz has to rear its ugly head somewhere in everything we do, and here's no exception. We found a lovely little bug with the rendering engine where when a refractive object (like, pretty much every liquid) clips with another object you get nasty shadow artifacts. This is, of course, bad when you want to cover your characters in goop. Uber's solution was to add a boolean component to his liquid system that carves out the liquid geometry in the shape of the collision object, meaning liquid perfectly fits on top of whatever it's covering (and thus, no more clipping :D).
Here's the culmination of Uber's efforts so far, complete with a procedural bubble generation system! Please mind that there are still a bunch of experimental nodes and dead-ends in that diagram.
A couple of things that you aren't seeing in the example scene that we plan on improving upon are general wetness and stringy/drippy/elastic liquid. For the former, we are considering using an alternate set of "wet" materials for characters/clothes and using the render manager I made awhile back to simply pump out a wet and dry render when necessary, then blend between them in Photoshop (this is basically what I did with the old art style). For the latter, we decided that using actual elastic liquid simulation to get the drippy effects we want in some cases is simply way too time consuming. Not only does simulation time explode, but it's really tough to get right on the first (or first dozen) tries. Instead, Uber plans on modeling a set of shapes that we can simply merge into our simulated liquid meshes and easily edit to perfection. He created this test model in just a few minutes, which could easily be edited for use over and over when we need an effect like this.
That's about all I have to say about splooge for now :0.
What’s Next!?
For the immediate future I personally need to finish up with Genesis 3 genitals and continue working on the battle artwork workflow overhaul. Now that Malise’s suit and guns are finished (and once her genitals are), I’ll be able to start creating actual battle portraits. I’ll likely create a second battle background soon so that we can begin work implementing the battle lighting system (which I’ll need help from APL on, so whether he’s at a good stopping point with his work on battle will play a role in whether we get that done sooner or later). This system will also work for portraits on the map and in the menu, so we’ll knock that out at the same time. For this month, Uber is doing a sort of a concept art apprenticeship, so he’s only working on critical stuff until he finishes that up, and then he’ll likely be back to working on maps with TK. At some point I’ll also need to work with APL to make any necessary adjustments to the menu / ARIS scene for the new art style and remaining adjustments for the new aspect ratio. I’m absolutely positive I’m missing some stuff here, but once the remaining artwork overhaul related stuff is out of the way we can really make progress on finishing v0.06 content.