Home
Home

 Artists
 Search
 Recent
 Random
 Posts
Posts
 DMs
DMs
 Tags
Tags
 Random
 Importer
 Import
 FAQ
FAQ
 Account
 Register
 Favorites
 Login
Login

- The Mighty Powers Of Palette Swaps - (Patreon)
Content
The cart and the raw source code will soon be available to download for all my patrons (1$+)!
Wanna know even more about palette swapping? Read on!
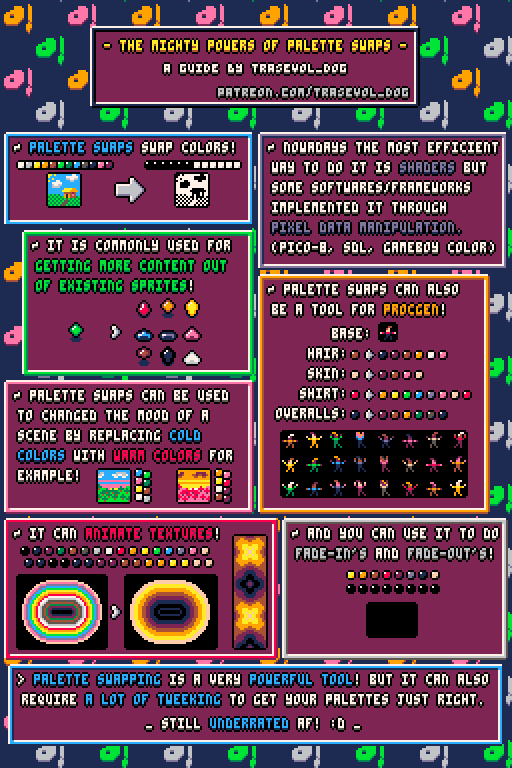
Pokemon's shiny pokemons are one very elegant example of palette swapping as a content generation tool. In Pokemon games, each pokemon species has its own appearance but each species also has a very rare version of itself, called "shiny" and that version uses the original sprites of the regular species only with a palette swap. I think the "shiny" version is slightly more powerful than the regular one but the main difference really is the palette swap.
A palette swapping shader is actually fairly easy to implement. All you need is a fragment shader that replace specific colors with other colors. Both the colors that need to be replaced and the colors that you want instead should be fed to shader in uniform arrays, or, if you're feeling fancy, in buffers.
About the pixel manipulation implementation! This is mostly an educated guess but I believe that in early Nintendo systems (eg: Gameboy Color and NES) as well as in the SDL framework's 8 bit surfaces, surfaces are actually a map of color indexes, associated with a palette. When actually drawing these surfaces, the system looks up the color for each pixel's color index in the associated palette. In this case, doing a palette swap is as simple as replacing or modifying the associated palette.
In Pico-8, I think the idea is the same except that it works also for drawing lines, circles, etc, not just sprites. It seems each color manipulated in the code is actually an index for a map which itself remaps each color to the color you set it to using the pal() function.
Using palette swaps for procedural generation is great because it lets you create a great graphic diversity at very low memory cost, as you do not have to generate a new set of sprite for every new generated instance. The only time costly step to do this is to choose and set the colors you want for each element and then forbid unwanted color combinaisons. In the GIF from above, each element of the sprite was forbidden to have the same color as any other neighboring element.
The texture animation trick can also be used to simulate lighting by simulating a normal map. Each color of the palette can represent an angle of inclinaison on the surface and then these colors can be colored swapped to the processed lightened colors from the positions of the object and of the light. However, this method can be very expensive on CPU. Prefer actual normal maps amd shaders if they are an option.
A good way to do fade-out's and fade-in's with a restricted palette is to define a map of the colors of the palette and that index them to darker versions of themselves inside the palette. Then when drawing the faded surface, you can look up the darker version of a color and then the darker version of this one and so on, to define the current intensity of the fade.
Note that fades can also be done towards other colors than black and also that this can be used to hide objects on a larger background.
In Pico-8, you can do palette swaps using the pal(cA,cB,[l]) function. After calling this function, cB will always be drawn instead of cA, until you call the function again to set cA to another color or back to cA, or that you call "pal()" which resets all the colors. The l argument is optional and '0' by default. If you set it to one, the palette swap will be done at screen level, meaning all appearances of cA will be replaced by cB on the screen at the end of the frame.
I hope this is enough for your thirst of knowledge!
There will be more guides and tutorials in the future but if you want to see them sooner than later, you should support me! :)
Take care!
TRASEVOL_DOG
Files