Home
Home

 Artists
 Search
 Recent
 Random
 Posts
Posts
 DMs
DMs
 Tags
Tags
 Random
 Importer
 Import
 FAQ
FAQ
 Account
 Register
 Favorites
 Login
Login

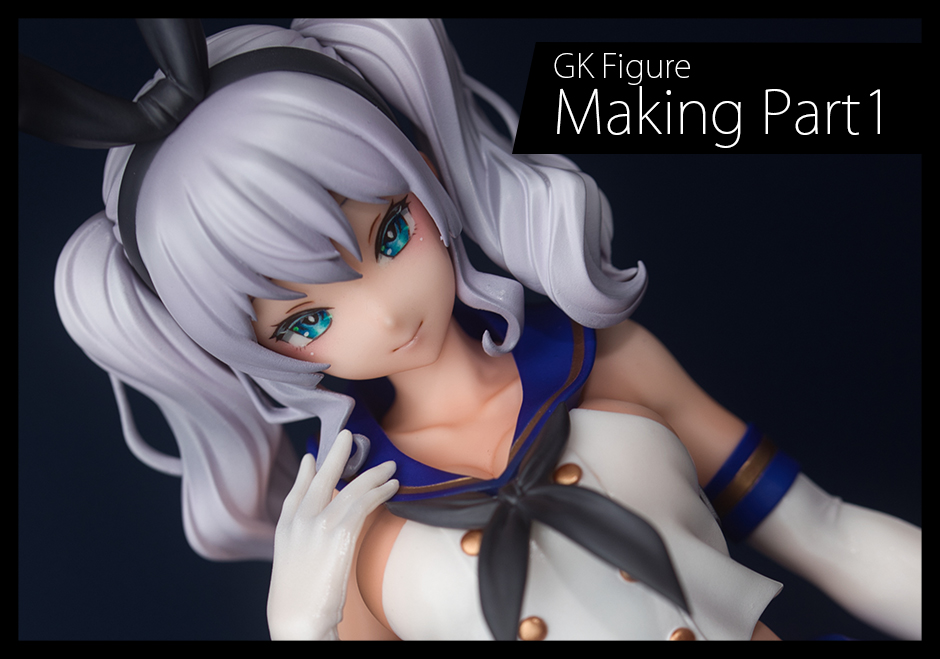
GRIZZRYPANDA - Kashimakaze making process part.1 (Patreon)
Content
This time, I painted Kashimakaze, sculpted by Grizzly Panda, and would like to introduce the process of its making.
┃Surface treatment - Dry fit
The first step, as always, is to check parts and surface treatment.

The number of parts is small and the cast is in good condition. Furthermore, the kit has very few masking points, so the difficulty level of production is very low. Those who have it lying on the shelf should assemble it now!
Seam lines can be easily removed by using motor tools such as Artima7 or Proxon, so those who can introduce them may want to do so. I personally think that surface preparation should be careful and fast (because I want to concentrate on the coloring process).
It would be a good idea to use a motor tool to quickly and roughly handle seam lines and gates, and then carefully work on the details by hand.

Naturally, whether using motor tools or hand tools, filing produces fine dust, so it is essential to take measures such as wearing a mask and using a dust collector. At first glance, this may not seem relevant, but it is important to take measures for your health in order to enjoy GK for a long time. If you think it is not enough, it is a good idea to review your work environment.
Most of the seam lines are removed with Artima, but if they are near dowels, they are removed by planing with Fantec's Figure Engraver.

Can't you do a similar job with God Hand's spin blade? You might think, "But that one is more effective for expanding narrow dowel holes.
After some use, you will have a good idea of which tools are appropriate and where to use them.
I guess one needs familiarity and experience to work speedily...
Such a seam line on the inside of the finger should be removed with a carbide scraper and then sanded with a sander using a Kami Yasu or reverse-action sander. About #400 to #600 may be just right.

Removing the seam line that runs through the bunny ears is a bit tricky, so we first lightly even it out with a cannonball diamond bit.


Basically, you don't want to use a zirconia bit for such a small part because just a little bit of force will shave it off at once. Diamond bits do not sharpen much, but you can adjust the steps by stroking.
Fill in and even out the bumps where it looks like the reuter will not work with Cyanon. This is easy way.


After filling in, file with Artima.
This is a very detailed part, but the final result will differ depending on whether or not such a small part is processed, so those who want to further improve their skills should work on it carefully.

The legs have molds for painting red and white lines, and the seam line is running vertically.

So the procedure to handle this is as follows.
1. Remove the seam line
2. Line engraving for painting.
The reason why line engraving is necessary is simple: if you don't do it, it won't look good.
There are only a few of them, and there are no complicated shapes that may cause problems in surface treatment or pinning/dry fitting, so let's assemble them quickly and easily.

Files