Home
Home

 Artists
 Search
 Recent
 Random
 Posts
Posts
 DMs
DMs
 Tags
Tags
 Random
 Importer
 Import
 FAQ
FAQ
 Account
 Register
 Favorites
 Login
Login

September's Modular Void Ship/Facility Interior Terrain Set! (Patreon)
Published:
2021-09-06 08:51:22
Imported:
2023-09
Content
Hello Patrons,
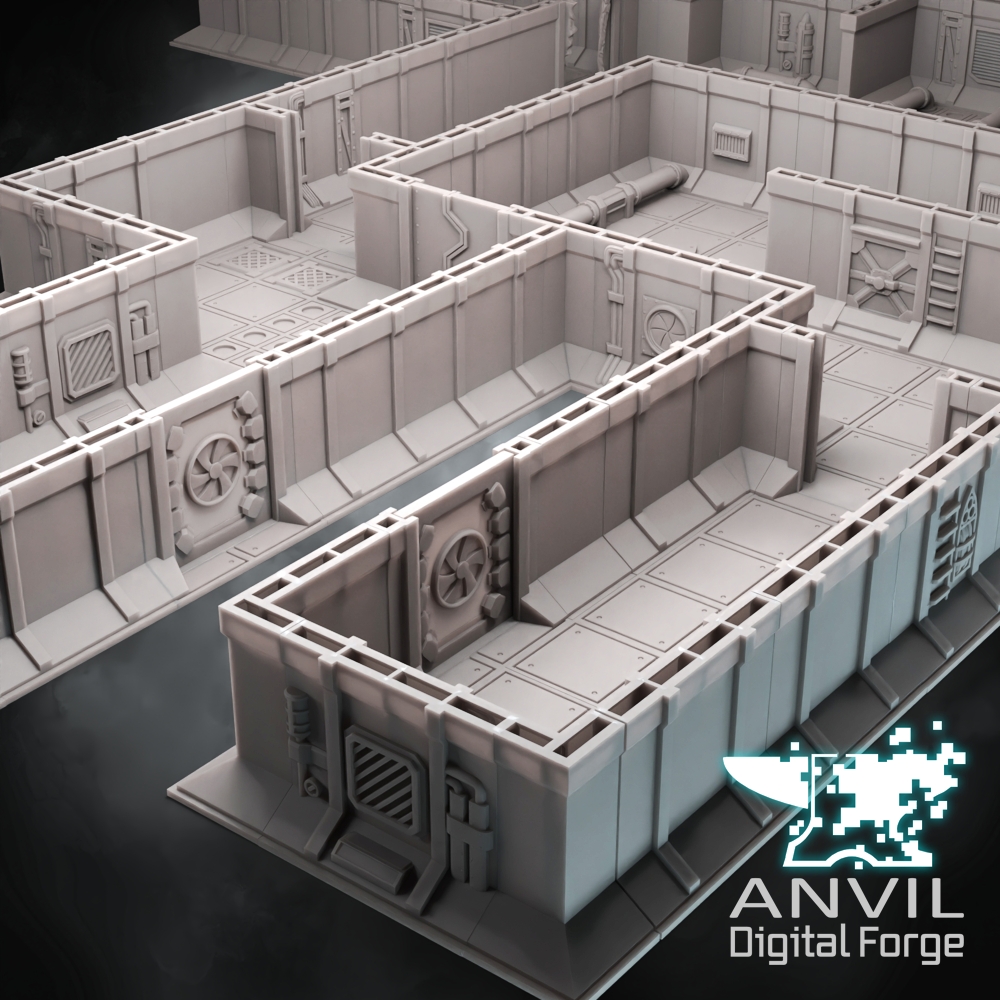
For our Special 10th Anniversary month, we've decided to release a very special terrain set. It's our largest terrain set so far so it gets a separate post!
We've created a set of gothic void-themed walls and doors which can be built at almost any size, from a single room research facility to a sprawling spaceship interior or underground lab!
- Fully modular 1" tile-based terrain system.
- Chunky wall sections have been carefully hollowed - less resin needed but still strong.
- Double and single sided walls to suit your project.
- Doors are designed to slot into the door frame so can be opened and closed during gameplay!
- Various separate accessory components for customisation.
- Detailed Wall sections are all "multishell" so you can edit and remove or move individual detail elements for more variety.
Here are all the separate components :

Here are some examples of what you can do with the kit!


Digital Design Advice Notes:
- Consider doing a test assembly of wall and floor tiles in Blender (or another CAD program) to design your building section and work out which components/how many of each you need to print.
- The 'One Sided' wall components are intended for interior only use, where you want to glue the walls to an MDF/foamcore exterior wall.
- All the separate "Detailed" wall sections are multishell. This means in Blender you can select and move/scale/detail individual detail elements, or try adding your own details to the Plain wall sections.
- It is possible to digitally combine sections of wall/corner pieces in either Blender or directly in a slicer program. Ensure sections are aligned correctly and there is no gap in the slice view. Printing combined pieces will make removing them from the buildplate, and clean up/assembly, slightly easier. (Do not print a fully closed in wall section with the "End Closer" at both ends, as it will not vent and drain properly)
- The various separate "gubbins" can be digitally combined, or printed separately. Depending on exactly what you do with them you may need to add your own supports.
Physical Assembly Notes:
- All the components are designed to print optimally on a SLA/LCD resin printer. It should be possible to print the parts on an FDM machine, but we have not tested this.
- The wall sections are designed to print upright with no extra supports needed.
- We have tried printing the floor tiles both flat on the build plate and upright on one side and both methods work, but we advise doing some trial prints with your machine. You could also just use the wall sections mounted on an MDF base and have a painted floor.
- For the hollow wall sections, we advise leaving them on the printer for at least 20 minutes to drain after a print has finished, and then ensure they are well rinsed to remove liquid resin from the interiors.
- The thinner parts, notably the One sided wall sections, and the floor tiles, are prone to warping. You can reduce this by post-curing soon after the parts have been cleaned up, so long as they are flat before post-curing. Or by carefully bending parts flat again before post-curing.
- For all components, the attachment layers will leave a thicker rim around the base which will need to be removed to ensure the parts fit together well. You can do this with a sharp hobby knife before post-curing, or with a file or sandpaper after post-curing (use the abrasive wet and/or work outdoors!)
- You can leave all the components separate, but for ease of use and a higher quality build we would advise assembling rooms with super glue - attaching the parts to each other and to a baseboard made with thin MDF, hardboard, styrene sheet or similar. This will also help with stabilising any warped parts. You can still keep a semi-modular layout by keeping room/corridor elements separate.
Let us know in the comments or by email/message if you have any problems or specific feedback while using the set!
We hope you like the terrain set!
Thanks
Team Anvil
Files