Home Artists Posts Import Register

Content

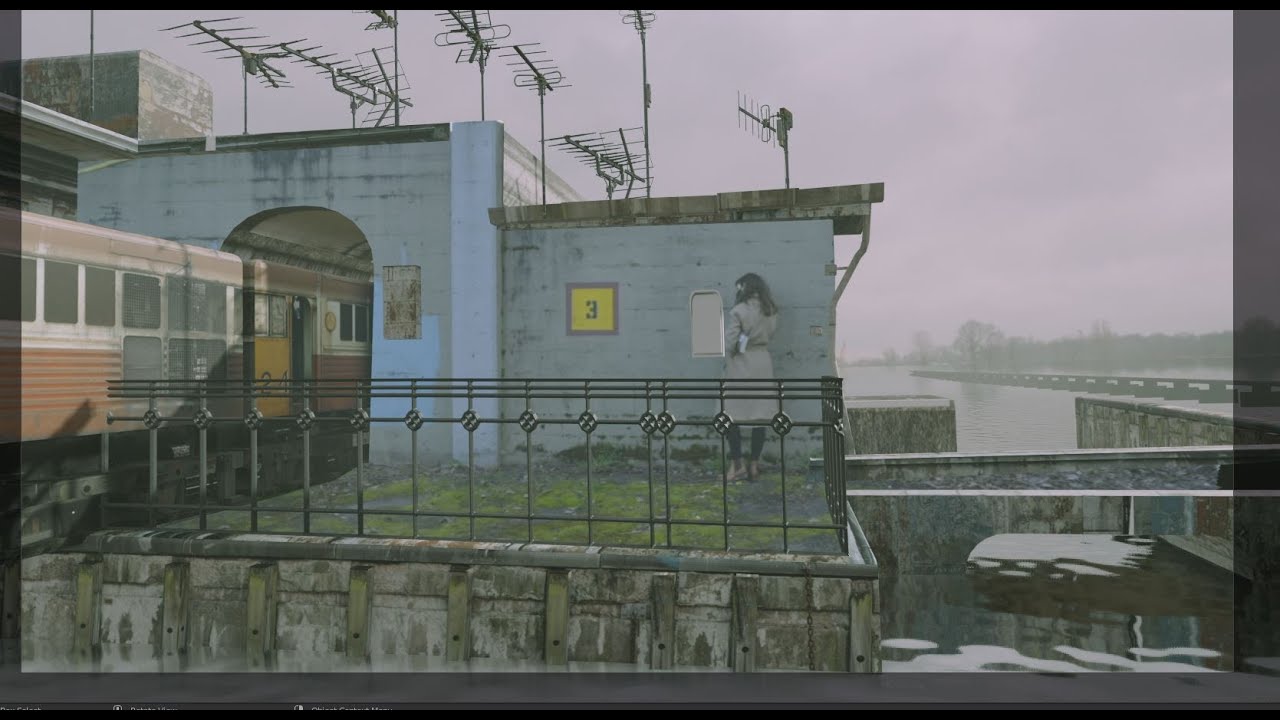
Oh man I'm glad I redid the final part of this video. The first version was fine (click here if you want to watch it), but the new version more captured what excites me about this stuff.

Actually- I wish I'd added foreground benches and maybe a little roof or something- being able to wrap the video in other geometry makes it almost impossible to tell where the live action ends and the CG starts (as opposed to my low-poly railing, which makes it... fairly obvious), but still happy with how it turned out (especially with a bit more polishing!)

The first bit has some random BTS stuff in there, but you can skip it if that's not your jam? I filmed BTS, figured it should go somewhere at some point.
Here's the footage I'm messing with, if you want to try it out! 


Hope all's well! 3 more days till Spring! :D 

Files

DigitalExtension

Comments

Anonymous

WOW! Never Seen It Done This Way. Like How You Reconstructed The Whole Scene Great Job!

Anonymous

As an ex contractor for "Not a number" in Blenders now distant past, it's great to see how the software and the artists who use it flourish. Ton must be proud. This looks great, thanks for sharing!

Anonymous

Oh man, oh man!! I have said this many times, but here it comes: I just love digital extension tutorials in Blender. That is most of the reason why Ian is the first person who convinced me to become a Patron to someone

Anonymous

if that car-generator gets on Patreon it should be for the tier 20 folks! Not that im one of them, but.. that's some next level sh*t!

IanHubert

You worked with Not a Number?? That's rad! And man seriously- being able to wake up and check the internet and the developers are like, "HEY you can do this thing now!" It's so fun. Blender's been growing so quick the past few years that it's hard to even keep up with all the features; it's been great :D.

Anonymous

Just what I needed after a long day of boring renders!! Thanks Ian :)

Anonymous

Have you experimented with geometry nodes much? Seems like you could do some pretty groovy stuff with them

IanHubert

I'm excited! Hopefully I can get it working! I mean- it's working, but I want it to be super easy to use (and ideally have some random generated drivers and stuff in there too)- trying to keep it all lightweight, though.

IanHubert

I've experimented a bit!! Folowed some of Erindale's great introductory videos. I just haven't had the "OH HEY THIS IS A GAMECHANGER" moment- which I'm sure is coming (they seem crazy powerful, and the stuff people are posting on twitter is wild).

Anonymous

I've been following these a few times, but I have a problem; when I render I dont get the video texture in the renders.. How do I make sure to render it nicely?

IanHubert

Oh! You mean a final render? That's my fault- I always stop a bit too soon, since then it gets into compositing passes and all that. The general gist is that when you click "Set up tracking scene" in the tracker, it does a bunch to "help you", but in some cases it's more than you'd want. In the top right, you'll see the render passes (it probably says foreground or background), and if you toggle between the two you'll see different things selected in the outliner. Blender assumes you're trying to composite CG onto the video background, so it sets things up that way. Typically I just do all my work in the foreground render pass (or even delete the background render pass), but that also means occasionally I have to open the compositor and simplify the nodes a bit (USUALLY I'm just dragging the Render Pass node with "FOREGROUND" directly to the "COMPOSITE" node, and bypassing all that other stuff, so it looks like it does in the viewport. That said !I didn't have to do any of that in this case (I hit render and it works out alright), but especially if I'm doing stuff with alpha channels, I have to make sure it doesn't composite over the "Background" pass. But yeah my guess is that's what's throwing things off. I'll make another video about the blender compositor soon here that'll hopefully clear that up. Unless if you mean it just doesn't show up in the viewport! In which case we could troubleshoot- first off make sure you're in rendered or material modes?

Anonymous

my hometown it's like an hour of train far from Venice and you managed to make me homesick with this shot ahhaha <3 btw i'm new here and i've learned more in this week here on patreon than alone in 6 months, to be able to see your workflow and creative process it's nothing less than an honor Ian!

Phil South

Okay did you just say you do your renders in Eevee? Or did I mishear that?

Anonymous

I would love to watch a video where you kind of show off how you get your textures. Do you have a specific photo workflow? Or are there any special keywords you type into Google? I would love to know

Anonymous

So happy to see how human a lot of the scenes you're making looks. More character interactions and stuff like that. Cool to see Dynamo come together like that. Seems like Dream is more focused early on than main Dynamo series? (though I always assumed that with time, main Dynamo will also have story threads merging). Awesome set extensions and set designs too, and lighting for them! I also love the amount of weird shots you're doing for Dream, with vertigo zooms and utilizing light and dark and camera angles and movements to make very dreamlike things, merged with more normal shots. You always had a way with unconventional cinematography, compositions and such, Ian. Great tut too!

Anonymous

Making a Flying Vehicle Part 2 is a pretty good texturing video. just a couple posts older than this one.

Anonymous

Wow dude! Awesome to actually see you do your magic. Also awesome that you're getting into coding!!

Anonymous

Nice to see a full-er on tutorial! Also, what makes your vids so entertaining is all the random stuff you keep saying, so please don't stop. As an architect, I always feel like throwing a bit of grunge here and there and a few broken up lines, but they tend to go more for artistic projects than design projects.

Anonymous

Both tutorials were a treat to wake up to! I'm just blown away by all the possibilities there are in Blender for Set Extensions. Man, this gives me hope for my projects (if I ever get the gumption to work on them!)

Anonymous

Actually, since you mention LOG footage in one of your tutorials, I have to ask: What's your opinion on replacing the current color grading options in Blender with the ACES Color Workflow?

Anonymous

Set extension is fun, but I'm really excited by the procgen cars!

Anonymous

Ian, your patreon has been easily one of the best professional investments I've ever made. Doing my first proper vfx paid gig next week, and your videos and tutorials have been a huge stepping stone in both my 3D skills and general vfx knowledge. Massive gratitude for fantastic post after fantastic post.

Anonymous

I was watching the second, Stranded-Ian, shot and thought it was pretty cool how quick you were able to come up with the spaceship leg (yes, I agree they're also very greedy by having legs) I immediately thought it was so cool how i could see where you were pulling design elements from (muscle?)memory. It seemed like you were keeping track of things you might want to ik rig for animation (the bolts and pivots and stuff ) It brought to mind the question: Do you have any specific things (exercises, references, techniques) that you use for coming up with space ship designs? It seems like you were really focused on the silhouette, is that where you like to start first? or is it more of a form-fits-function kind of thing? Maybe there's an " Ian does spaceships(vehicles) " series coming ? lol

skes

Hi Ian, i've heard you mention your noisy computer a few times now and I just wanted to let you know I never really hear any noise during these videos. Maybe you just do a good job editing the sound afterwards, otherwise I don't think its really something you have to worry about for our sakes.

Anonymous

Btw if you don't want to have to eyeball the scaling with the UV project modifier, under aspect where it says 1 x 1 just change that to the aspect of your footage.

Anonymous

Love it!

Anonymous

Absolutely love it when you've essentially finished the tutorial and continue to riff new things and just follow the creative tangents. Keep up the good work!

IanHubert

Ah yeah! I think I've mentioned it in the last two videos, but in both few videos I've actually figured out a fairly good way of filtering it out! It's pretty gnarly if not unfiltered, but I think it's to a point where I don't have to worry about it. Good to know it doesn't bother you, thanks! :D

Anonymous

Awesome content as usual Ian. It's always great to see how you're going somewhere and in the middle of the tutorial you get another idea to make it work even better. Most of the tutorials are so scripted and structured but is so refreshing and engaging to see your workflow and train of thought. Always learning a lot from your videos.

Anonymous

awesome..learned so much...keep it going Ian. You are really inspiring.

Anonymous

WOW! this is insanely useful and informative I'm so excited to try this out and do some set extension

Anonymous

you forgot the phone! lol

Anonymous

Yay, two for one longform videos!

Anonymous

Not to spoil the end but "looks like a 2005 video game...." is maybe the best back handed self compliment ever.

Anonymous

Okay that simply drives me crazy. I've done motion tracking before, I also did yours with the waterfalls etc... Now on this one, when I apply the video texture and move in the viewport, it simply does not appear. I've redone this tutorial again and again on several versions of Blender, nothing changes, it stays gray... I want to cry. Help.

IanHubert

Hmmmm- are you in a material or rendered view?? On one hand, I apologize if that's a really basic question, but on the other, it's a really basic thing that's maybe more confusing than it needs to be :/ Hold the mouse in the viewport and hit "Z" and change to either Material or Rendered, and see if that fixes it? Or, if the object you're trying to project onto hasn't been UV unwrapped, that could be an issue, too. Go into edit mode, select everything, and hit "unwrap", so the object has UV coordinates (it should show SOMETHING by default, but... maybe not??). Let me know if that helps! We can figure this out!

IanHubert

Thanks Diego! Yeah usually I'm working on a shot that has to work well in an edit, so I have to stay more on track- I've actually been really enjoying these ones where the whole point is to just have some fun :D

IanHubert

ohmannnn I learned just enough color workflow to get stuff to work alright, then ran away. Between the A73s color profile, my monitor's, after effects/premiere's workspaces, Blender's various colorspaces and all that, I've gotten to a point where I mostly just eyeball it and hope for the best- if there's a good ACES workflow though, I should definitely familiarize myself! Typically I've just been pretending blender's "Very Low Contrast" Filmic colorspace and my DSLR's Slog-2 colorspace are more or less the same thing, and just eyeball the black levels till they look right, and I've been mostly lucky so far. Have you experimented with it at all??

Anonymous

The UV project to geometry ain't working like it does in the vid. As the camera moves it distorts the image and I used the same settings.

Yoshio

I like thinking that the arch-top element is a standard element in their architectural design, rather than the boring rectangular windows we use.

Anonymous

I feel like the thing that always gives away a simple geometry set extension in my composition is the perfect sharp edges and corners on the model. is it just a matter of keeping the geometry far away from the camera, making sure they're real world scales, or going through and selectively applying bevel that helps render realism for you?

IanHubert

Oooo yeah if you feel like the simple geometry is what's giving it away, that's probably it. A lot of times I'll add edge loops and offset them a little bit in random directlys, and add random geometry in there just to break up the straight lines. The more squiggly the seam is, the more difficult it is to point at where it changes from CG to real life :D.

Anonymous

Hi! I am new to the Patreon so I have been binge-watching these videos all weekend. Great stuff! I noticed that the workflow for introducing live footage varies from the "Making a Shot" method. This one didn't need keying but seemed easier since you didn't need to normalize the clip. Could you have done the one with the guy this way? Would it be more convenient or is it just a "depends on the case" scenario?

Anonymous

How would you add the shadow catcher so the phone box casts a shadow on the video project wall?

Anonymous

this is very interesting CG-uation we have here

Anonymous

OMG. You are the best

Anonymous

This taught me more than what I had learned in the past three years about blender. 😅

Anonymous

I'm trying to follow the whole reprojection workflow right now which works great BUT is it possible to cast shadows on a video texture that is emmisive? How do you do that? :)

Anonymous

simply incredible

Anonymous

No matter how many times I've repeated these steps, I cannot get the Projected texture on the geometry to stop bouncing around. Subdivided and Subdivided - Obviously I'm missing something!

IanHubert

Dang- it bounces around, like, it's sliding from frame to frame? For the video texture, trying changing the offset or the start frame (I could imagine it could easily start on 0 when it should start on 1, or something like that)

Anonymous

Ian - You're the man - I tried tracking everything in Syntheyes and bringing it over. Unnecessary - because hey why not make it harder for myself, but looks like the texture offset starts at 1 (weird), but then I must have shifted my camera timelines somehow :/ - Thanks so much! Now I can get passed the first 3 minutes - haha THANKS for the reply!

Anonymous

Hey Ian, I was wondering if you could tell us about your camera settings when you shoot? I’ve had trouble with tracking green screen markers due to maybe shutter speeds being too slow or maybe the depth of field too shallow so the markers are not defined well enough for a good track and I wondered if you had some go-to settings for this type of shot?

Anonymous

Wow, i have question.how you match the light on the new thing you add .do you emission as base materials?