Home
Home

 Artists
 Search
 Recent
 Random
 Posts
Posts
 DMs
DMs
 Tags
Tags
 Random
 Importer
 Import
 FAQ
FAQ
 Account
 Register
 Favorites
 Login
Login

MOB walkthrough (Patreon)
Content
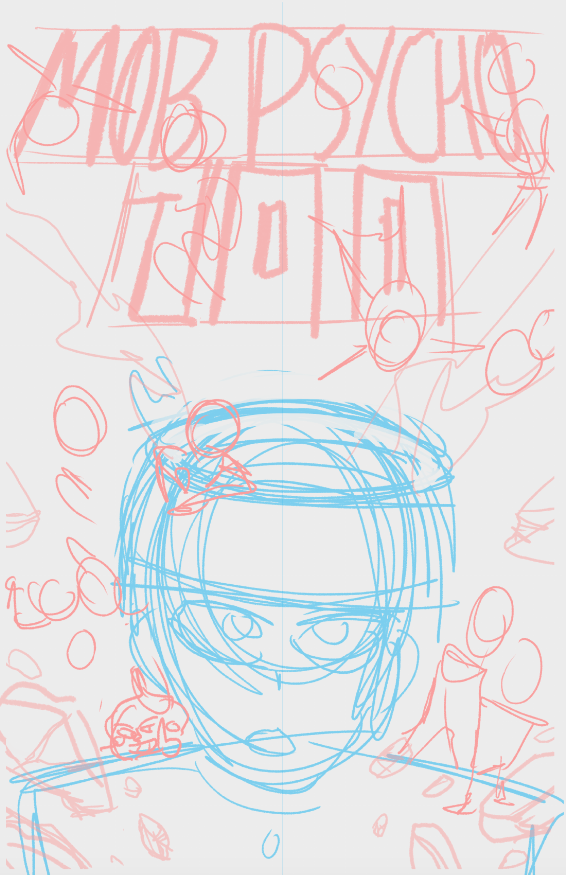
As promised, here's the walkthrough WIP post for the Mob Psycho print! Sorry it's taken a while but this file wound up being very disorganized and I haven't had time to sort through all the layers. So instead of going through each little detail, this time it's gonna be more general steps. Follow along by clicking through the image gallery!
If you have any questions about specific things please leave a comment. The entire piece was done in Clip Studio Paint.
1 - The rough sketch; Here I'm just thinking of ideas and where I'd generally like everything to be.
2- 2nd stage rough sketch; I've cleaned up Mob enough to move on from him, and I copy+paste and flipped half his face and body horizontally to make sure both sides were even. I started getting a better idea of what poses to draw the friends in.
3- Logo sketch; I took a break from the other kids and began sketching the logo. At this point I decided to make it stone, to match the rubble I planned to add to the bottom (seen in the initial rough sketch).
4- I lowered the opacity of everything and finished sketching the kids and the rubble. There was a lot of moving and resizing before I was totally happy with them.
5- Finished sketch; Let's see it all together!
6- Inking; I lowered the opacity on everything again and began inking! I started with Mob. For this piece I used a custom brush of my own. It's the default G-pen Clip Studio brush with the pen pressure and "Randomness" settings adjusted. I filled in some white behind him to make him stand out.
7- Inking 2; Now I start inking the friends! I split them up into different layer groups to keep things organized. Some are in front of Mob's layer group, and the rest will be behind him. Note the closeup and how I cover up where the lines are gonna interact. I fill in more white spots to finish up.
8- Inking 3; Now the rest of the friends!
9- Inking 4; Now the Logo and the rubble! I did my best to give them a rocky sort of texture. I filled these in gray to separate them from the characters.
10- Inking done; Let's see it all together!
11- Color 1; I start with the background color! First some gradients, then a halftone pattern set to soft light blending mode.
12- Color 2; Bit a jump here; I changed the BG colors, added some noise to the top, and added another halftone (diamond) pattern around Mob, and I went ahead and finished Mob's colors. I used some more halftone patterns (line and dot) to match the background, set to a low opacity.
13- Color 3; I added color to the friends, and colored all their lineart to a light purple. I made Dimple's outline green.
14- Color 4; I adjusted the background gradient colors again and lost the noise texture. I finished up the Logo's coloring too and made the sides pink ( I just thought it'd look cool). I added a stone texture to it as well (a stock texture from google set to overlay and on low opacity). I also began adding a lighting effect emanating from Mob's head, and adjusted some of his colors to match the background.
15- Color 5; I finished up the lighting effect from Mob's head, using the lasso tool, gaussian blur, and setting some layer modes to "Screen"
16- Color 6; another big jump; I turned the friend layer groups back on, and finished coloring them. I used bright colors, a different color for each character, and set the shading layer's blending mode to to "multiply". I also added a dot halftone pattern to the shading on a very low opacity layer.
17- Final Touches; A lot of small things to finish it off; Some white outlines added to the layer groups to make them stand out from the BG. Finished the rubble the same way as the text. And some screen blending mode lighting effects added to Dimple and Suzuki's eyes
Files