Home
Home

 Artists
 Search
 Recent
 Random
 Posts
Posts
 DMs
DMs
 Tags
Tags
 Random
 Importer
 Import
 FAQ
FAQ
 Account
 Register
 Favorites
 Login
Login

VAM Reshade Guide (Pixiv Fanbox)
Downloads
Content
Updated guide for Reshade 5.x can be found here.
Virt-A-Mate Reshade Guide v2

Guide and Presets are available in the VAM Addons folder
PDF Format:
Prerequisite Downloads:
MacGruber PostMagic (required) - https://hub.virtamate.com/resources/postmagic.161/
Install this and overwrite the PostMagic you may already have in your AddonPackages folder. This is a modified version with additional LUTs preinstalled. You will need this for the AntiAliasing, LUT, and to set up RayTracing in Reshade.
Hunting-Succubus AutomaticBodySmoother (required) - https://hub.virtamate.com/resources/automaticbodysmoother-session-plugin.5235/
This will help smooth out all the rough edges on your girls.
Reshade 4.9.1 (required) - https://www.mediafire.com/file/wdfnrzhsk0bea07/ReShade_Setup_4.9.1.exe/file
Password is futabegood.
An earlier version of Reshade is required for RayTracing to work properly in VaM. If you want to do without or want ReShade in VR, then the latest version can be used. Not all the provided shaders may work with 5.* version. If they don't, you will have to install the shaders through ReShade 5.* install and use the provided settings screencaps to adjust settings for those shaders that don't set automatically with the preset.
Reshade Shaders + Presets (required) - https://files.catbox.moe/1tngr3.7z
This is all the shaders and my preset, along with RTGI. Extract to your main directory after installing Reshade and overwrite anything it asks.
GiveMeFPS (recommended) - https://hub.virtamate.com/resources/givemefps.1367/
Not entirely required, but definitely will help you out with performance issues if all this is tanking your FPS. This can Also do stuff like make sure janky settings like Tongue Collision always remains off.
PostMagic:
Make sure that you set PostMagic as a Session Plugin.
Settings Overview
You only need these settings enabled. The rest can be done much better through Reshade.
LUT
I suggest loading TT_DynamicColors1_LUT32 or Natural as your default LUT as they work best with my ReShade settings. Cocktail can also be good. These are all found in the top directory after clicking Browse UserLUT, not within any folders. You can use Reshade to further change colors and tone for scenes instead of constantly changing between LUTs, so once you load these, they should pretty much remain unchanged. Make sure to turn down Contribution for a better blend.
AntiAliasing
Use the settings below. You can use TAA instead, but I don't think it looks as good and it can cause flickering.
GiveMeFPS:
Make sure that you set GiveMeFPS as a Session Plugin.
Settings
None of these settings are absolutely required except for the AntiAliasing options. Other than that, set everything for what gives you the best performance. Shader Quality seems to have the biggest impact on performance, so I usually leave this on medium in GiveMeFPS until I am ready to take screenshots, then turn it up to high in the main VaM settings (not through GiveMeFPS).
Automatic Body Smoother:
Make sure that you set Automatic Body Smoother as a Session Plugin. You can use default settings.
VaM Settings + Session Defaults:
Settings
Use these settings for best quality. If your PC struggles with FPS, you can turn down Shader Quality to medium until you want to take a screenshot, then temporarily turn it back to high. Render Scale only affects VR quality. Turn it down if your game still struggles in VR.
Session Defaults
This is very important. Make sure to save your Session Plugins as Session default or they will not load every time you open VaM. Click Session Plugin Presets on the left side. Change User Defaults in the top middle. Now click Set Current As User Defaults. This will make VaM load PostMagic, GiveMeFPS, and Automatic Body Smoother load automatically during every session.
Reshade Setup:
Close down VaM now that you have it set up and ready to go. Install Reshade using the provided .exe in the link.
IMPORTANT
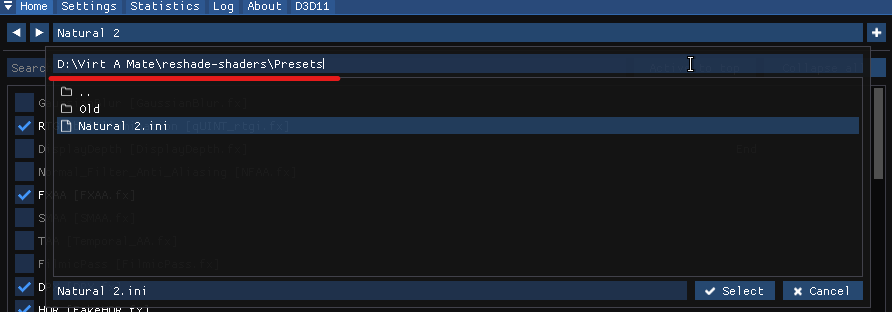
My presets are in a preset folder inside of reshade-shaders folder. Reshade normally puts these in the main game directory, but I think that is stupid and unorganized.
1. Select the 'Click here to select a game...' button
2. Choose the VaM exe, not the Desktop Mode bat file.
3. Select Direct3D 10/11/12
4. Go through the rest with defaults
5. Now extract the provided Reshade zip file into your main VaM directory. Password is futabegood. Overwrite any files if asked.
6. Open up VaM.
7. Go through the tutorial of how to use ReShade if this is your first time.
8. Navigate to the Presets folder if asked or click on the top bar (as seen in the Important spoiler) and find then click on Natural 2.ini
If you installed Reshade 5.* because you want to use VR, there should now be a ReShade button in the Steam overlay that you can toggle.
ReShade Settings
This is a list of my settings and keybinds. You can change the keybindings to whatever you choose.
Required Shaders
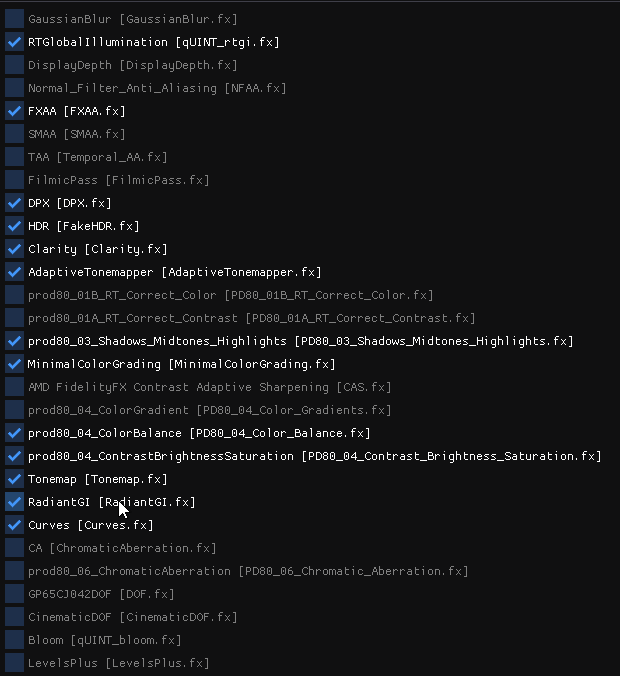
These are the shaders that I almost always have turned on 100% of the time and make no adjustments. These should automatically be set with the preset, but if not I have provided shots of the settings so you can manually adjust them, or even reference back to if you mess something up. The greyed out shaders in this list are used, but are supplementary and can be turned on depending on the scene and effect you want. The order of the shaders do have an affect on the others. This order is what I have settled on.
List of Shaders:
Settings Screenshots:
AdaptiveTonemapper - AdaptiveTonemapper.fx
Clarity - Clarity.fx
Curves - Curves.fx
DPX - DPX.fx
FXAA - FXAA.fx
HDR - FakeHDR.fx
MinimalColorGrading - MinimalColorGrading.fx
prod80_03_Shadows_Midtones_Highlights - prod80_03_Shadows_Midtones_Highlights.fx
prod80_04_ColorBalance - prod80_04_Color_Balance.fx
prod80_04_ContrastBrightnessSaturation - prod80_04_Contrast_Brightness_Saturation.FX
RadiantGI - RadiantGI.fx
RTGlobalIllumination - qUINT_rtgi.fx
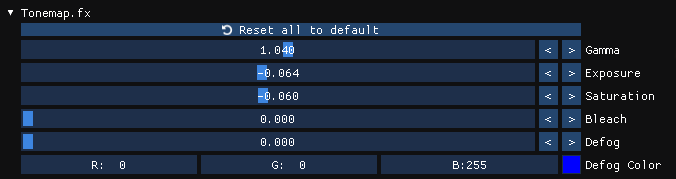
Tonemap - Tonemap.fx
Additional Shaders
These shaders will change things like antialiasing, sharpness, brightness, contrast, etc even further. They aren't required, but may help in some scenes. Toggle them on and off and see what you like.
AMD FidelityFX Contrast Adaptive Sharpening - CAS.fx
FilmicPass- FilmicPass.fx
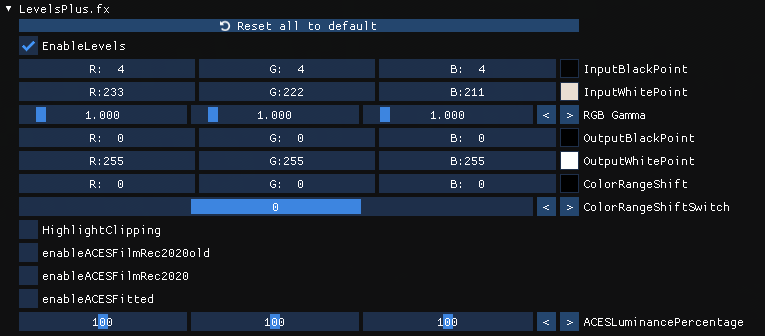
LevelsPlus - LevelsPlus.fx
NFAA - NFAA.fx
prod80_01A_RT_Correct_Contrast - prod80_01A_RT_Correct_Contrast.fx
prod80_01B_RT_Correct_Color - prod80_01B_RT_Correct_Color.fx
SMAA - SMAA.fx
TAA - Temporal_AA.fx
Visual Effects
These are visual effects that replace what you can do with PostMagic's LUT, Bloom, Depth of Field, and more. The default settings may not work in some scenes, so feel free to play around with them as needed... especially the Depth of Field. There are also 2 different DoF and Chromatic Abberation shaders. They can be used together if needed, but usually only 1 is needed for that particular effect.
Bloom - qUINT_bloom.fx
ChromaticAberration - ChromaticAberration.fx
CinematicDOF - CinematicDOF.fx
GaussianBlur - GaussianBlur.fx
GP65CJ042DOF - DOF.fx
PD80_06_Chromatic_Aberration - PD80_06_Chromatic_Aberration.fx
prod80_04_ColorGradient - prod80_04_ColorGradient.fx
RayTracing & Depth setup:
Alright. You're in the home stretch. Now you need to get ReShade to read the Depth/3D part of the game so RayTracing and other shaders can do their thing. This might be a little confusing at first, but i'll try my best. This is the part that 4.9.1 is required. If you have 5.* then you can skip this whole thing as that version will not play well with reading depth in VaM.
For ReShade to read the depth of the game, it needs to have the proper depth buffers set up. In order for it to read the depth buffers properly you will need to utilize PostMagic's Depth of Field setting.
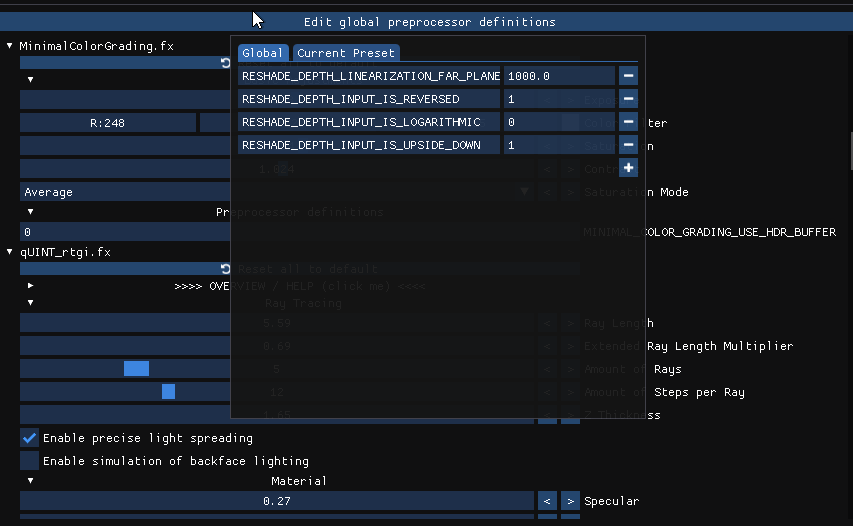
Setting Global Preprocessor Definitions
To start off you will want to set your global definitiions all to the value of 1. This button can be found directly between the shaders list and the shader settings on the Home tab. It is the long horizontal bar that the mouse is hovered over. Depending on how Reshade reads the depth buffer you will have to turn these on or off, 1 or 0, to get it set correctly. As you can see below, I had to turn off Logarithmic for mine to work, but the other 2 turned on. Change all yours to 1 for now until we fix things later.
Set your Depth Buffers Part 1
Now you will want to set up Reshades Depth Buffers so it knows what to read. Click on D3D11 tab at the top of Reshade window to get to these settings. Make sure to check the top 2 options. Ignore the bottom boxes below these 2 for now.
PostMagic DoF
Now to get Reshade to start reading things, we need to turn off and on PostMagic's Depth of Field setting. This plugin should be in your session plugins tab if you have been following the guide.
Make sure it is enabled inside of the Depth of Field setting
Now toggle it on then off in the main Session Plugins screen.
Turn on DisplayDepth
Now you will want to turn on DisplayDepth in the shaders list. This will give you a visualization of what Reshade sees in terms of in game '3D'. Once on, your screen will turn half blue and half white.
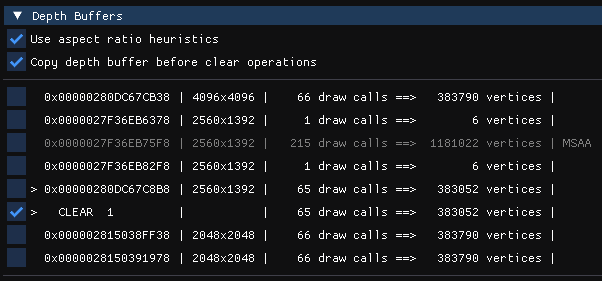
Set your Depth Buffers Part 2
If all is going well, the game should now be able to read things properly and you can now start selecting the bottom boxes in your DepthBuffers tab. Click on D3D11 tab at the top of Reshade window to get to these settings.
You ultimately want your screen to look like this.
Click through the different buffers until you get a head on view of your character. If they are upside down, jagged, or reversed, that is ok. Leave the box checked for the one with the most vertices and closest to the picture above. If you are already good to go, great, you can turn off the DepthBuffer shader and you are done. If your depth needs to be adjusted, go back to the Global Processors on the Home tab where we set the 1's and 0's and turn them on and off until the image corrects itself to above. Below is what I ended up needing to set it to. Once fixed, turn off the DisplayDepth Shader.
Now that all that's out of the way, you should be set for the rest of your session in VaM. The Depth Buffer will sometimes need to be reset, usually when closing and reopening VaM, but you don't have to go through the whole long process. Just go into PostMagic and turn on then off the Depth of Field and Reshade's Depth Buffer will set itself on its own from now on.
Scene Lighting
This is generally what I use for scene lighting in almost all my scenes, and even sometimes other peoples scenes. Its generally the best settings all around and changing camera exposure between 0.40 - 0.80 will help with lighting depending on the darkness or brightness of the scene.
Alright, that's it. This took me a while to put together so I may have missed some things, made typos, or been a bit too confusing somewhere. If you have questions then 100% feel free to ask. I want you to enjoy VaM as much as I do!
Files