Home
Home

 Artists
 Search
 Recent
 Random
 Posts
Posts
 DMs
DMs
 Tags
Tags
 Random
 Importer
 Import
 FAQ
FAQ
 Account
 Register
 Favorites
 Login
Login

Vampire set first look and editing process :) (Patreon)
Content
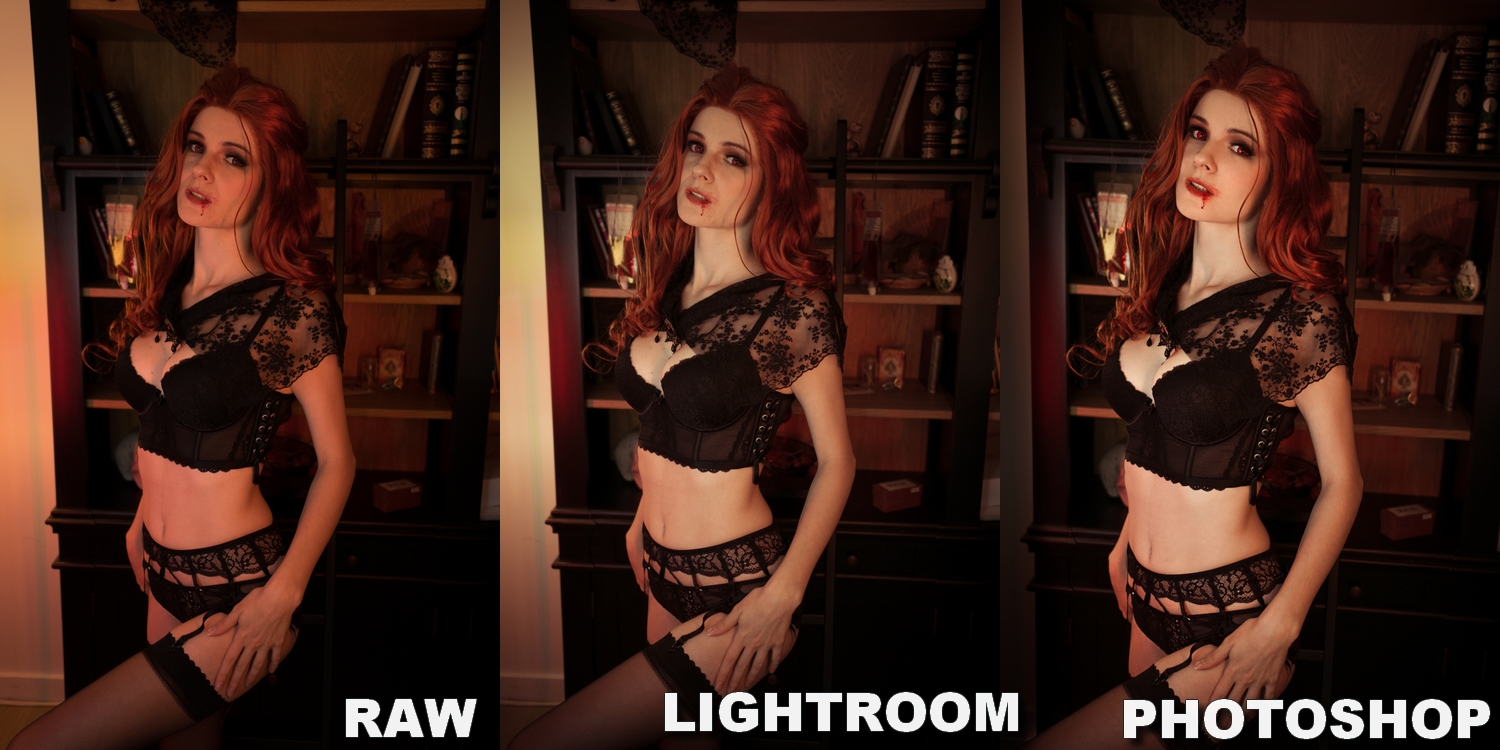
Tonight, a little post about the editing process of my vampire set (the lvl 15+ set of the month!)
Here is how I set this dark and mysterious atmosphere for my gorgeous bloodthirsty babe ^-^
On the first image is the RAW : This picture is straight from the camera with absolutely 0 editing. For this set we worked in low light and had to boost the ISO a little bit (320 I believe!), we had a bit of natural light but not much since we shoot indoors and late in a cloudy afternoon, a DEL ring light to keep the face and body decently lighted, plus 2 DEL bars, one in pure red mode (Left side of the pics) and one in a very warm orange tone to contrast a bit (right side of the pics). It creates a very dark, reddish mood to the pictures, perfect for the vampire, and adds some beautiful red/gold lights in the ginger wig!
Then I had to balance the colors and lights/shadows/contrasts a little bit on Lightroom. I created a preset to remove the extreme red light on my skin, adding a bit of blue/green in the lighter parts of the pictures to bring some depth! As you can see, my body "pops" more in this version and it catches more the attention of the viewer, in the RAW pictures I feel more "lost" in the background :)
I complete the picture's editing on Photoshop after that! First I reframe the picture a little bit, then I clean the skin to achieve a perfect, glowy vampire look! I also brighten it slightly and boost contrasts just on the skin :) As you can see, I also removed the shadow of the hair on my cheek, because it was just too strong and not very nice. Better without! Then I darken the left part of the picture when needed, because else it's catching the attention without purpose. After that, I brighten some parts with interesting details for them to catch the eye: The lace of the lingerie, the red eyes, and a little bit in the hair. I finish my editing by adding a little bit of red in soft light mode in my eyes and around the fake blood for it to be more obvious. Let's add a tiny bit of sharp, and voila !
That's a lot, but quite the basic thing to be honest. This set is quite easy to edit and everything goes smoothly! (It's still a lot of work but it's nothing compared to the Yuna set, for example, so I'm kind of enjoying that hahaha!)
I hope you enjoyed that explanation ^-^ If you have any question, I'll be happy to answer in the comments below or in private messages!
Files